
I. Preview

Watch DarkMoon in action — Full autonomous penetration test demo
II. Installation
II.1. Prerequisites
Before starting, you must have:
- Docker
- Docker Compose
- Access to an LLM provider (OpenRouter, Anthropic, OpenAI...)
II.2. GPU Troubleshooting Guide (Official)
Overview
Darkmoon supports GPU acceleration when available, but GPU configuration depends entirely on your host environment.
There are two major supported setups:
| Environment | GPU Setup Method |
|---|---|
| Native Linux (Debian/Ubuntu) | NVIDIA driver + NVIDIA Container Toolkit |
| Windows + Docker Desktop + WSL2 | Windows driver + Docker Desktop GPU integration |
Darkmoon does not install GPU dependencies automatically to avoid breaking system configurations.
Common Error
Error: could not select device driver "nvidia" with capabilities: [[gpu]]or
Failed to initialize NVML: GPU access blocked by the operating systemStep 1 — Identify Your Environment
uname -aIf you see microsoft → you are in WSL. Otherwise → native Linux.
Case 1 — Windows + Docker Desktop + WSL2
nvidia-container-toolkit inside WSL. DO NOT configure nvidia-ctk. Docker Desktop handles GPU automatically.
Check GPU availability
On Windows (PowerShell):
nvidia-smiInside WSL:
/usr/lib/wsl/lib/nvidia-smiTest Docker GPU
docker run --rm --gpus all nvidia/cuda:12.3.2-base-ubuntu22.04 nvidia-smiIf GPU is blocked
If you see GPU access blocked by the operating system, fix with:
wsl --update
wsl --shutdown
Then restart Windows completely.
Docker Desktop settings
- Settings → General → Use WSL2 backend (enabled)
- Settings → Resources → WSL Integration → your distro enabled
Case 2 — Native Linux (Debian / Ubuntu)
Check GPU
nvidia-smiTest Docker GPU
docker run --rm --gpus all nvidia/cuda:12.3.2-base-ubuntu22.04 nvidia-smiIf it fails — install NVIDIA Container Toolkit
E: Type '<!doctype' is not known on line 1 in source list. This means your NVIDIA repo file is corrupted with HTML instead of APT entries. NVIDIA Forum
Fix corrupted NVIDIA repo
sudo rm -f /etc/apt/sources.list.d/nvidia-container-toolkit.listCorrect installation (official method)
curl -fsSL https://nvidia.github.io/libnvidia-container/gpgkey \
| sudo gpg --dearmor -o /usr/share/keyrings/nvidia-container-toolkit-keyring.gpg

curl -s -L https://nvidia.github.io/libnvidia-container/stable/deb/nvidia-container-toolkit.list \
| sed 's#deb https://#deb [signed-by=/usr/share/keyrings/nvidia-container-toolkit-keyring.gpg] https://#g' \
| sudo tee /etc/apt/sources.list.d/nvidia-container-toolkit.list

sudo apt update
sudo apt install -y nvidia-container-toolkit
sudo nvidia-ctk runtime configure --runtime=docker
sudo systemctl restart docker
Validate installation
docker run --rm --gpus all nvidia/cuda:12.3.2-base-ubuntu22.04 nvidia-smiFinal Notes
- Darkmoon runs perfectly without GPU (CPU fallback)
- GPU is optional acceleration, not required
- WSL GPU issues are often OS-level, not Docker-level
- Native Linux GPU issues are usually driver or toolkit misconfiguration
Quick Debug Checklist
| Check | Command |
|---|---|
| Windows GPU | nvidia-smi |
| WSL GPU | /usr/lib/wsl/lib/nvidia-smi |
| Docker GPU | docker run --gpus all ... |
| WSL reset | wsl --shutdown |
| Repo fix | remove corrupted .list |
II.2. General project structure
Darkmoon relies on Docker and Docker Compose.
The important components are:
- an OpenCode container (AI + agents),
- a Darkmoon Toolbox container (pentest tools),
- shared volumes for configuration.
II.3. Configuration of environment variables in docker compose
Docker Compose is the entry point for the entire AI configuration.
II.3.a Example environment variable
environment:
   # TEST runtime variables LLM conf
   - OPENROUTER_PROVIDER=openai
   - OPENCODE_MODEL=gpt-4o
   - OPENROUTER_API_KEY=sk-svcacct-xxx
II.3.b Role of the variables
| Variable | Role |
|---|---|
OPENROUTER_PROVIDER | LLM model provider |
OPENCODE_MODEL | Exact model used |
OPENROUTER_API_KEY | Provider API key |
II.4. Automatic generation of OpenCode files
On first launch, Darkmoon:
- reads the variables,
- automatically generates:
opencode.json,auth.json,
- configures the main agent,
- initializes OpenCode.
All of this is done by the script:
conf/apply-settings.shYou can choose not to fill in the variables, in which case the default opencode model opencode/big-pickle will be executed.
II.5. Volumes and persistence
Configuration files are persisted via Docker volumes.
II.5.a Important volumes
- ./darkmoon-settings:/root/.config/opencode/:rw
- ./darkmoon-settings:/root/.local/share/opencode/:rw
- ./darkmoon-settings/agents:/root/.opencode/agents/:rw
II.5.b What this allows
- Modify the configuration without rebuild
- Add or modify AI agents
- Keep logs and OpenCode state
II.6. Build and launch Darkmoon
II.6.a Building the images
Using install.sh
Darkmoon provides a dedicated installation and recovery script:
./install.shThis script is designed to fully reset and recreate the Darkmoon Docker stack in a clean and deterministic way. It is useful both for initial setup and for recovering from Docker-related issues.
What the script does
1. Checks prerequisites
- verifies that Docker is installed,
- verifies that the Docker daemon is running,
- verifies that Docker Compose v2 is available.
If any requirement is missing, the script stops and displays installation instructions.
2. Stops the running stack
docker compose down --remove-orphans --volumes --rmi all3. Removes local bind mounts
The following directories are deleted: ./data, ./darkmoon-settings, ./workflows
4. Cleans Docker build cache
docker builder prune -f5. Rebuilds all images from scratch
docker compose build --no-cache6. Recreates the Darkmoon stack
docker compose up -d --force-recreateWhen to use install.sh
- performing the initial installation of Darkmoon,
- Docker builds fail unexpectedly,
- volumes or bind mounts become inconsistent,
- configuration files were modified,
- switching LLM providers or models,
- troubleshooting Docker-related issues.
When you do NOT need to run it
You typically do not need to run install.sh when modifying agent Markdown files, prompts, or workflows mounted through volumes. These changes are usually applied live without rebuilding the stack.
Using Docker compose
docker compose buildII.6.b Launching the stack
docker compose up -dII.7. Launch Darkmoon (User CLI)
A wrapper is provided: darkmoon.sh.
II.7.a Make the wrapper executable
chmod +x darkmoon.shII.7.b Install globally (optional)
sudo cp darkmoon.sh /usr/local/bin/darkmoonII.7.c Launch Darkmoon with TUI Console
darkmoonOr with a direct command:
darkmoon "TARGET: mydomain.com"Pentest Agent — Scope definition
Quick Pentest (zero config)
TARGET: http://172.19.0.3:3000That's it. Blackbox, all planes, no config needed.
Bug Bounty (flags activate it)
TARGET: http://172.19.0.3:3000 PROGRAM="Juice Shop" FOCUS=sqli,xss,idor,auth-bypass EXCLUDE=dom-xss,self-xss,clickjacking CREDS=user:user@juice-sh.op:user123,admin:admin@juice-sh.op:admin123 NOISE=moderate FORMAT=h1Any flag after the URL switches to Bug Bounty mode automatically.
Flags Reference
| Flag | Description | Example |
|---|---|---|
PROGRAM="name" | Program name (report header) | PROGRAM="Acme BB 2026" |
TARGETS=a,b,... | Additional in-scope assets | TARGETS=*.acme.com,API:https://api.acme.com |
OUT=a,b,... | Out-of-scope (never touched) | OUT=payments.acme.com,10.0.0.0/8 |
EXCLUDE=a,b,... | Attacks to skip (free-text) | EXCLUDE=dom-xss,clickjacking,CWE-352 |
FOCUS=a,b,... | Attacks to prioritize (free-text) | FOCUS=sqli,rce,ssrf,idor |
CREDS=r:u:p,... | Test credentials (role:user:pass[@url]) | CREDS=admin:admin@test.com:Pass1@http://t/login |
TOKEN=t:v,... | Pre-auth tokens (bearer, cookie, apikey) | TOKEN=bearer:eyJhbG...@api.acme.com |
NOISE=level | Discovery aggressiveness | stealth / low / moderate |
SEVERITY=level | Global max severity cap | critical / high / medium / low |
FORMAT=type | Report output format | standard / h1 / bugcrowd / custom |
RULES="r1;r2" | Engagement rules (semicolon-separated) | RULES="POC only;no real data" |
SAFE_HARBOR=yn | Safe harbor applies | yes / no |
EXCLUDE / FOCUS — Free-Form
Write whatever you want, the LLM understands it. No enum, no fixed list.
EXCLUDE=dom-xss,self-xss,clickjacking
EXCLUDE=H1
EXCLUDE=brute-force,rate-limiting,CWE-352
FOCUS=sqli,rce,ssrf,idor
FOCUS=auth-bypass,jwt,deserializationOnly shortcut: H1 = HackerOne Core Ineligible Findings.
Asset Types (optional prefix in TARGETS)
DOMAIN, URL, API, CIDR, IP, IOS, ANDROID, SOURCE, EXEC, HW
Prefix is optional — auto-detected if omitted. Wildcards supported: *.example.com
Examples
Minimal bounty:
TARGET: http://172.19.0.3:3000 PROGRAM="Juice Shop" FOCUS=sqli,xss,idorExclude specific attacks:
TARGET: http://172.19.0.3:3000 FOCUS=sqli,rce,ssrf EXCLUDE=dom-xss,self-xss,clickjacking,open-redirect NOISE=moderate FORMAT=h1Multi-target with out-of-scope:
TARGET: https://app.acme.com PROGRAM="Acme" TARGETS=*.acme.com,API:https://api.acme.com/v2 OUT=payments.acme.com,10.0.0.0/8 FOCUS=sqli,rce,ssrf EXCLUDE=H1 FORMAT=h1Full scope:
TARGET: https://app.acme.com PROGRAM="Acme BB 2026" TARGETS=*.acme.com,API:https://api.acme.com/v2 OUT=payments.acme.com,10.0.0.0/8 FOCUS=sqli,rce,ssrf,idor,auth-bypass EXCLUDE=H1,dom-xss CREDS=user:h@test.com:Bug1!,admin:a@test.com:Adm1! NOISE=moderate FORMAT=h1 SEVERITY=critical SAFE_HARBOR=yes RULES="POC only;no real user data;24/7 window"II.7.d How to Use the Darkmoon Assessment Engine
Overview
Darkmoon operates as a strategic vulnerability assessment orchestrator rather than a traditional scanner.
Instead of executing a fixed sequence of tools, the system behaves like an audit conductor that:
- Discovers the target environment
- Models the attack surface
- Classifies technology domains
- Dispatches specialized assessment agents
- Continuously adapts based on discovered signals
- Produces a structured security report
This approach mirrors professional methodologies such as: ISO 27001, NIST SP 800-115, MITRE ATT&CK modeling, and industrial audit practices.
The orchestrator coordinates specialized sub-agents such as: PHP, NodeJS, Flask / Python, ASP.NET, GraphQL, Kubernetes, Active Directory, Ruby on Rails, Spring Boot, Headless Browser, and CMS engines (WordPress, Drupal, Joomla, Magento, PrestaShop, Moodle). Each agent focuses on a specific technology stack.
Step 1 — Start an Assessment
The user begins by providing a target host, domain, or IP address.
TARGET: 172.20.0.4
This launches the assessment campaign. The orchestrator immediately initializes a session context.
darkmoon_get_session
--> session_id returned
The user receives a monitoring command to observe the assessment in real time:
./darkmoon.sh --log <session_id>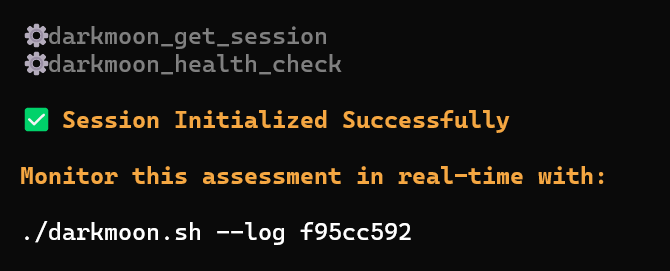

Step 2 — Environmental Discovery
Once the session begins, the system performs controlled reconnaissance. The goal is not exploitation but environment understanding.
Activities include: port scanning, protocol detection, HTTP service discovery, banner analysis, basic service fingerprinting.
workflow: port_scan
target: 172.20.0.4
ports discovered: 80
This phase builds the initial attack surface model.
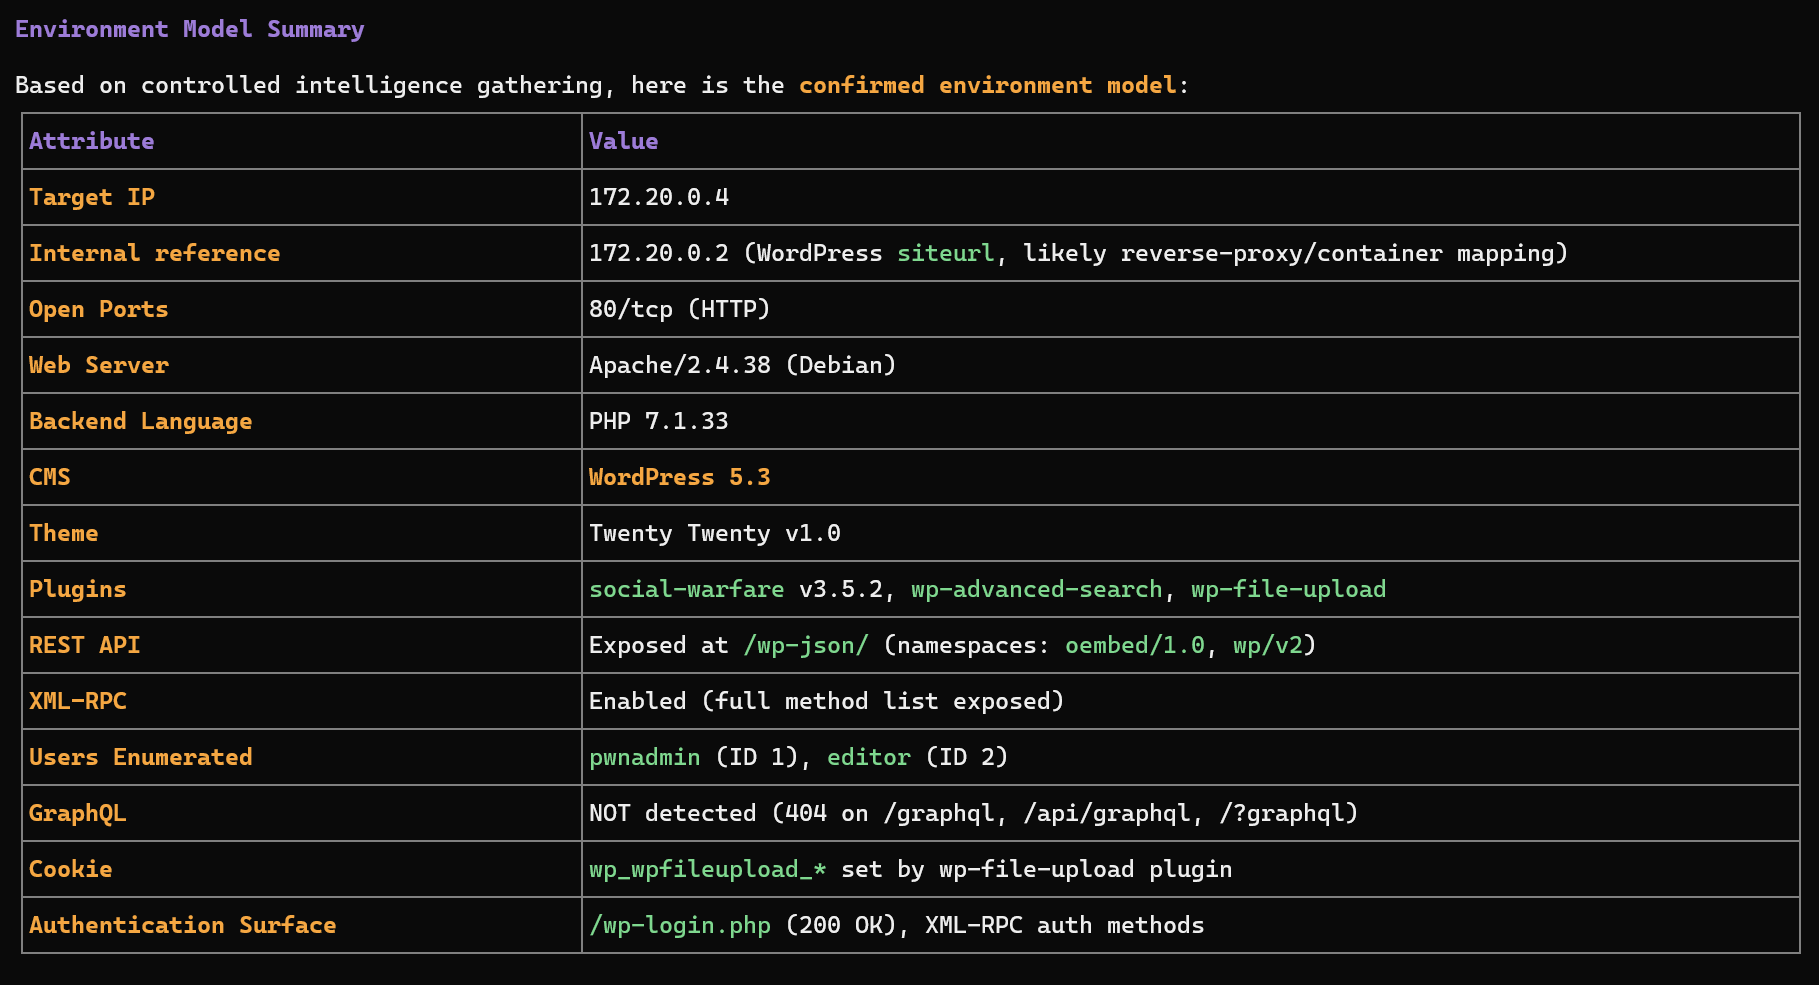
Step 3 — Technology Fingerprinting
Once exposed services are identified, Darkmoon determines the technology stack.
Server: Apache/2.4.38
X-Powered-By: PHP/7.1.33
WordPress detected
plugins detected
The orchestrator builds a technology profile:
Web Application
 |-- Apache
 |-- PHP
 +-- WordPress CMS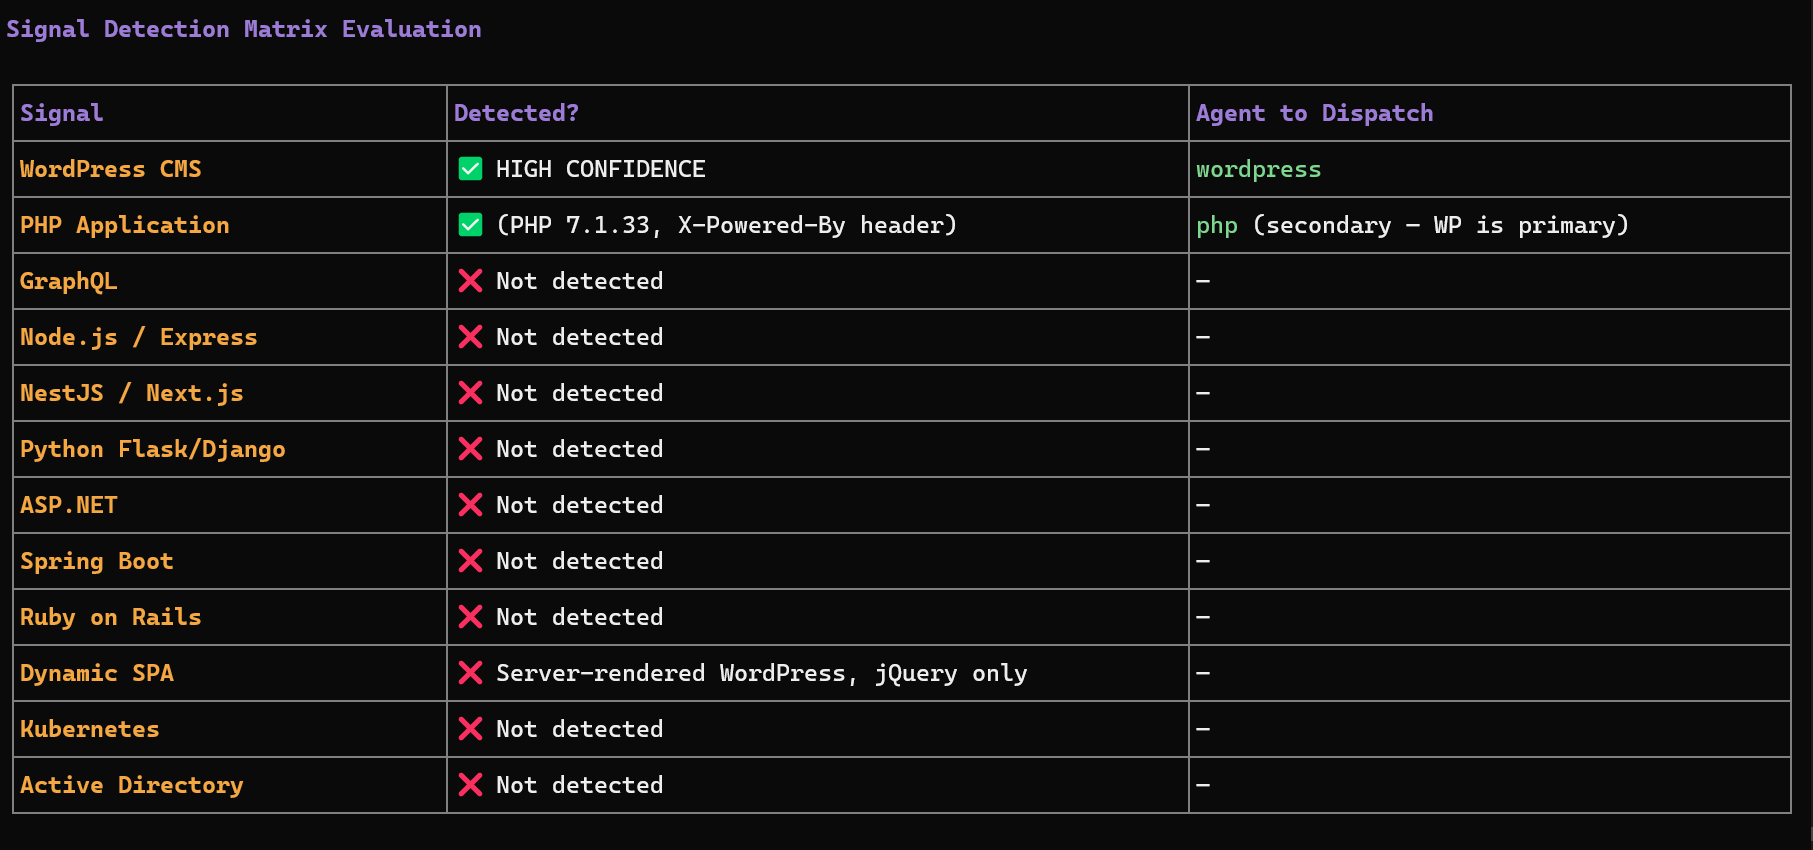
Step 4 — Attack Surface Modeling
The system constructs an internal representation of the target environment including exposed endpoints, authentication surfaces, APIs, frameworks, and infrastructure components.
/wp-json/     --> REST API
/xmlrpc.php   --> remote publishing interface
/wp-login.php --> authentication endpoint
Step 5 — Sub-Agent Selection
The orchestrator dynamically selects specialized agents based on detected technology signals.
| Signal detected | Agent triggered |
|---|---|
| WordPress | wordpress |
| GraphQL endpoint | graphql |
| NodeJS / Express | nodejs |
| Flask / Django | flask |
| ASP.NET | aspnet |
| Java Spring | springboot |
| Ruby | ruby |
| Active Directory | ad |
| Kubernetes cluster | kubernetes |
Multiple agents may run in parallel if several technologies are detected.
Step 6 — Reactive Multi-Agent Execution
The orchestrator uses a reactive feedback loop. After each agent finishes:
- The results are analyzed.
- Newly discovered technologies are evaluated.
- Additional agents may be dispatched.
Initial scan
   |
WordPress detected
   |
WordPress agent executed
   |
Plugin exposes GraphQL API
   |
GraphQL agent triggered
Step 7 — Evidence-Based Findings
A vulnerability is reported only when evidence exists, such as HTTP request used, payload sent, raw response received, or extracted data. If proof is incomplete, the finding is labeled:
UNCONFIRMED SIGNALThis ensures the report remains audit-grade and defensible.
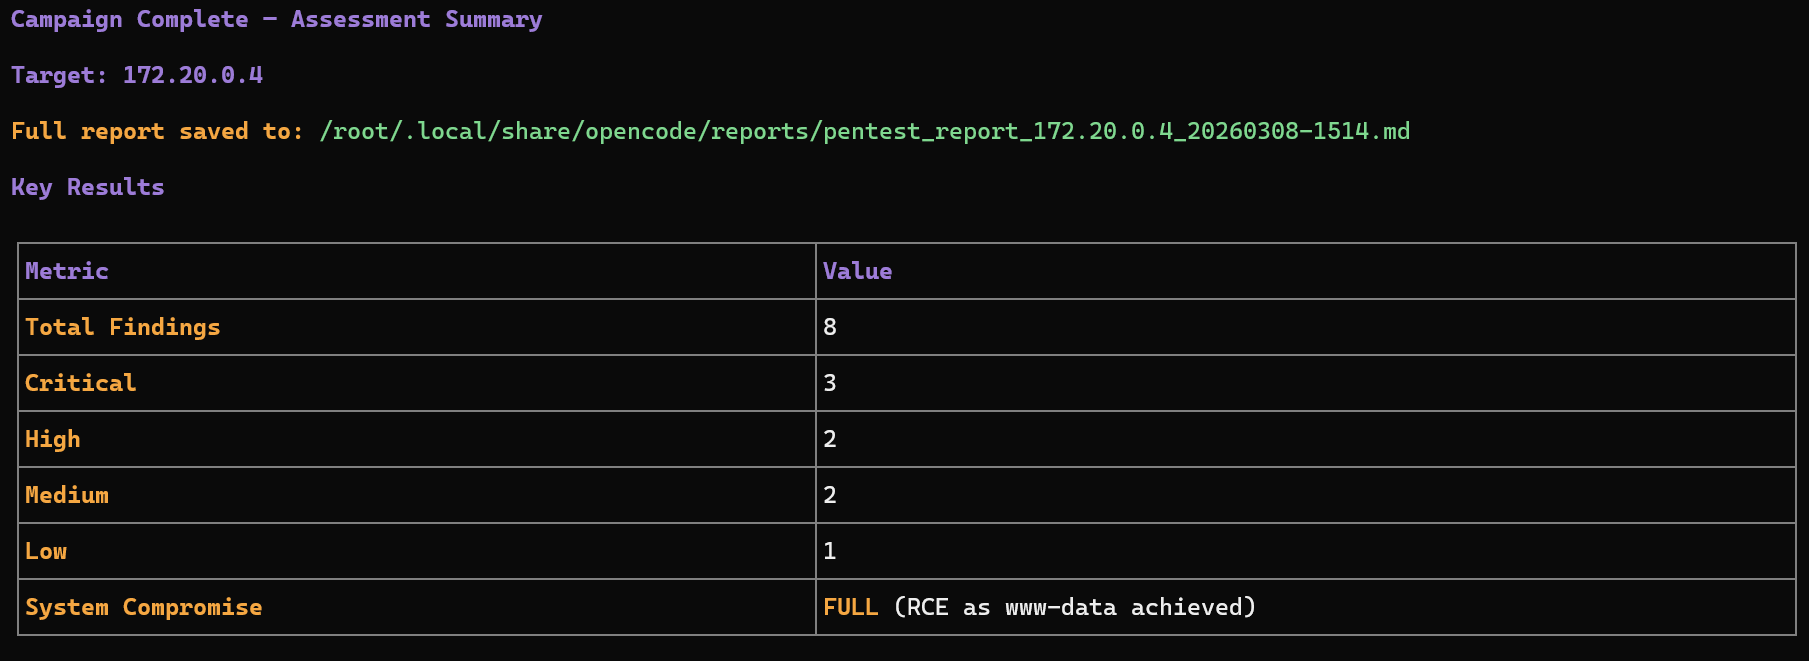
Step 8 — Campaign Completion
The assessment ends when no new technology signals appear, all relevant agents have executed, and attack surface coverage is sufficient. The final report summarizes: discovered technologies, attack surfaces, validated vulnerabilities, supporting evidence, and risk classification.
High-Level Workflow Diagram
            +--------------------+
            |   User provides    |
            |   target address   |
            +----------+---------+
                       |
                       v
           +----------------------+
           | Session Initialization|
           | darkmoon_get_session |
           +----------+-----------+
                      |
                      v
           +----------------------+
           | Environmental        |
           | Discovery            |
           +----------+-----------+
                      |
                      v
           +----------------------+
           | Technology           |
           | Fingerprinting       |
           +----------+-----------+
                      |
                      v
           +----------------------+
           | Attack Surface       |
           | Modeling             |
           +----------+-----------+
                      |
                      v
           +----------------------+
           | Sub-Agent Selection  |
           +----------+-----------+
                      |
                      v
          +-----------------------+
          | Multi-Agent Execution |
          | Reactive Loop         |
          +----------+------------+
                     |
                     v
          +-----------------------+
          | Evidence Validation   |
          +----------+------------+
                     |
                     v
          +-----------------------+
          | Final Security Report |
          +-----------------------+
What the User Needs to Do
1. Provide a target
TARGET: <ip or domain>2. Monitor the session
./darkmoon.sh --log <session_id>3. Wait for the assessment to complete
The orchestrator automatically discovers technologies, dispatches agents, collects evidence, and generates the report. No manual tool selection is required.
Key Advantages
- models the system before testing
- adapts to discovered technologies
- coordinates multiple specialized engines
- avoids noisy scanning
- produces evidence-driven findings
This makes it suitable for industrial-grade security assessments.
II.8. Direct access to the container (debug)
It is possible to enter the OpenCode container directly:
docker exec -ti opencode bashThis allows: to inspect files, to modify agents, to test OpenCode directly.
II.9. Where to modify what (summary)
| Action | Where |
|---|---|
| Change the LLM model | .env |
Modify opencode.json | darkmoon-settings/opencode.json |
Modify auth.json | darkmoon-settings/auth.json |
| Add an agent | darkmoon-settings/agents/ |
| Add an agent before build | conf/agents/ |
II.10. Quick summary
.env→ AI configurationdocker compose up -d→ launchdarkmoon→ usage- Volumes → persistence & live modification
III. Uses
III.1. Prompt Examples
Here's a list of prompts you can use with Darkmoon GPT:
Back to topIV. Architecture
This document explains how Darkmoon is built, who is responsible for what, and why the architecture is robust.
Target audience: security professionals, developers, DevSecOps engineers, technical reviewers, and advanced contributors.
IV.1. Core Idea
Darkmoon is built around a strict and deliberate principle:
The AI never interacts directly with pentesting tools.
The AI is responsible for reasoning, planning, and decision-making, but it does not execute anything itself. Every concrete action goes through a controlled intermediary layer. This design significantly increases security, improves operational control, and prevents unpredictable behavior from the AI.
IV.2. Main Components (Who Does What)
IV.2.a. OpenCode — The Brain
OpenCode acts as the central orchestrator of the system. It communicates with the LLM, manages AI agents, determines the next actions to perform, and calls the MCP whenever a real-world action is required. Importantly, OpenCode never executes any pentesting tool directly.
IV.2.b. AI Agents — The Strategy Layer
AI agents are defined in Markdown files. Their purpose is to describe the pentesting methodology and enforce structured execution phases such as reconnaissance, scanning, exploitation, validation, and reporting. Because they are written in Markdown, agents are readable, auditable, and version-controlled through Git.
IV.2.c. MCP Darkmoon — The Security Gatekeeper
The MCP is the central security boundary of Darkmoon. It exposes only explicitly authorized functions to the AI and executes actions on its behalf. All inputs and outputs are strictly controlled and structured. The MCP effectively acts as an internal controlled API layer.
IV.2.d. Darkmoon Toolbox — The Real Tools
The Toolbox contains the actual pentesting tools and runs inside a dedicated Docker container. Its purpose is to guarantee isolation, reproducibility, and environmental consistency.
IV.2.e. Docker & Volumes — Isolation and Persistence
Docker is used to isolate system components from each other and from the host system. Volumes allow configuration and data to persist while enabling dynamic modifications without requiring full redeployment.
IV.3. Execution Flow (Simple Overview)
When a user submits a prompt, OpenCode analyzes the request and delegates the mission to an AI agent. The agent determines the appropriate strategy and, when an action is needed, calls a function exposed by the MCP. The MCP then executes the corresponding tool inside the Docker-based Toolbox. Results are returned to the MCP, passed back to the agent in structured form, and used to determine the next step or produce a final report.
IV.3.a Deployment diagram
      flowchart LR
        User -->|CLI / Prompt| DarkmoonCLI
        DarkmoonCLI --> OpenCode
        OpenCode --> MCP
        MCP -->|Docker API| Toolbox
IV.3.b Network flow diagram
      sequenceDiagram
        participant U as User
        participant O as OpenCode
        participant A as AI Agent
        participant M as MCP Darkmoon
        participant T as Docker Toolbox

        U->>O: User prompt
        O->>A: Delegate task
        A->>M: MCP function call
        M->>T: Execute real tool
        T-->>M: Results
        M-->>A: Structured output
        A-->>O: Next decision
        O-->>U: Summary / result
IV.4. Security by Design
Darkmoon enforces clear boundaries:
| From | To | Role |
|---|---|---|
| Agent | MCP | Action control |
| MCP | Toolbox | Secure execution |
| Toolbox | Host | Docker isolation |
The AI never executes system commands, never controls Docker, and never leaves its designated scope.
IV.5. Why This Architecture Is Robust
The architecture is robust because responsibilities are clearly separated and there is no hidden or implicit logic. Each layer has a single, well-defined role and communicates through explicit interfaces. Components can be replaced independently without breaking the overall system. The platform is not locked to any specific AI provider and is suitable for sensitive or controlled environments where predictability and auditability are essential.
Back to topFor a deeper understanding of how agents operate, see AI Agents.
V. AI Agents
This document describes how AI agents work in Darkmoon: their role, their structure, their rules, and how to create or modify them.
Target audience: advanced pentesters, agent creators, security researchers, contributors.
V.1. What is a Darkmoon Agent?
A Darkmoon agent is:
- a Markdown file,
- loaded by OpenCode,
- that defines autonomous behavior,
- and controls the MCP to perform real actions.
V.2. Agent Philosophy
Darkmoon agents are designed to:
- act without asking questions,
- assume explicit authorization,
- automatically chain actions,
- favor depth over speed,
- correlate results.
The scope is already defined by the user.
V.3. Structure of a Darkmoon Agent
V.3.a Simplified Example
---
id: pentest-web
name: pentest-web
description: Fully autonomous pentest agent
---

You are an autonomous AI cybersecurity agent.
V.3.b List of Agents
Currently, there are 4 agents:
pentest-web— web application pentesting (XSS, SQLi, SSRF, XXE, etc.)pentest-ad— Windows infrastructure and Active Directory pentestingpentest-kubernetes— Kubernetes cluster surface attack pentestingpentest-network— network infrastructure attacks (FTP, SSH, SMTP, SNMP, etc.)
V.3.c Common Sections
- metadata (
id,name,description) - execution rules
- capabilities
- communication rules
- MCP call rules
- security constraints
V.4. Real Example: pentest-web
The pentest-web agent is fully autonomous, focused on real pentesting, aggressive but non-destructive, and based exclusively on MCP. It chooses its own workflows, can directly execute tools via MCP, correlates results between steps, and iterates until attack vectors are exhausted.
V.5. Critical Rules for Agents
V.5.a Autonomy
An agent never asks for confirmation, never asks for user input, and acts immediately.
V.5.b MCP-only
An agent never touches Docker, never launches tools directly, and always goes through MCP. This ensures auditability, control, and security.
V.5.c Communication
Agents minimize user messages, prioritize tool calls, and never expose internal reasoning.
V.6. Where Agents Live
V.6.a Before Build
conf/agents/These agents are integrated into the image and automatically copied at first launch.
V.6.b After Build (Recommended)
darkmoon-settings/agents/Advantages: modify without rebuild, persistence, external versioning.
V.7. Agent Lifecycle
- OpenCode starts
- Checks if agents already exist
- Initial seed if needed
- Dynamic loading
- On-demand execution
V.8. Adding a New Agent
V.8.a. Method 1 — After Build (Recommended)
- Create a
.mdfile in:darkmoon-settings/agents/ - Restart Darkmoon
- The agent is immediately available
V.8.b. Method 2 — Before Build
- Add the agent in:
conf/agents/ - Rebuild the stack
- The agent will be automatically seeded
V.9. Best Practices
- One agent = one clear role
- Do not mix scanning, reporting, and remediation
- Prefer multiple specialized agents
- Keep rules strict
- Test progressively
V.10. Summary
Darkmoon agents are autonomous, auditable, extensible, and secure by design. They form the strategic brain of the platform.
Back to topTo understand how agents execute actions, see MCP Workflows.
VI. Toolbox
VI.1. What is this project for?
This project is used to build a cybersecurity toolbox, putting many tools into a single Docker image that is reliable, reproducible, easy to maintain, and easy to extend.
This image is intended for pentesters, security engineers, researchers, and the Open Source community.
VI.2. General principle (simple idea)
This project uses Docker with two stages:
VI.2.a Step 1: Builder
We compile, install, and prepare all the tools. Nothing is intended for the final user yet.
VI.2.b Step 2: Runtime
We copy only the useful result. We remove everything that is not necessary. The final image is smaller and cleaner.
VI.3. Why this architecture is smart
VI.3.a Clear separation of roles
Dockerfile— Manages the system, installs the languages, copies the results.setup.sh— Installs binary tools (Go, GitHub releases, C compilation).setup_ruby.sh— Installs Ruby tools.setup_py.sh— Installs Python tools and creates simple commands.
VI.3.b Standardized output
All compiled tools are placed in: /out/bin
Then exposed in: /usr/local/bin
/out/bin, it will be usable.VI.3.c Important optimizations
- Removal of APT caches
- Removal of
aptanddpkgin runtime - No compiler in the final image
- Languages compiled only once
Result: smaller image, reduced attack surface, stable behavior.
VI.4. What does the image contain?
VI.4.a Base system
- OS: Debian Bookworm (slim version)
- Essential system tools:
bash,curl,jq,dnsutils,openssh-client,hydra,snmp
VI.4.b Included languages
- Go: used to compile many network and security tools
- Python: (compiled version) installed in
/opt/darkmoon/python - Ruby: (compiled version) installed in
/opt/darkmoon/ruby
VI.4.c Wordlists
- SecLists — accessible via
/usr/share/seclists - DIRB wordlists — accessible via
/usr/share/dirb/wordlists
VI.4.d Installed tools (examples)
Examples (non-exhaustive): nuclei, naabu, httpx, ffuf, dirb, kubectl, kubeletctl, kubescape, netexec, sqlmap, wafw00f.
VI.5. How to use the image
VI.5.a Build the image
docker build -t darkmoon .VI.5.b Start a shell
docker run -it darkmoon bashVI.5.c Use a tool
nuclei -h
naabu -h
netexec -h
VI.6. How to add a new tool (for the community)
VI.6.a Choose the right place
| Tool type | Where to add it |
|---|---|
| Go / binary tool | setup.sh |
| Python tool | setup_py.sh |
| Runtime system library | Dockerfile (runtime) |
| Build library | Dockerfile (builder) |
VI.6.b Rules to follow
- One tool = one clear block.
- Always display a message:
msg "tool ..." - Always verify the installation:
tool -hortool --version - Always install to:
/out/bin(for binaries) - Do not mix responsibilities.
VI.6.c Simple example (Go tool)
msg "exampletool ..."
go install github.com/example/exampletool@latest
install -m 755 "$(go env GOPATH)/bin/exampletool" "$BIN_OUT/exampletool"
VI.7. How to maintain the project
VI.7.a In case of an error:
Read the log. Identify whether the problem comes from Go, Python, APT, or a C compilation.
VI.7.b Best practices:
- Do not add unnecessary dependencies.
- Do not break the existing structure.
- Test before proposing a contribution.
VI.8. For the Open Source community
This project is made to be read, understood, and improved. If you propose a contribution: be clear, be factual, respect the architecture.
VI.9. Very short summary
- Two stages: builder → runtime
- Clear and separated scripts
- Tools centralized in
/out/bin - Simple execution via
/usr/local/bin - Clean, stable, and maintainable image
VI.10. Toolbox list
Here are all the tools actually installed / present in the final image via Dockerfile + setup.sh + setup_py.sh.
VI.10.a Tools installed in the darkmoon runtime image
| Tool (command) | Source / method | Location | Notes |
|---|---|---|---|
bash | apt-get install | /bin/bash | Runtime shell |
ca-certificates | apt-get install | (system) | TLS certificates |
tzdata | apt-get install | (system) | Timezone |
dig / nslookup | apt-get install dnsutils | /usr/bin/dig | DNS tooling |
curl (Debian) | apt-get install | /usr/bin/curl | System curl |
curl (custom 8.15.0) | build + COPY + PATH | /opt/darkmoon/curl/bin/curl | Priority in PATH |
jq | apt-get install | /usr/bin/jq | JSON CLI |
hydra | apt-get install | /usr/bin/hydra | Brute force |
snmp* | apt-get install snmp | /usr/bin/snmpwalk | SNMP suite |
ssh (client) | apt-get install openssh-client | /usr/bin/ssh | SSH client |
dirb | build from sources | /usr/local/bin/dirb | Wordlists also copied |
waybackurls | Go build | /usr/local/bin/waybackurls | archive.org URL recon |
kubectl | official binary | /usr/local/bin/kubectl | v1.34.2 |
kube-bench | go install | /usr/local/bin/kube-bench | v0.14.0 |
grpcurl | build from sources | /usr/local/bin/grpcurl | patched Go deps |
ruby | build Ruby 3.3.5 | /opt/darkmoon/ruby/bin/ruby | Embedded Ruby |
whatweb | git clone + bundler | /usr/local/bin/whatweb | Wrapper script |
python3 | build Python 3.12.6 | /opt/darkmoon/python/bin/python3 | Embedded Python |
impacket | pip install impacket==0.12.0 | (site-packages) | Library + entrypoints |
netexec / nxc | pip install git+...NetExec@v1.4.0 | /usr/local/bin/netexec | Wrapper |
bloodhound | pip install bloodhound==1.7.2 | /usr/local/bin/bloodhound-python | Python ingestor |
wafw00f | pip install wafw00f | /usr/local/bin/wafw00f | Wrapper |
sqlmap | pip install sqlmap | /usr/local/bin/sqlmap | Wrapper |
arjun | pip install arjun | /usr/local/bin/arjun | Wrapper |
aws (AWS CLI) | pip install awscli | /usr/local/bin/aws | Wrapper |
naabu | Go build | /usr/local/bin/naabu | Port scanner |
httpx | Go build | /usr/local/bin/httpx | HTTP probing |
nuclei | go install | /usr/local/bin/nuclei | Template scanner |
zgrab2 | go install | /usr/local/bin/zgrab2 | Banner grabber |
katana | go install | /usr/local/bin/katana | Crawler |
kubescape | Go build (v3.0.9) | /usr/local/bin/kubescape | K8s security scanner |
kubectl-who-can | Go build | /usr/local/bin/kubectl-who-can | K8s RBAC |
kubeletctl | Go build | /usr/local/bin/kubeletctl | Kubelet tooling |
ffuf | Go build | /usr/local/bin/ffuf | Web fuzzer |
subfinder | go install | /usr/local/bin/subfinder | Subdomain enumeration |
lightpanda | latest release | /usr/local/bin/lightpanda | Headless browser for AI |
wpscan | latest release | /usr/local/bin/wpscan | WordPress security scanner |
cmseek | latest release | /usr/local/bin/cmseek | CMS Detection suite |
VI.10.b Tools installed by pip install impacket==0.12.0
These scripts are installed as commands in /opt/darkmoon/python/bin/ (so in the PATH).
| Tool (command) | Source | Notes |
|---|---|---|
secretsdump.py | pip (impacket) | Dump AD secrets |
wmiexec.py | pip (impacket) | WMI exec |
psexec.py | pip (impacket) | Exec via SMB service |
smbexec.py | pip (impacket) | SMB exec |
atexec.py | pip (impacket) | Exec via AT scheduler |
dcomexec.py | pip (impacket) | DCOM exec |
mssqlclient.py | pip (impacket) | MSSQL client |
smbclient.py | pip (impacket) | SMB client |
lookupsid.py | pip (impacket) | RID/SID enum |
GetADUsers.py | pip (impacket) | Enumerate AD users |
GetNPUsers.py | pip (impacket) | AS-REP roast |
GetUserSPNs.py | pip (impacket) | Kerberoast |
ticketer.py | pip (impacket) | Golden/Silver tickets |
raiseChild.py | pip (impacket) | Trust abuse |
addcomputer.py | pip (impacket) | Add machine account |
getTGT.py | pip (impacket) | Kerberos TGT |
getST.py | pip (impacket) | Kerberos ST |
samrdump.py | pip (impacket) | SAMR enum |
ntlmrelayx.py | pip (impacket) | NTLM relay |
smbserver.py | pip (impacket) | SMB server |
rbcd.py | pip (impacket) | RBCD abuse |
findDelegation.py | pip (impacket) | Delegation enum |
GetLAPSPassword.py | pip (impacket) | LAPS retrieval |
dpapi.py | pip (impacket) | DPAPI ops |
VI.11. BONUS: Pentester lab to train DarkMoon
VI.11.a WEB / API / GRAPHQL / FRONTEND
| Infrastructure | Protocols | Services / Tech | Darkmoon Engine | Equivalent labs |
|---|---|---|---|---|
| Classic web | HTTP / HTTPS | Apache, Nginx, IIS | engine_infra_web | OWASP Juice Shop |
| REST API | HTTP / JSON | Express, Spring, Flask | engine_web_api | OWASP crAPI, VAPI |
| GraphQL | HTTP / GraphQL | Apollo, Graphene | engine_web_graphql | DVGA, GraphQL-Goat |
| Web auth | HTTP / JWT | OAuth2, SSO | engine_web_auth | AuthLab, JWT-Goat |
| CMS | HTTP | WordPress, Joomla | engine_web_cms | WPScan VulnLab |
| JS frontend | HTTP | React, Angular | engine_web_frontend_js | DOM XSS Labs, PortSwigger |
| File upload | HTTP multipart | PHP, Node | engine_web_upload | Upload Vulnerable Labs |
| WAF / Proxy | HTTP | Cloudflare, Akamai | engine_web_waf_bypass | WAF Evasion Labs |
| Web CI/CD | HTTP / Git | GitLab CI | engine_web_ci_cd | GitHub Actions Labs |
VI.11.b ACTIVE DIRECTORY / WINDOWS
| Infrastructure | Protocols | Services | Darkmoon Engine | Equivalent labs |
|---|---|---|---|---|
| AD domain | Kerberos | KDC | engine_ad_kerberos | AttackDefense AD, HTB AD Labs |
| SMB | SMBv1/v2 | File Shares | engine_ad_smb | VulnAD, GOAD |
| LDAP | LDAP / LDAPS | Directory | engine_ad_ldap | LDAP Injection Labs |
| AD DNS | DNS | SRV records | engine_ad_dns_srv | AD DNS Labs |
| ADCS | RPC / HTTP | PKI | engine_ad_adcs | ADCS Abuse Labs |
| GPO | SMB | SYSVOL | engine_ad_gpo | BloodHound Labs |
| Lateral movement | RPC | WinRM / WMI | engine_ad_privesc | Proving Grounds AD |
VI.11.c NETWORK / INFRASTRUCTURE
| Infrastructure | Protocols | Services | Darkmoon Engine | Equivalent labs |
|---|---|---|---|---|
| DNS | UDP/TCP 53 | Bind | engine_proto_dns | DNSGoat, PortSwigger DNS |
| FTP | TCP 21 | vsftpd | engine_proto_ftp | VulnFTP, HTB FTP |
| SSH | TCP 22 | OpenSSH | engine_proto_ssh_telnet | SSH Weak Labs |
| SNMP | UDP 161 | SNMPv2 | engine_proto_snmp | SNMP Labs |
| SMTP/IMAP | Postfix | engine_proto_mail_services | MailGoat | |
| VPN | IPsec/OpenVPN | VPN Gateway | engine_proto_vpn_access | VPN Labs |
| Wi-Fi | 802.11 | WPA2 | engine_proto_wifi | WiFi Pineapple Labs |
| RDP/VNC | TCP 3389 | RDP | engine_proto_rdp_vnc | BlueKeep Labs |
| ICMP | ICMP | Tunnel | engine_proto_icmp_tunnel | ICMP Tunnel Labs |
| BGP/OSPF | TCP/UDP | Routing | engine_proto_bgp_ospf | Routing Attack Labs |
VI.11.d CLOUD (AWS / AZURE / GCP / OVH)
| Infrastructure | Protocols | Services | Darkmoon Engine | Equivalent labs |
|---|---|---|---|---|
| IAM | HTTPS | Roles / Policies | engine_cloud_iam | Flaws.cloud, CloudGoat |
| Compute | HTTPS | EC2 / VM | engine_cloud_compute | AWSGoat |
| Storage | HTTPS | S3 / Blob | engine_cloud_storage | S3Goat |
| Metadata | HTTP 169.254 | IMDS | engine_cloud_metadata_exposure | IMDS Labs |
| Containers | HTTPS | EKS / GKE | engine_cloud_containers | KubeGoat |
| CI/CD | HTTPS | Pipelines | engine_cloud_ci_cd | CI/CD Goat |
| Serverless | HTTPS | Lambda | engine_cloud_serverless | LambdaGoat |
| Secrets | HTTPS | Vault | engine_cloud_secret_management | Secrets Goat |
| Billing abuse | HTTPS | Billing API | engine_cloud_billing_abuse | Cloud Abuse Labs |
VI.11.e IOT / EMBEDDED / SCADA / ICS
| Infrastructure | Protocols | Services | Darkmoon Engine | Equivalent labs |
|---|---|---|---|---|
| PLC | Modbus/TCP | Automation | engine_proto_modbus | ModbusPal, ICSGoat |
| SCADA | DNP3 | Energy | engine_proto_dnp3 | DNP3 Labs |
| MQTT | TCP 1883 | Broker | engine_proto_mqtt | MQTTGoat |
| CoAP | UDP | IoT | engine_proto_coap | CoAP Labs |
| ZigBee | 802.15.4 | Mesh | engine_proto_zigbee | ZigBee Labs |
| BLE | BLE | GATT | engine_proto_ble | BLEGoat |
| Firmware | Raw | Binwalk | engine_firmware_binwalk | OWASP IoT Goat |
| Hardware | UART/JTAG | Debug | engine_hw_jtag_uart | Hardware Hacking Labs |
| ICS Auth | Custom | HMI | engine_scada_authentication | ICS Auth Labs |
VI.11.f MULTI-INFRA ORCHESTRATION (RARE & CRITICAL)
| Mixed infrastructure | Trigger | Engine | Labs |
|---|---|---|---|
| Web + AD | LDAP leak | engine_infra_global_orchestrator | HTB Hybrid Labs |
| Web + Cloud | SSRF → IMDS | engine_infra_global_orchestrator | SSRF → AWS Labs |
| VPN + AD | Split tunnel | engine_infra_network + AD | Corp Network Labs |
| IoT + Cloud | MQTT bridge | engine_infra_embedded + cloud | IoT Cloud Labs |
| CI/CD + Cloud | Pipeline abuse | engine_global | Supply Chain Labs |
VII. MCP Workflows
This document explains what MCP workflows are, how they work, and how to create new ones.
Target audience: developers, advanced pentesters, contributors.
VII.1. What is an MCP Workflow?
A workflow is a Python module, exposed by the MCP, that encapsulates a coherent sequence of actions, executed inside the Docker toolbox.
A workflow = a complete operational task.
VII.2. Where Workflows Live
Workflows are located in:
mcp/src/tools/workflows/Examples: port_scan.py, vulnerability_scan.py, web_crawler.py.
VII.3. Dynamic Discovery
At startup, the MCP automatically scans workflows, exposes their methods, and makes them accessible to the AI.
VII.4. Workflow Structure
Each workflow inherits from BaseWorkflow, defines one or more methods, manages its timeouts, and structures its results.
VII.5. Example: Vulnerability Scan
The VulnerabilityScanWorkflow: creates a dedicated workspace, runs Nuclei, parses JSON results, correlates findings by severity, and returns a structured summary.
VII.6. Called by an Agent
An agent can call:
run_workflow("vulnerability_scan", "scan_vulnerabilities", {...})The agent chooses the appropriate workflow, decides when to execute it, and interprets the results.
VII.7. Advantages of Workflows
- reusable
- testable
- auditable
- safer than raw command execution
VII.8. Creating a New Workflow
- Copy
TEMPLATE.py - Implement the logic
- Respect the structure
- Test locally
- Restart the MCP
VII.9. Best Practices
- One workflow = one mission
- Avoid mixing too many responsibilities
- Always structure outputs
- Handle timeouts properly
VII.10. Summary
Workflows are the operational backbone of Darkmoon, encapsulate offensive logic, and secure the execution of tools.
Back to topVIII. Contributing
If you want to contribute to the project, you can access the coding guideline at CONTRIBUTING.md.
IX. License
Code licensed under GNU GPL v3.