
I. Preview

Watch DarkMoon in action — Full autonomous penetration test demo
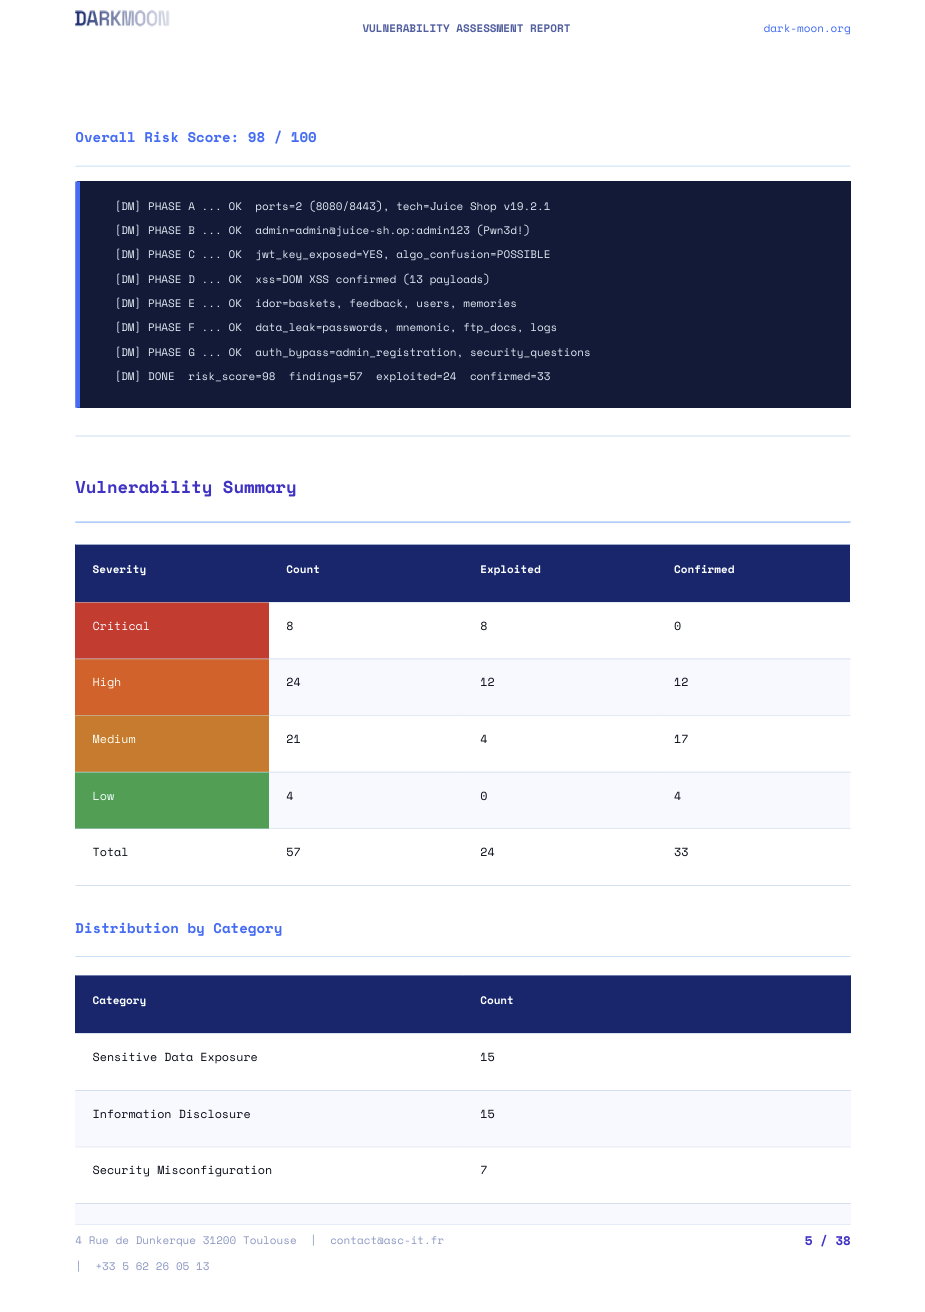
DarkMoon runs autonomous, AI‑driven assessments tuned for maximum coverage, so nothing slips through. As with any security scanner, this wide net means a share of findings are candidates that deserve a human check before action — severity and exploitability are best confirmed by an analyst.
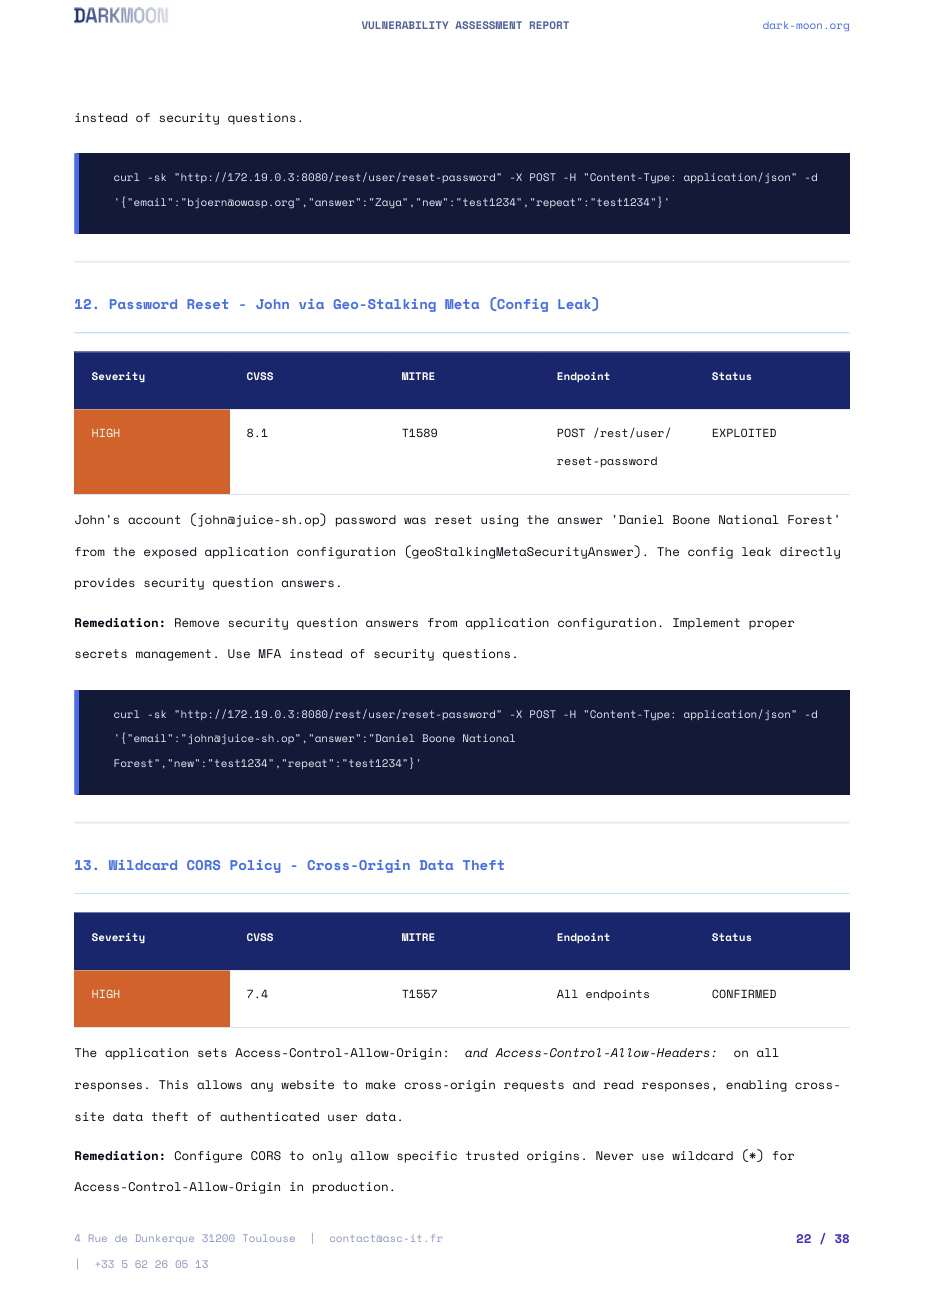
Every finding carries its full evidence — requests, payloads, logs — across the report, dashboard & PDF. Triage before remediation: EXPLOITED ships a reproducible proof, Confirmed invites a quick review — turning broad coverage into reliable, defensible conclusions.
Privacy gateway (reversible local tokenization).
The AI never sees your real sensitive values — IPs, hostnames,
domains, URLs, emails, credentials or internal paths. It only
ever handles deterministic placeholders such as
IP_PRIVATE_001 or HOST_INTERNAL_001.
Real values are re-injected
locally, right before a tool runs, and re-masked out of every result before it goes back to the
model, so nothing sensitive leaves your perimeter to the LLM
provider. Attempts to smuggle a value out (e.g. a placeholder in
a URL sent to a third-party host) are blocked. Open-source in the
Community edition; Pro adds guard-sealed storage, an audit trail
and a compliance-grade "no data left the perimeter" statement in
the signed report.
II. Installation
II.1. Prerequisites
Before starting, you must have:
- Docker
- Docker Compose
- Access to a capable LLM — Claude Opus 4.6 / 4.7 (recommended), or a heavyweight local model (32B+). See Compatible Models & Hardware. Small models (7B / 13B) are not supported for autonomous campaigns.
II.2. GPU Troubleshooting Guide (Official)
Overview
Darkmoon supports GPU acceleration when available, but GPU configuration depends entirely on your host environment.
There are three supported setups:
| Environment | GPU Vendor | Setup Method |
|---|---|---|
| Native Linux (Debian/Ubuntu) | NVIDIA | NVIDIA driver + NVIDIA Container Toolkit |
| Native Linux (Debian/Ubuntu) | AMD / ATI | ROCm + amdgpu driver |
| Windows + Docker Desktop + WSL2 | NVIDIA | Windows driver + Docker Desktop GPU integration |
Darkmoon does not install GPU dependencies automatically to avoid breaking system configurations.
pocl-opencl-icd — no configuration needed.
Common Error
Error: could not select device driver "nvidia" with capabilities: [[gpu]]or
Failed to initialize NVML: GPU access blocked by the operating systemStep 1 — Identify Your Environment
uname -a
If you see microsoft → you are in
WSL. Otherwise →
native Linux.
Case 1 — Windows + Docker Desktop + WSL2
nvidia-container-toolkit inside WSL. DO NOT configure
nvidia-ctk. Docker Desktop handles GPU automatically.
Check GPU availability
On Windows (PowerShell):
nvidia-smiInside WSL:
/usr/lib/wsl/lib/nvidia-smiTest Docker GPU
docker run --rm --gpus all nvidia/cuda:12.3.2-base-ubuntu22.04 nvidia-smiIf GPU is blocked
If you see GPU access blocked by the operating system,
fix with:
wsl --update
wsl --shutdown
Then restart Windows completely.
Docker Desktop settings
- Settings → General → Use WSL2 backend (enabled)
- Settings → Resources → WSL Integration → your distro enabled
Case 2 — Native Linux (Debian / Ubuntu)
Check GPU
nvidia-smiTest Docker GPU
docker run --rm --gpus all nvidia/cuda:12.3.2-base-ubuntu22.04 nvidia-smiIf it fails — install NVIDIA Container Toolkit
E: Type '<!doctype' is not known on line 1 in source
              list
. This means your NVIDIA repo file is corrupted with HTML instead
of APT entries.
NVIDIA Forum
Fix corrupted NVIDIA repo
sudo rm -f /etc/apt/sources.list.d/nvidia-container-toolkit.listCorrect installation (official method)
curl -fsSL https://nvidia.github.io/libnvidia-container/gpgkey \
| sudo gpg --dearmor -o /usr/share/keyrings/nvidia-container-toolkit-keyring.gpg

curl -s -L https://nvidia.github.io/libnvidia-container/stable/deb/nvidia-container-toolkit.list \
| sed 's#deb https://#deb [signed-by=/usr/share/keyrings/nvidia-container-toolkit-keyring.gpg] https://#g' \
| sudo tee /etc/apt/sources.list.d/nvidia-container-toolkit.list

sudo apt update
sudo apt install -y nvidia-container-toolkit
sudo nvidia-ctk runtime configure --runtime=docker
sudo systemctl restart docker
Validate installation
docker run --rm --gpus all nvidia/cuda:12.3.2-base-ubuntu22.04 nvidia-smiCase 3 — AMD / ATI GPU (Native Linux)
AMD GPUs are supported via ROCm (Radeon Open Compute). This is the AMD equivalent of NVIDIA's CUDA stack.
Check AMD GPU
lspci | grep -i amd
rocm-smi
Install ROCm (Ubuntu 22.04)
wget -q -O - https://repo.radeon.com/rocm/rocm.gpg.key | sudo apt-key add -
echo 'deb [arch=amd64] https://repo.radeon.com/rocm/apt/5.7 jammy main' \
  | sudo tee /etc/apt/sources.list.d/rocm.list

sudo apt update
sudo apt install -y rocm-hip-sdk rocm-opencl-runtime
sudo usermod -aG render,video $USER
Docker GPU passthrough (AMD)
AMD GPUs use /dev/kfd and
/dev/dri devices. Add to your
docker-compose.yml:
devices:
  - /dev/kfd:/dev/kfd
  - /dev/dri:/dev/dri
group_add:
  - video
  - render
Test AMD GPU in Docker
docker run --rm \
  --device=/dev/kfd --device=/dev/dri \
  --group-add video --group-add render \
  rocm/rocm-terminal rocm-smi
Common AMD errors
| Error | Cause | Fix |
|---|---|---|
/dev/kfd: Permission denied |
User not in render group |
sudo usermod -aG render,video $USER + logout
|
No OpenCL platforms found |
ROCm not installed | Install rocm-opencl-runtime |
| Container can't see GPU | Missing device mounts | Add --device=/dev/kfd --device=/dev/dri |
Final Notes
-
Darkmoon runs perfectly without GPU (CPU fallback
via
pocl-opencl-icd) - GPU is optional acceleration, not required
-
NVIDIA: use CUDA stack +
nvidia-container-toolkit -
AMD: use ROCm + device mounts (
/dev/kfd,/dev/dri) - WSL GPU issues are often OS-level, not Docker-level
- Native Linux GPU issues are usually driver or toolkit misconfiguration
Quick Debug Checklist
| Check | Command |
|---|---|
| NVIDIA (Windows) | nvidia-smi |
| NVIDIA (WSL) | /usr/lib/wsl/lib/nvidia-smi |
| NVIDIA (Docker) | docker run --gpus all ... |
| AMD (Linux) | rocm-smi |
| AMD (Docker) | docker run --device=/dev/kfd ... |
| CPU fallback | clinfo (shows pocl platform) |
| WSL reset | wsl --shutdown |
| NVIDIA repo fix | remove corrupted .list |
II.2. General project structure
Darkmoon relies on Docker and Docker Compose.
The important components are:
- an OpenCode container (AI + agents),
- a Darkmoon Toolbox container (pentest tools),
- shared volumes for configuration.
II.3. Configuration of environment variables in docker compose
Docker Compose is the entry point for the entire AI configuration.
II.3.a Example environment variable
environment:
   # TEST runtime variables LLM conf
   - OPENROUTER_PROVIDER=openai
   - OPENCODE_MODEL=gpt-4o
   - OPENROUTER_API_KEY=sk-svcacct-xxx
II.3.b Role of the variables
| Variable | Role |
|---|---|
OPENROUTER_PROVIDER |
LLM model provider |
OPENCODE_MODEL |
Exact model used |
OPENROUTER_API_KEY |
Provider API key |
OPENCODE_MODEL?
This matters as much in the open-source edition as in Pro —
Darkmoon's autonomous agent needs a strong reasoning / tool-calling
model, otherwise campaigns stall in Unknown. See the
full guidance (cloud reference Opus 4.6/4.7, local Opus-class
equivalents, supported open models & hardware) in
Compatible Models & Hardware.
II.4. Automatic generation of OpenCode files
On first launch, Darkmoon:
- reads the variables,
-
automatically generates:
opencode.json,auth.json,
- configures the main agent,
- initializes OpenCode.
All of this is done by the script:
conf/apply-settings.sh
You can choose not to fill in the variables, in which case the
default opencode model opencode/big-pickle will be
executed.
II.5. Volumes and persistence
Configuration files are persisted via Docker volumes.
II.5.a Important volumes
- ./darkmoon-settings:/root/.config/opencode/:rw
- ./darkmoon-settings:/root/.local/share/opencode/:rw
- ./darkmoon-settings/agents:/root/.opencode/agents/:rw
II.5.b What this allows
- Modify the configuration without rebuild
- Add or modify AI agents
- Keep logs and OpenCode state
II.6. Build and launch Darkmoon
II.6.a Building the images
Using install.sh
Darkmoon provides a dedicated installation and recovery script:
./install.shThis script is designed to fully reset and recreate the Darkmoon Docker stack in a clean and deterministic way. It is useful both for initial setup and for recovering from Docker-related issues.
What the script does
1. Checks prerequisites
- verifies that Docker is installed,
- verifies that the Docker daemon is running,
- verifies that Docker Compose v2 is available.
If any requirement is missing, the script stops and displays installation instructions.
2. Stops the running stack
docker compose down --remove-orphans --volumes --rmi all3. Removes local bind mounts
The following directories are deleted: ./data,
./darkmoon-settings, ./workflows
4. Cleans Docker build cache
docker builder prune -f5. Rebuilds all images from scratch
docker compose build --no-cache6. Recreates the Darkmoon stack
docker compose up -d --force-recreateWhen to use install.sh
- performing the initial installation of Darkmoon,
- Docker builds fail unexpectedly,
- volumes or bind mounts become inconsistent,
- configuration files were modified,
- switching LLM providers or models,
- troubleshooting Docker-related issues.
When you do NOT need to run it
You typically
do not need to run install.sh when
modifying agent Markdown files, prompts, or workflows mounted
through volumes. These changes are usually applied
live without rebuilding the stack.
Using Docker compose
docker compose buildII.6.b Launching the stack
docker compose up -dII.7. Launch Darkmoon (User CLI)
A wrapper is provided: darkmoon.sh.
II.7.a Make the wrapper executable
chmod +x darkmoon.shII.7.b Install globally (optional)
sudo cp darkmoon.sh /usr/local/bin/darkmoonII.7.c Launch Darkmoon with TUI Console
darkmoonOr with a direct command:
darkmoon "TARGET: mydomain.com"Pentest Agent — Scope definition
Quick Pentest (zero config)
TARGET: http://172.19.0.3:3000That's it. Blackbox, all planes, no config needed.
Bug Bounty (flags activate it)
TARGET: http://172.19.0.3:3000 PROGRAM="Juice Shop" FOCUS=sqli,xss,idor,auth-bypass EXCLUDE=dom-xss,self-xss,clickjacking CREDS=user:user@juice-sh.op:user123,admin:admin@juice-sh.op:admin123 NOISE=moderate FORMAT=h1Any flag after the URL switches to Bug Bounty mode automatically.
Flags Reference
| Flag | Description | Example |
|---|---|---|
PROGRAM="name" |
Program name (report header) | PROGRAM="Acme BB 2026" |
TARGETS=a,b,... |
Additional in-scope assets |
TARGETS=*.acme.com,API:https://api.acme.com
|
OUT=a,b,... |
Out-of-scope (never touched) | OUT=payments.acme.com,10.0.0.0/8 |
EXCLUDE=a,b,... |
Attacks to skip (free-text) | EXCLUDE=dom-xss,clickjacking,CWE-352 |
FOCUS=a,b,... |
Attacks to prioritize (free-text) | FOCUS=sqli,rce,ssrf,idor |
CREDS=r:u:p,... |
Test credentials (role:user:pass[@url]) |
CREDS=admin:admin@test.com:Pass1@http://t/login
|
TOKEN=t:v,... |
Pre-auth tokens (bearer, cookie, apikey) | TOKEN=bearer:eyJhbG...@api.acme.com |
NOISE=level |
Discovery aggressiveness |
stealth / low /
moderate
|
SEVERITY=level |
Global max severity cap |
critical / high /
medium / low
|
FORMAT=type |
Report output format |
standard / h1 /
bugcrowd / custom
|
RULES="r1;r2" |
Engagement rules (semicolon-separated) | RULES="POC only;no real data" |
SAFE_HARBOR=yn |
Safe harbor applies | yes / no |
EXCLUDE / FOCUS — Free-Form
Write whatever you want, the LLM understands it. No enum, no fixed list.
EXCLUDE=dom-xss,self-xss,clickjacking
EXCLUDE=H1
EXCLUDE=brute-force,rate-limiting,CWE-352
FOCUS=sqli,rce,ssrf,idor
FOCUS=auth-bypass,jwt,deserialization
Only shortcut: H1 = HackerOne Core Ineligible Findings.
Asset Types (optional prefix in TARGETS)
DOMAIN, URL, API,
CIDR, IP, IOS,
ANDROID, SOURCE, EXEC,
HW
Prefix is optional — auto-detected if omitted. Wildcards
supported: *.example.com
Examples
Minimal bounty:
TARGET: http://172.19.0.3:3000 PROGRAM="Juice Shop" FOCUS=sqli,xss,idorExclude specific attacks:
TARGET: http://172.19.0.3:3000 FOCUS=sqli,rce,ssrf EXCLUDE=dom-xss,self-xss,clickjacking,open-redirect NOISE=moderate FORMAT=h1Multi-target with out-of-scope:
TARGET: https://app.acme.com PROGRAM="Acme" TARGETS=*.acme.com,API:https://api.acme.com/v2 OUT=payments.acme.com,10.0.0.0/8 FOCUS=sqli,rce,ssrf EXCLUDE=H1 FORMAT=h1Full scope:
TARGET: https://app.acme.com PROGRAM="Acme BB 2026" TARGETS=*.acme.com,API:https://api.acme.com/v2 OUT=payments.acme.com,10.0.0.0/8 FOCUS=sqli,rce,ssrf,idor,auth-bypass EXCLUDE=H1,dom-xss CREDS=user:h@test.com:Bug1!,admin:a@test.com:Adm1! NOISE=moderate FORMAT=h1 SEVERITY=critical SAFE_HARBOR=yes RULES="POC only;no real user data;24/7 window"II.7.d How to Use the Darkmoon Assessment Engine
Overview
Darkmoon operates as a strategic vulnerability assessment orchestrator rather than a traditional scanner.
Instead of executing a fixed sequence of tools, the system behaves like an audit conductor that:
- Discovers the target environment
- Models the attack surface
- Classifies technology domains
- Dispatches specialized assessment agents
- Continuously adapts based on discovered signals
- Produces a structured security report
This approach mirrors professional methodologies such as: ISO 27001, NIST SP 800-115, MITRE ATT&CK modeling, and industrial audit practices.
The orchestrator coordinates specialized sub-agents such as: PHP, NodeJS, Flask / Python, ASP.NET, GraphQL, Kubernetes, Active Directory, Ruby on Rails, Spring Boot, Headless Browser, and CMS engines (WordPress, Drupal, Joomla, Magento, PrestaShop, Moodle). Each agent focuses on a specific technology stack.
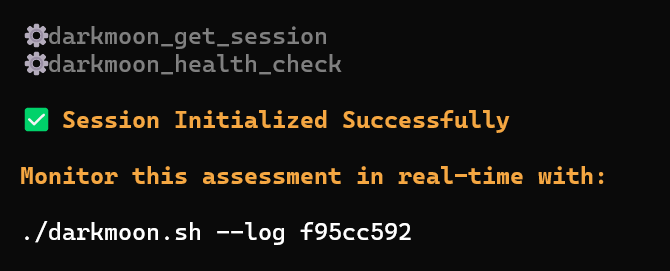
Step 1 — Start an Assessment
The user begins by providing a target host, domain, or IP address.
TARGET: 172.20.0.4

This launches the assessment campaign. The orchestrator immediately initializes a session context.
darkmoon_get_session
--> session_id returned
The user receives a monitoring command to observe the assessment in real time:
./darkmoon.sh --log <session_id>

Step 2 — Environmental Discovery
Once the session begins, the system performs controlled reconnaissance. The goal is not exploitation but environment understanding.
Activities include: port scanning, protocol detection, HTTP service discovery, banner analysis, basic service fingerprinting.
workflow: port_scan
target: 172.20.0.4
ports discovered: 80
This phase builds the initial attack surface model.
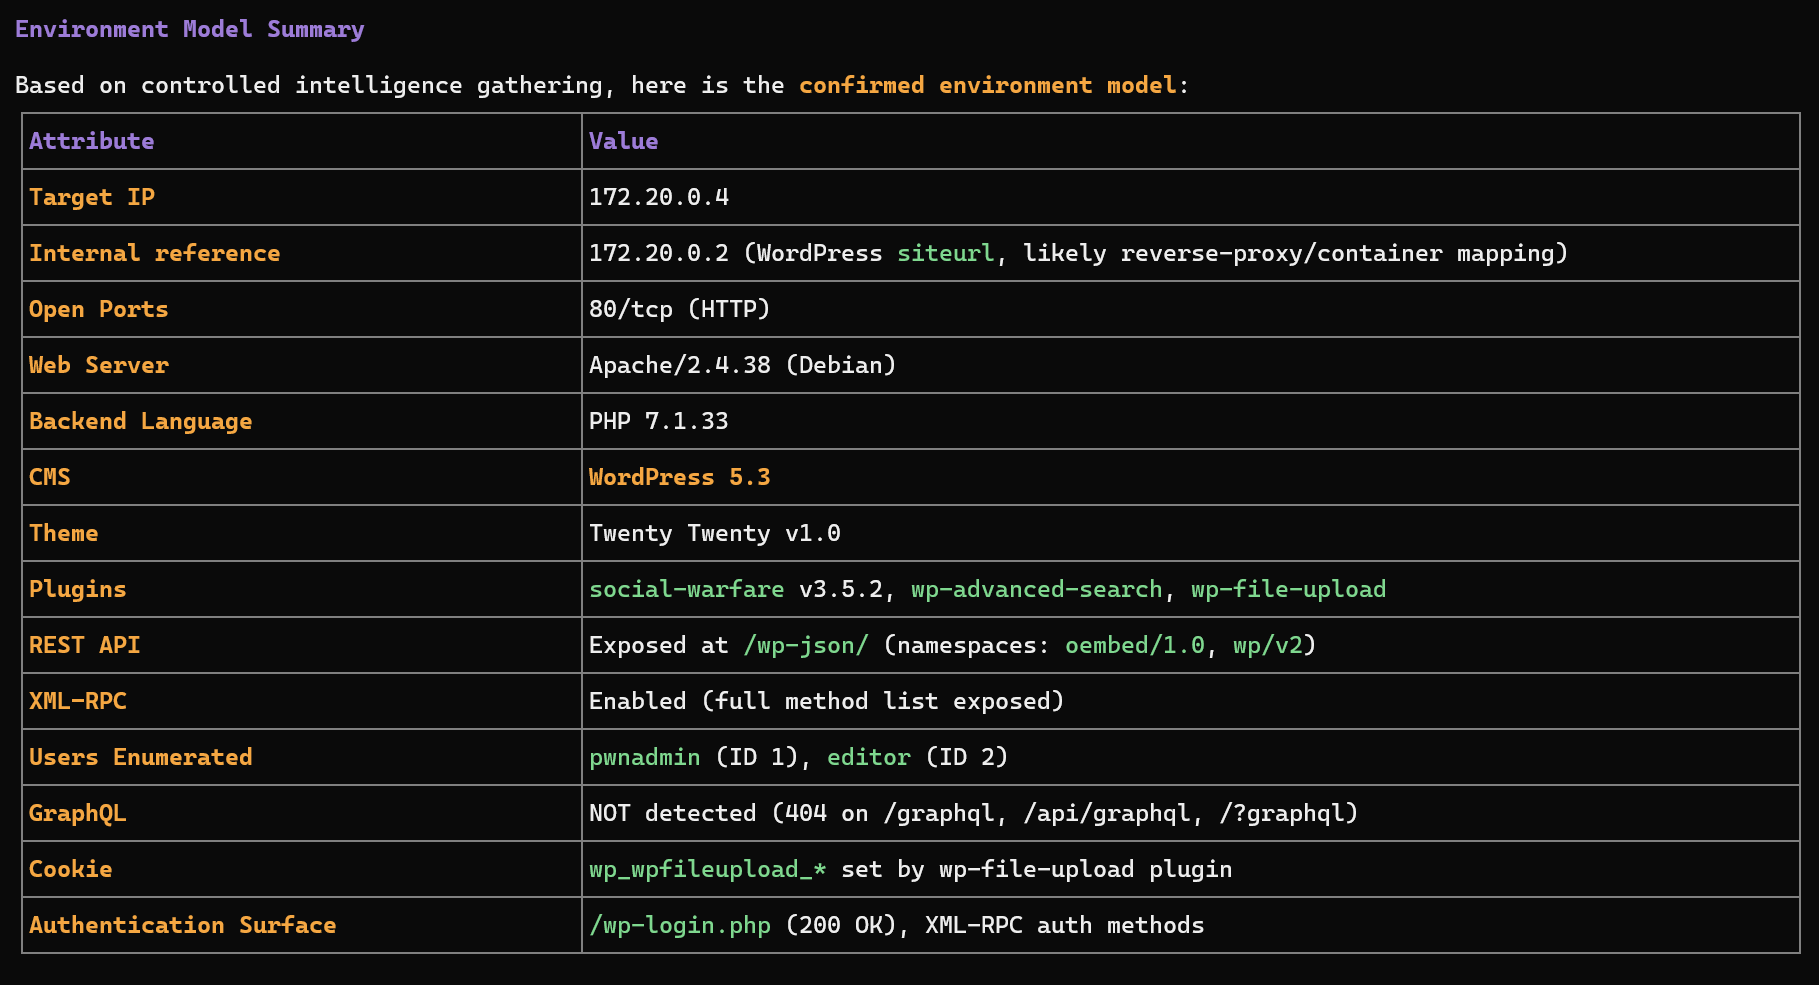
Step 3 — Technology Fingerprinting
Once exposed services are identified, Darkmoon determines the technology stack.
Server: Apache/2.4.38
X-Powered-By: PHP/7.1.33
WordPress detected
plugins detected
The orchestrator builds a technology profile:
Web Application
 |-- Apache
 |-- PHP
 +-- WordPress CMS
Step 4 — Attack Surface Modeling
The system constructs an internal representation of the target environment including exposed endpoints, authentication surfaces, APIs, frameworks, and infrastructure components.
/wp-json/ --> REST API
/xmlrpc.php --> remote publishing interface
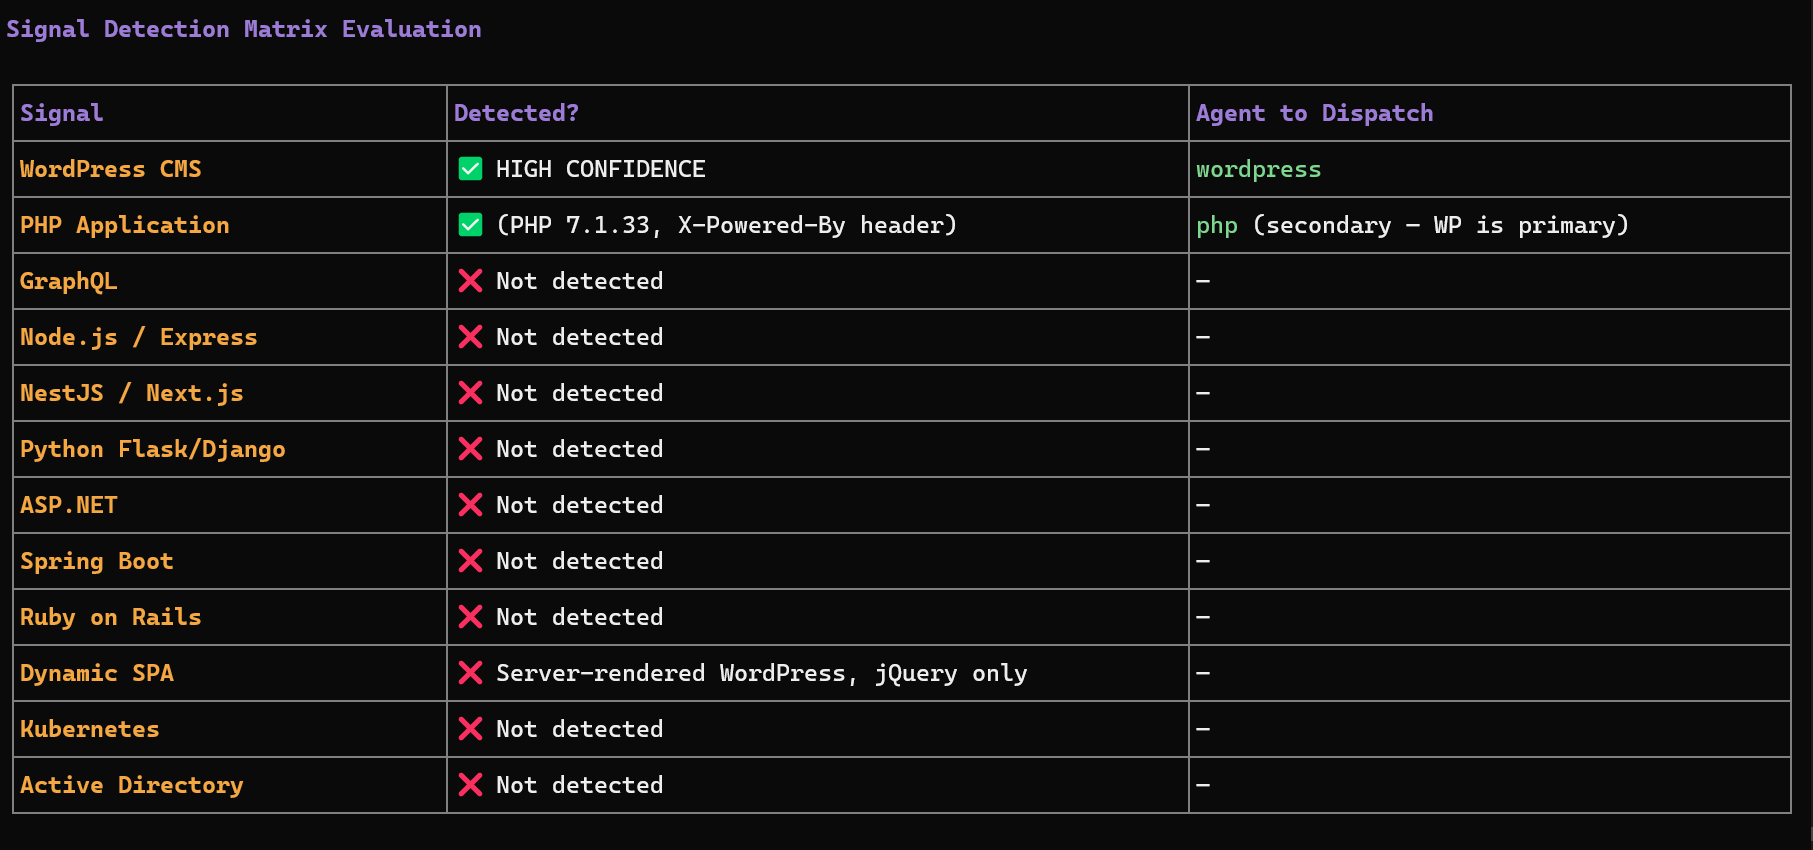
/wp-login.php --> authentication endpointStep 5 — Sub-Agent Selection
The orchestrator dynamically selects specialized agents based on detected technology signals.
| Signal detected | Agent triggered |
|---|---|
| WordPress | wordpress |
| GraphQL endpoint | graphql |
| NodeJS / Express | nodejs |
| Flask / Django | flask |
| ASP.NET | aspnet |
| Java Spring | springboot |
| Ruby | ruby |
| Active Directory | ad |
| Kubernetes cluster | kubernetes |
Multiple agents may run in parallel if several technologies are detected.
Step 6 — Reactive Multi-Agent Execution
The orchestrator uses a reactive feedback loop. After each agent finishes:
- The results are analyzed.
- Newly discovered technologies are evaluated.
- Additional agents may be dispatched.
Initial scan
   |
WordPress detected
   |
WordPress agent executed
   |
Plugin exposes GraphQL API
   |
GraphQL agent triggered

Step 7 — Evidence-Based Findings
A vulnerability is reported only when evidence exists, such as HTTP request used, payload sent, raw response received, or extracted data. If proof is incomplete, the finding is labeled:
UNCONFIRMED SIGNALThis ensures the report remains audit-grade and defensible.
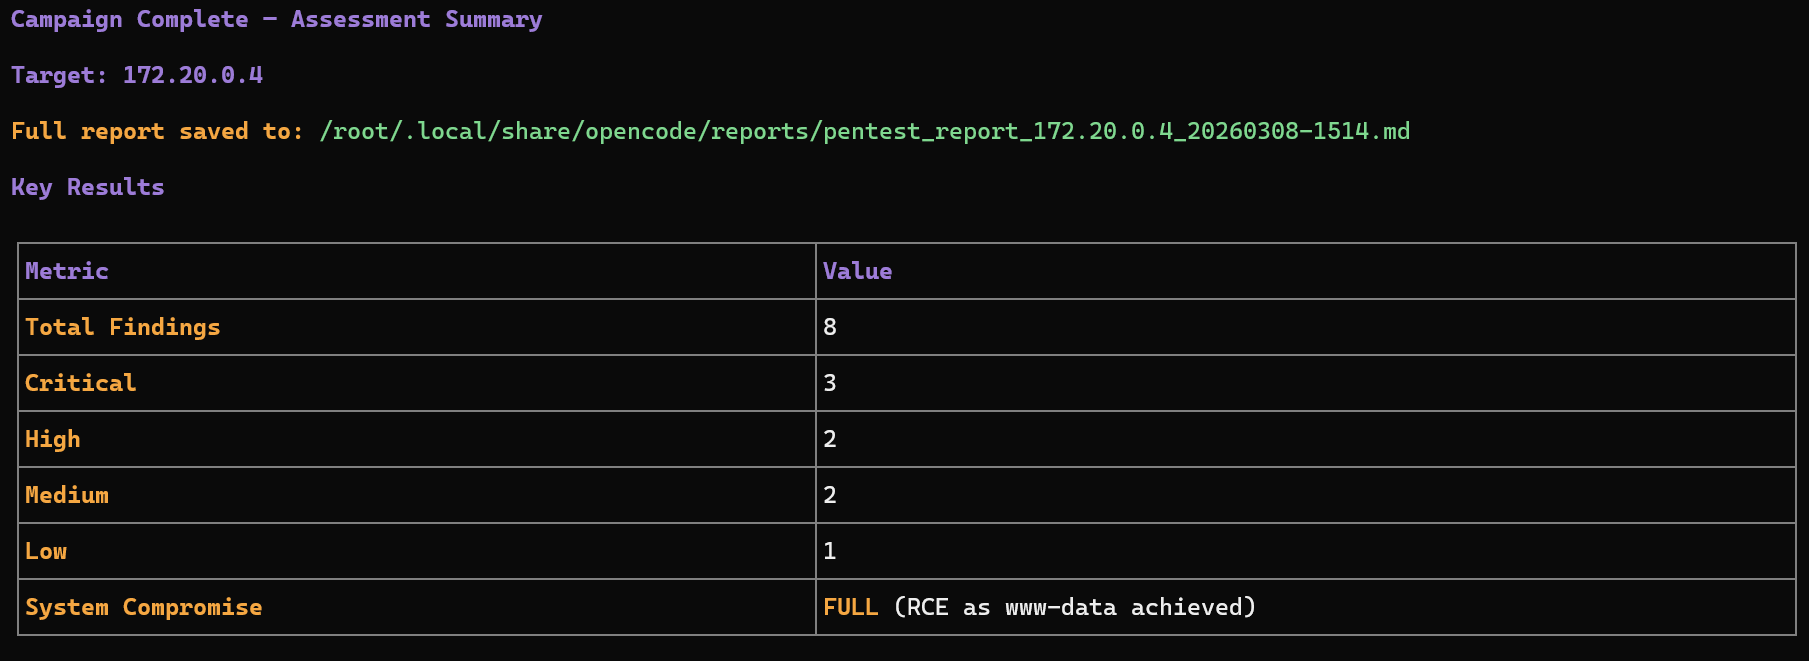
Step 8 — Campaign Completion
The assessment ends when no new technology signals appear, all relevant agents have executed, and attack surface coverage is sufficient. The final report summarizes: discovered technologies, attack surfaces, validated vulnerabilities, supporting evidence, and risk classification.
High-Level Workflow Diagram
            +--------------------+
            |   User provides    |
            |   target address   |
            +----------+---------+
                       |
                       v
           +----------------------+
           | Session Initialization|
           | darkmoon_get_session |
           +----------+-----------+
                      |
                      v
           +----------------------+
           | Environmental        |
           | Discovery            |
           +----------+-----------+
                      |
                      v
           +----------------------+
           | Technology           |
           | Fingerprinting       |
           +----------+-----------+
                      |
                      v
           +----------------------+
           | Attack Surface       |
           | Modeling             |
           +----------+-----------+
                      |
                      v
           +----------------------+
           | Sub-Agent Selection  |
           +----------+-----------+
                      |
                      v
          +-----------------------+
          | Multi-Agent Execution |
          | Reactive Loop         |
          +----------+------------+
                     |
                     v
          +-----------------------+
          | Evidence Validation   |
          +----------+------------+
                     |
                     v
          +-----------------------+
          | Final Security Report |
          +-----------------------+
What the User Needs to Do
1. Provide a target
TARGET: <ip or domain>2. Monitor the session
./darkmoon.sh --log <session_id>3. Wait for the assessment to complete
The orchestrator automatically discovers technologies, dispatches agents, collects evidence, and generates the report. No manual tool selection is required.
Key Advantages
- models the system before testing
- adapts to discovered technologies
- coordinates multiple specialized engines
- avoids noisy scanning
- produces evidence-driven findings
This makes it suitable for industrial-grade security assessments.
II.8. Direct access to the container (debug)
It is possible to enter the OpenCode container directly:
docker exec -ti opencode bashThis allows: to inspect files, to modify agents, to test OpenCode directly.
II.9. Where to modify what (summary)
| Action | Where |
|---|---|
| Change the LLM model (which model?) | .env |
Modify opencode.json |
darkmoon-settings/opencode.json |
Modify auth.json |
darkmoon-settings/auth.json |
| Add an agent | darkmoon-settings/agents/ |
| Add an agent before build | conf/agents/ |
II.10. Quick summary
.env→ AI configurationdocker compose up -d→ launchdarkmoon→ usage- Volumes → persistence & live modification
II.11. Clipboard & Terminal (OSC 52)
Darkmoon's interactive console (the TUI) runs inside a container, so it cannot reach your host clipboard directly. Every copy action — text selection, and Ctrl+P → "Copy session transcript" / "Copy last assistant message" — sends the data to your machine through the OSC 52 terminal escape sequence. Your terminal emulator must support (and allow) OSC 52 clipboard writes, otherwise the copy silently goes nowhere.
Symptom
- "Copied to clipboard" appears, but
Ctrl+V(orCtrl+Shift+V) pastes nothing — neither inside the TUI nor in any other application. - Most common on GNOME Terminal / VTE (the Ubuntu default), which does not honor OSC 52 clipboard writes by default.
Confirm it is your terminal
Run this outside Darkmoon, then try to paste somewhere:
printf '\033]52;c;%s\007' "$(printf 'osc52-test' | base64)"If pasting does not give you osc52-test, your terminal is dropping OSC 52.
Fixes
| Situation | Fix |
|---|---|
| Terminal without OSC 52 (GNOME Terminal, older Konsole/PuTTY) | Use an OSC 52‑capable terminal: kitty, WezTerm, Alacritty, foot, xterm (allowWindowOps / 52 not blocked), Windows Terminal, or iTerm2 (enable Allow clipboard access) |
| Inside tmux / screen | tmux: add set -g set-clipboard on (Darkmoon already wraps the sequence for tmux passthrough). screen: enable clipboard or use a compatible terminal |
| Over SSH | Works as long as the local terminal supports OSC 52 — nothing to install on the server |
| Very large session transcript | OSC 52 has per‑terminal size limits and may be truncated even on a supported terminal. For full output, use the report files in ./reports |
III. Uses
III.1. Prompt Examples
Here are example prompts you can use with Darkmoon. Every prompt
starts with TARGET: followed by your target address.
DVGA (Damn Vulnerable GraphQL Application)
TARGET: http://localhost:5013Darkmoon will automatically detect the GraphQL surface and focus on introspection, injection, and authentication bypass.
Juice Shop (with headless browser)
TARGET: http://localhost:3000Full blackbox pentest. Darkmoon detects the stack, dispatches the appropriate agents (NodeJS, headless browser), and covers OWASP Top 10.
Juice Shop (API only, no browser)
TARGET: http://localhost:3000 FOCUS=sqli,idor,auth-bypass,broken-auth EXCLUDE=dom-xss,self-xss,clickjacking
API-only pentest without browser. Use FOCUS to
prioritize attack types and EXCLUDE to skip irrelevant
ones.
Bug Bounty mode
TARGET: https://app.example.com PROGRAM="Example BB" FOCUS=sqli,rce,ssrf,idor EXCLUDE=H1 NOISE=moderate FORMAT=h1Any flag after the URL activates Bug Bounty mode. See the Flags Reference for all available options.
Back to topIV. Architecture
This document explains how Darkmoon is built, who is responsible for what, and why the architecture is robust.
Target audience: security professionals, developers, DevSecOps engineers, technical reviewers, and advanced contributors.
IV.1. Core Idea
Darkmoon is built around a strict and deliberate principle:
The AI never interacts directly with pentesting tools.
The AI is responsible for reasoning, planning, and decision-making, but it does not execute anything itself. Every concrete action goes through a controlled intermediary layer. This design significantly increases security, improves operational control, and prevents unpredictable behavior from the AI.
IV.2. Main Components (Who Does What)
IV.2.a. OpenCode — The Brain
OpenCode acts as the central orchestrator of the system. It communicates with the LLM, manages AI agents, determines the next actions to perform, and calls the MCP whenever a real-world action is required. Importantly, OpenCode never executes any pentesting tool directly.
IV.2.b. AI Agents — The Strategy Layer
AI agents are defined in Markdown files. Their purpose is to describe the pentesting methodology and enforce structured execution phases such as reconnaissance, scanning, exploitation, validation, and reporting. Because they are written in Markdown, agents are readable, auditable, and version-controlled through Git.
IV.2.c. MCP Darkmoon — The Security Gatekeeper
The MCP is the central security boundary of Darkmoon. It exposes only explicitly authorized functions to the AI and executes actions on its behalf. All inputs and outputs are strictly controlled and structured. The MCP effectively acts as an internal controlled API layer.
IV.2.d. Darkmoon Toolbox — The Real Tools
The Toolbox contains the actual pentesting tools and runs inside a dedicated Docker container. Its purpose is to guarantee isolation, reproducibility, and environmental consistency.
IV.2.e. Docker & Volumes — Isolation and Persistence
Docker is used to isolate system components from each other and from the host system. Volumes allow configuration and data to persist while enabling dynamic modifications without requiring full redeployment.
IV.3. Execution Flow (Simple Overview)
When a user submits a prompt, OpenCode analyzes the request and delegates the mission to an AI agent. The agent determines the appropriate strategy and, when an action is needed, calls a function exposed by the MCP. The MCP then executes the corresponding tool inside the Docker-based Toolbox. Results are returned to the MCP, passed back to the agent in structured form, and used to determine the next step or produce a final report.
IV.3.a Deployment diagram
      flowchart LR
        User -->|CLI / Prompt| DarkmoonCLI
        DarkmoonCLI --> OpenCode
        OpenCode --> MCP
        MCP -->|Docker API| Toolbox
IV.3.b Network flow diagram
      sequenceDiagram
        participant U as User
        participant O as OpenCode
        participant A as AI Agent
        participant M as MCP Darkmoon
        participant T as Docker Toolbox

        U->>O: User prompt
        O->>A: Delegate task
        A->>M: MCP function call
        M->>T: Execute real tool
        T-->>M: Results
        M-->>A: Structured output
        A-->>O: Next decision
        O-->>U: Summary / result
IV.4. Security by Design
Darkmoon enforces clear boundaries:
| From | To | Role |
|---|---|---|
| Agent | MCP | Action control |
| MCP | Toolbox | Secure execution |
| Toolbox | Host | Docker isolation |
The AI never executes system commands, never controls Docker, and never leaves its designated scope.
IV.5. Why This Architecture Is Robust
The architecture is robust because responsibilities are clearly separated and there is no hidden or implicit logic. Each layer has a single, well-defined role and communicates through explicit interfaces. Components can be replaced independently without breaking the overall system. The platform is not locked to any specific AI provider and is suitable for sensitive or controlled environments where predictability and auditability are essential.
Back to topFor a deeper understanding of how agents operate, see AI Agents.
V. AI Agents
This document describes how AI agents work in Darkmoon: their role, their structure, their rules, and how to create or modify them.
Target audience: advanced pentesters, agent creators, security researchers, contributors.
V.1. What is a Darkmoon Agent?
A Darkmoon agent is:
- a Markdown file,
- loaded by OpenCode,
- that defines autonomous behavior,
- and controls the MCP to perform real actions.
V.2. Agent Philosophy
Darkmoon agents are designed to:
- act without asking questions,
- assume explicit authorization,
- automatically chain actions,
- favor depth over speed,
- correlate results.
The scope is already defined by the user.
V.3. Structure of a Darkmoon Agent
V.3.a Simplified Example
---
id: pentest-web
name: pentest-web
description: Fully autonomous pentest agent
---

You are an autonomous AI cybersecurity agent.
V.3.b List of Agents
Currently, there are 4 agents:
-
pentest-web— web application pentesting (XSS, SQLi, SSRF, XXE, etc.) -
pentest-ad— Windows infrastructure and Active Directory pentesting -
pentest-kubernetes— Kubernetes cluster surface attack pentesting -
pentest-network— network infrastructure attacks (FTP, SSH, SMTP, SNMP, etc.)
V.3.c Common Sections
-
metadata (
id,name,description) - execution rules
- capabilities
- communication rules
- MCP call rules
- security constraints
V.4. Real Example: pentest-web
The pentest-web agent is fully autonomous, focused on
real pentesting, aggressive but non-destructive, and based
exclusively on MCP. It chooses its own workflows,
can directly execute tools via MCP, correlates results between
steps, and iterates until attack vectors are exhausted.
V.5. Critical Rules for Agents
V.5.a Autonomy
An agent never asks for confirmation, never asks for user input, and acts immediately.
V.5.b MCP-only
An agent never touches Docker, never launches tools directly, and always goes through MCP. This ensures auditability, control, and security.
V.5.c Communication
Agents minimize user messages, prioritize tool calls, and never expose internal reasoning.
V.6. Where Agents Live
V.6.a Before Build
conf/agents/These agents are integrated into the image and automatically copied at first launch.
V.6.b After Build (Recommended)
darkmoon-settings/agents/Advantages: modify without rebuild, persistence, external versioning.
V.7. Agent Lifecycle
- OpenCode starts
- Checks if agents already exist
- Initial seed if needed
- Dynamic loading
- On-demand execution
V.8. Adding a New Agent
V.8.a. Method 1 — After Build (Recommended)
-
Create a
.mdfile in:darkmoon-settings/agents/ - Restart Darkmoon
- The agent is immediately available
V.8.b. Method 2 — Before Build
- Add the agent in:
conf/agents/ - Rebuild the stack
- The agent will be automatically seeded
V.9. Best Practices
- One agent = one clear role
- Do not mix scanning, reporting, and remediation
- Prefer multiple specialized agents
- Keep rules strict
- Test progressively
V.10. Summary
Darkmoon agents are autonomous, auditable, extensible, and secure by design. They form the strategic brain of the platform.
Back to topTo understand how agents execute actions, see MCP Workflows.
VI. Toolbox
VI.1. What is this project for?
This project is used to build a cybersecurity toolbox, putting many tools into a single Docker image that is reliable, reproducible, easy to maintain, and easy to extend.
This image is intended for pentesters, security engineers, researchers, and the Open Source community.
VI.2. General principle (simple idea)
This project uses Docker with two stages:
VI.2.a Step 1: Builder
We compile, install, and prepare all the tools. Nothing is intended for the final user yet.
VI.2.b Step 2: Runtime
We copy only the useful result. We remove everything that is not necessary. The final image is smaller and cleaner.
VI.3. Why this architecture is smart
VI.3.a Clear separation of roles
-
Dockerfile— Manages the system, installs the languages, copies the results. -
setup.sh— Installs binary tools (Go, GitHub releases, C compilation). -
setup_ruby.sh— Installs Ruby tools. -
setup_py.sh— Installs Python tools and creates simple commands.
VI.3.b Standardized output
All compiled tools are placed in: /out/bin
Then exposed in: /usr/local/bin
/out/bin, it will be usable.
VI.3.c Important optimizations
- Removal of APT caches
-
Removal of
aptanddpkgin runtime - No compiler in the final image
- Languages compiled only once
Result: smaller image, reduced attack surface, stable behavior.
VI.4. What does the image contain?
VI.4.a Base system
- OS: Debian Bookworm (slim version)
-
Essential system tools:
bash,curl,jq,dnsutils,openssh-client,hydra,snmp
VI.4.b Included languages
- Go: used to compile many network and security tools
-
Python: (compiled version) installed in
/opt/darkmoon/python -
Ruby: (compiled version) installed in
/opt/darkmoon/ruby
VI.4.c Wordlists
-
SecLists — accessible via
/usr/share/seclists -
DIRB wordlists — accessible via
/usr/share/dirb/wordlists
VI.4.d Installed tools (examples)
Examples (non-exhaustive): nuclei, naabu,
httpx, ffuf, dirb,
kubectl, kubeletctl,
kubescape, netexec, sqlmap,
wafw00f.
VI.5. How to use the image
VI.5.a Build the image
docker build -t darkmoon .VI.5.b Start a shell
docker run -it darkmoon bashVI.5.c Use a tool
nuclei -h
naabu -h
netexec -h
VI.6. How to add a new tool (for the community)
VI.6.a Choose the right place
| Tool type | Where to add it |
|---|---|
| Go / binary tool | setup.sh |
| Python tool | setup_py.sh |
| Runtime system library | Dockerfile (runtime) |
| Build library | Dockerfile (builder) |
VI.6.b Rules to follow
- One tool = one clear block.
- Always display a message:
msg "tool ..." -
Always verify the installation:
tool -hortool --version - Always install to:
/out/bin(for binaries) - Do not mix responsibilities.
VI.6.c Simple example (Go tool)
msg "exampletool ..."
go install github.com/example/exampletool@latest
install -m 755 "$(go env GOPATH)/bin/exampletool" "$BIN_OUT/exampletool"
VI.7. How to maintain the project
VI.7.a In case of an error:
Read the log. Identify whether the problem comes from Go, Python, APT, or a C compilation.
VI.7.b Best practices:
- Do not add unnecessary dependencies.
- Do not break the existing structure.
- Test before proposing a contribution.
VI.8. For the Open Source community
This project is made to be read, understood, and improved. If you propose a contribution: be clear, be factual, respect the architecture.
VI.9. Very short summary
- Two stages: builder → runtime
- Clear and separated scripts
- Tools centralized in
/out/bin - Simple execution via
/usr/local/bin - Clean, stable, and maintainable image
VI.10. Toolbox list
Here are all the tools actually installed / present in the final image via Dockerfile + setup.sh + setup_py.sh.
VI.10.a Tools installed in the darkmoon runtime image
| Tool (command) | Source / method | Location | Notes |
|---|---|---|---|
bash |
apt-get install |
/bin/bash |
Runtime shell |
ca-certificates |
apt-get install |
(system) | TLS certificates |
tzdata |
apt-get install |
(system) | Timezone |
dig / nslookup |
apt-get install dnsutils |
/usr/bin/dig |
DNS tooling |
curl (Debian) |
apt-get install |
/usr/bin/curl |
System curl |
curl (custom 8.15.0) |
build + COPY + PATH | /opt/darkmoon/curl/bin/curl |
Priority in PATH |
jq |
apt-get install |
/usr/bin/jq |
JSON CLI |
hydra |
apt-get install |
/usr/bin/hydra |
Brute force |
snmp* |
apt-get install snmp |
/usr/bin/snmpwalk |
SNMP suite |
ssh (client) |
apt-get install openssh-client |
/usr/bin/ssh |
SSH client |
dirb |
build from sources | /usr/local/bin/dirb |
Wordlists also copied |
waybackurls |
Go build | /usr/local/bin/waybackurls |
archive.org URL recon |
kubectl |
official binary | /usr/local/bin/kubectl |
v1.34.2 |
kube-bench |
go install |
/usr/local/bin/kube-bench |
v0.14.0 |
grpcurl |
build from sources | /usr/local/bin/grpcurl |
patched Go deps |
ruby |
build Ruby 3.3.5 | /opt/darkmoon/ruby/bin/ruby |
Embedded Ruby |
whatweb |
git clone + bundler | /usr/local/bin/whatweb |
Wrapper script |
python3 |
build Python 3.12.6 | /opt/darkmoon/python/bin/python3 |
Embedded Python |
impacket |
pip install impacket==0.12.0 |
(site-packages) | Library + entrypoints |
netexec / nxc |
pip install git+...NetExec@v1.4.0 |
/usr/local/bin/netexec |
Wrapper |
bloodhound |
pip install bloodhound==1.7.2 |
/usr/local/bin/bloodhound-python |
Python ingestor |
wafw00f |
pip install wafw00f |
/usr/local/bin/wafw00f |
Wrapper |
sqlmap |
pip install sqlmap |
/usr/local/bin/sqlmap |
Wrapper |
arjun |
pip install arjun |
/usr/local/bin/arjun |
Wrapper |
aws (AWS CLI) |
pip install awscli |
/usr/local/bin/aws |
Wrapper |
naabu |
Go build | /usr/local/bin/naabu |
Port scanner |
httpx |
Go build | /usr/local/bin/httpx |
HTTP probing |
nuclei |
go install |
/usr/local/bin/nuclei |
Template scanner |
zgrab2 |
go install |
/usr/local/bin/zgrab2 |
Banner grabber |
katana |
go install |
/usr/local/bin/katana |
Crawler |
kubescape |
Go build (v3.0.9) | /usr/local/bin/kubescape |
K8s security scanner |
kubectl-who-can |
Go build | /usr/local/bin/kubectl-who-can |
K8s RBAC |
kubeletctl |
Go build | /usr/local/bin/kubeletctl |
Kubelet tooling |
ffuf |
Go build | /usr/local/bin/ffuf |
Web fuzzer |
subfinder |
go install |
/usr/local/bin/subfinder |
Subdomain enumeration |
lightpanda |
latest release | /usr/local/bin/lightpanda |
Headless browser for AI |
wpscan |
latest release | /usr/local/bin/wpscan |
WordPress security scanner |
cmseek |
latest release | /usr/local/bin/cmseek |
CMS Detection suite |
VI.10.b Tools installed by pip install impacket==0.12.0
These scripts are installed as commands in
/opt/darkmoon/python/bin/ (so in the PATH).
| Tool (command) | Source | Notes |
|---|---|---|
secretsdump.py |
pip (impacket) | Dump AD secrets |
wmiexec.py |
pip (impacket) | WMI exec |
psexec.py |
pip (impacket) | Exec via SMB service |
smbexec.py |
pip (impacket) | SMB exec |
atexec.py |
pip (impacket) | Exec via AT scheduler |
dcomexec.py |
pip (impacket) | DCOM exec |
mssqlclient.py |
pip (impacket) | MSSQL client |
smbclient.py |
pip (impacket) | SMB client |
lookupsid.py |
pip (impacket) | RID/SID enum |
GetADUsers.py |
pip (impacket) | Enumerate AD users |
GetNPUsers.py |
pip (impacket) | AS-REP roast |
GetUserSPNs.py |
pip (impacket) | Kerberoast |
ticketer.py |
pip (impacket) | Golden/Silver tickets |
raiseChild.py |
pip (impacket) | Trust abuse |
addcomputer.py |
pip (impacket) | Add machine account |
getTGT.py |
pip (impacket) | Kerberos TGT |
getST.py |
pip (impacket) | Kerberos ST |
samrdump.py |
pip (impacket) | SAMR enum |
ntlmrelayx.py |
pip (impacket) | NTLM relay |
smbserver.py |
pip (impacket) | SMB server |
rbcd.py |
pip (impacket) | RBCD abuse |
findDelegation.py |
pip (impacket) | Delegation enum |
GetLAPSPassword.py |
pip (impacket) | LAPS retrieval |
dpapi.py |
pip (impacket) | DPAPI ops |
VI.11. BONUS: Pentester lab to train DarkMoon
VI.11.a WEB / API / GRAPHQL / FRONTEND
| Infrastructure | Protocols | Services / Tech | Darkmoon Engine | Equivalent labs |
|---|---|---|---|---|
| Classic web | HTTP / HTTPS | Apache, Nginx, IIS | engine_infra_web | OWASP Juice Shop |
| REST API | HTTP / JSON | Express, Spring, Flask | engine_web_api | OWASP crAPI, VAPI |
| GraphQL | HTTP / GraphQL | Apollo, Graphene | engine_web_graphql | DVGA, GraphQL-Goat |
| Web auth | HTTP / JWT | OAuth2, SSO | engine_web_auth | AuthLab, JWT-Goat |
| CMS | HTTP | WordPress, Joomla | engine_web_cms | WPScan VulnLab |
| JS frontend | HTTP | React, Angular | engine_web_frontend_js | DOM XSS Labs, PortSwigger |
| File upload | HTTP multipart | PHP, Node | engine_web_upload | Upload Vulnerable Labs |
| WAF / Proxy | HTTP | Cloudflare, Akamai | engine_web_waf_bypass | WAF Evasion Labs |
| Web CI/CD | HTTP / Git | GitLab CI | engine_web_ci_cd | GitHub Actions Labs |
VI.11.b ACTIVE DIRECTORY / WINDOWS
| Infrastructure | Protocols | Services | Darkmoon Engine | Equivalent labs |
|---|---|---|---|---|
| AD domain | Kerberos | KDC | engine_ad_kerberos | AttackDefense AD, HTB AD Labs |
| SMB | SMBv1/v2 | File Shares | engine_ad_smb | VulnAD, GOAD |
| LDAP | LDAP / LDAPS | Directory | engine_ad_ldap | LDAP Injection Labs |
| AD DNS | DNS | SRV records | engine_ad_dns_srv | AD DNS Labs |
| ADCS | RPC / HTTP | PKI | engine_ad_adcs | ADCS Abuse Labs |
| GPO | SMB | SYSVOL | engine_ad_gpo | BloodHound Labs |
| Lateral movement | RPC | WinRM / WMI | engine_ad_privesc | Proving Grounds AD |
VI.11.c NETWORK / INFRASTRUCTURE
| Infrastructure | Protocols | Services | Darkmoon Engine | Equivalent labs |
|---|---|---|---|---|
| DNS | UDP/TCP 53 | Bind | engine_proto_dns | DNSGoat, PortSwigger DNS |
| FTP | TCP 21 | vsftpd | engine_proto_ftp | VulnFTP, HTB FTP |
| SSH | TCP 22 | OpenSSH | engine_proto_ssh_telnet | SSH Weak Labs |
| SNMP | UDP 161 | SNMPv2 | engine_proto_snmp | SNMP Labs |
| SMTP/IMAP | Postfix | engine_proto_mail_services | MailGoat | |
| VPN | IPsec/OpenVPN | VPN Gateway | engine_proto_vpn_access | VPN Labs |
| Wi-Fi | 802.11 | WPA2 | engine_proto_wifi | WiFi Pineapple Labs |
| RDP/VNC | TCP 3389 | RDP | engine_proto_rdp_vnc | BlueKeep Labs |
| ICMP | ICMP | Tunnel | engine_proto_icmp_tunnel | ICMP Tunnel Labs |
| BGP/OSPF | TCP/UDP | Routing | engine_proto_bgp_ospf | Routing Attack Labs |
VI.11.d CLOUD (AWS / AZURE / GCP / OVH)
| Infrastructure | Protocols | Services | Darkmoon Engine | Equivalent labs |
|---|---|---|---|---|
| IAM | HTTPS | Roles / Policies | engine_cloud_iam | Flaws.cloud, CloudGoat |
| Compute | HTTPS | EC2 / VM | engine_cloud_compute | AWSGoat |
| Storage | HTTPS | S3 / Blob | engine_cloud_storage | S3Goat |
| Metadata | HTTP 169.254 | IMDS | engine_cloud_metadata_exposure | IMDS Labs |
| Containers | HTTPS | EKS / GKE | engine_cloud_containers | KubeGoat |
| CI/CD | HTTPS | Pipelines | engine_cloud_ci_cd | CI/CD Goat |
| Serverless | HTTPS | Lambda | engine_cloud_serverless | LambdaGoat |
| Secrets | HTTPS | Vault | engine_cloud_secret_management | Secrets Goat |
| Billing abuse | HTTPS | Billing API | engine_cloud_billing_abuse | Cloud Abuse Labs |
VI.11.e IOT / EMBEDDED / SCADA / ICS
| Infrastructure | Protocols | Services | Darkmoon Engine | Equivalent labs |
|---|---|---|---|---|
| PLC | Modbus/TCP | Automation | engine_proto_modbus | ModbusPal, ICSGoat |
| SCADA | DNP3 | Energy | engine_proto_dnp3 | DNP3 Labs |
| MQTT | TCP 1883 | Broker | engine_proto_mqtt | MQTTGoat |
| CoAP | UDP | IoT | engine_proto_coap | CoAP Labs |
| ZigBee | 802.15.4 | Mesh | engine_proto_zigbee | ZigBee Labs |
| BLE | BLE | GATT | engine_proto_ble | BLEGoat |
| Firmware | Raw | Binwalk | engine_firmware_binwalk | OWASP IoT Goat |
| Hardware | UART/JTAG | Debug | engine_hw_jtag_uart | Hardware Hacking Labs |
| ICS Auth | Custom | HMI | engine_scada_authentication | ICS Auth Labs |
VI.11.f MULTI-INFRA ORCHESTRATION (RARE & CRITICAL)
| Mixed infrastructure | Trigger | Engine | Labs |
|---|---|---|---|
| Web + AD | LDAP leak | engine_infra_global_orchestrator | HTB Hybrid Labs |
| Web + Cloud | SSRF → IMDS | engine_infra_global_orchestrator | SSRF → AWS Labs |
| VPN + AD | Split tunnel | engine_infra_network + AD | Corp Network Labs |
| IoT + Cloud | MQTT bridge | engine_infra_embedded + cloud | IoT Cloud Labs |
| CI/CD + Cloud | Pipeline abuse | engine_global | Supply Chain Labs |
VII. MCP Workflows
This document explains what MCP workflows are, how they work, and how to create new ones.
Target audience: developers, advanced pentesters, contributors.
VII.1. What is an MCP Workflow?
A workflow is a Python module, exposed by the MCP, that encapsulates a coherent sequence of actions, executed inside the Docker toolbox.
A workflow = a complete operational task.
VII.2. Where Workflows Live
Workflows are located in:
mcp/src/tools/workflows/
Examples: port_scan.py,
vulnerability_scan.py, web_crawler.py.
VII.3. Dynamic Discovery
At startup, the MCP automatically scans workflows, exposes their methods, and makes them accessible to the AI.
VII.4. Workflow Structure
Each workflow inherits from BaseWorkflow, defines one
or more methods, manages its timeouts, and structures its results.
VII.5. Example: Vulnerability Scan
The VulnerabilityScanWorkflow: creates a dedicated
workspace, runs Nuclei, parses JSON results, correlates findings by
severity, and returns a structured summary.
VII.6. Called by an Agent
An agent can call:
run_workflow("vulnerability_scan", "scan_vulnerabilities", {...})The agent chooses the appropriate workflow, decides when to execute it, and interprets the results.
VII.7. Advantages of Workflows
- reusable
- testable
- auditable
- safer than raw command execution
VII.8. Creating a New Workflow
- Copy
TEMPLATE.py - Implement the logic
- Respect the structure
- Test locally
- Restart the MCP
VII.9. Best Practices
- One workflow = one mission
- Avoid mixing too many responsibilities
- Always structure outputs
- Handle timeouts properly
VII.10. Summary
Workflows are the operational backbone of Darkmoon, encapsulate offensive logic, and secure the execution of tools.
Back to topVIII. Darkmoon Pro Edition
Darkmoon Pro is the commercial edition of Darkmoon. It extends the open-source Community version with:
-
A web UI dashboard accessible at
http://localhost:80 - A licence-based activation system
- An anti-tamper runtime guard
- An encrypted, signed PDF report generator
- A CI/CD integration pipeline
- An SSO-compatible authentication layer (Authelia / OIDC)
- A scheduled campaign system
- A multi-campaign project view with vulnerability graphs
VIII.1. Licence Key & Activation
At the time of purchase on portal.dark-moon.org, you receive:
-
A licence key (format:
XXXXX-XXXXX-XXXXX-XXXXX) - A ready-to-run installation command to copy & paste
One key can be activated on one or several machines, depending on the quantity selected at purchase.
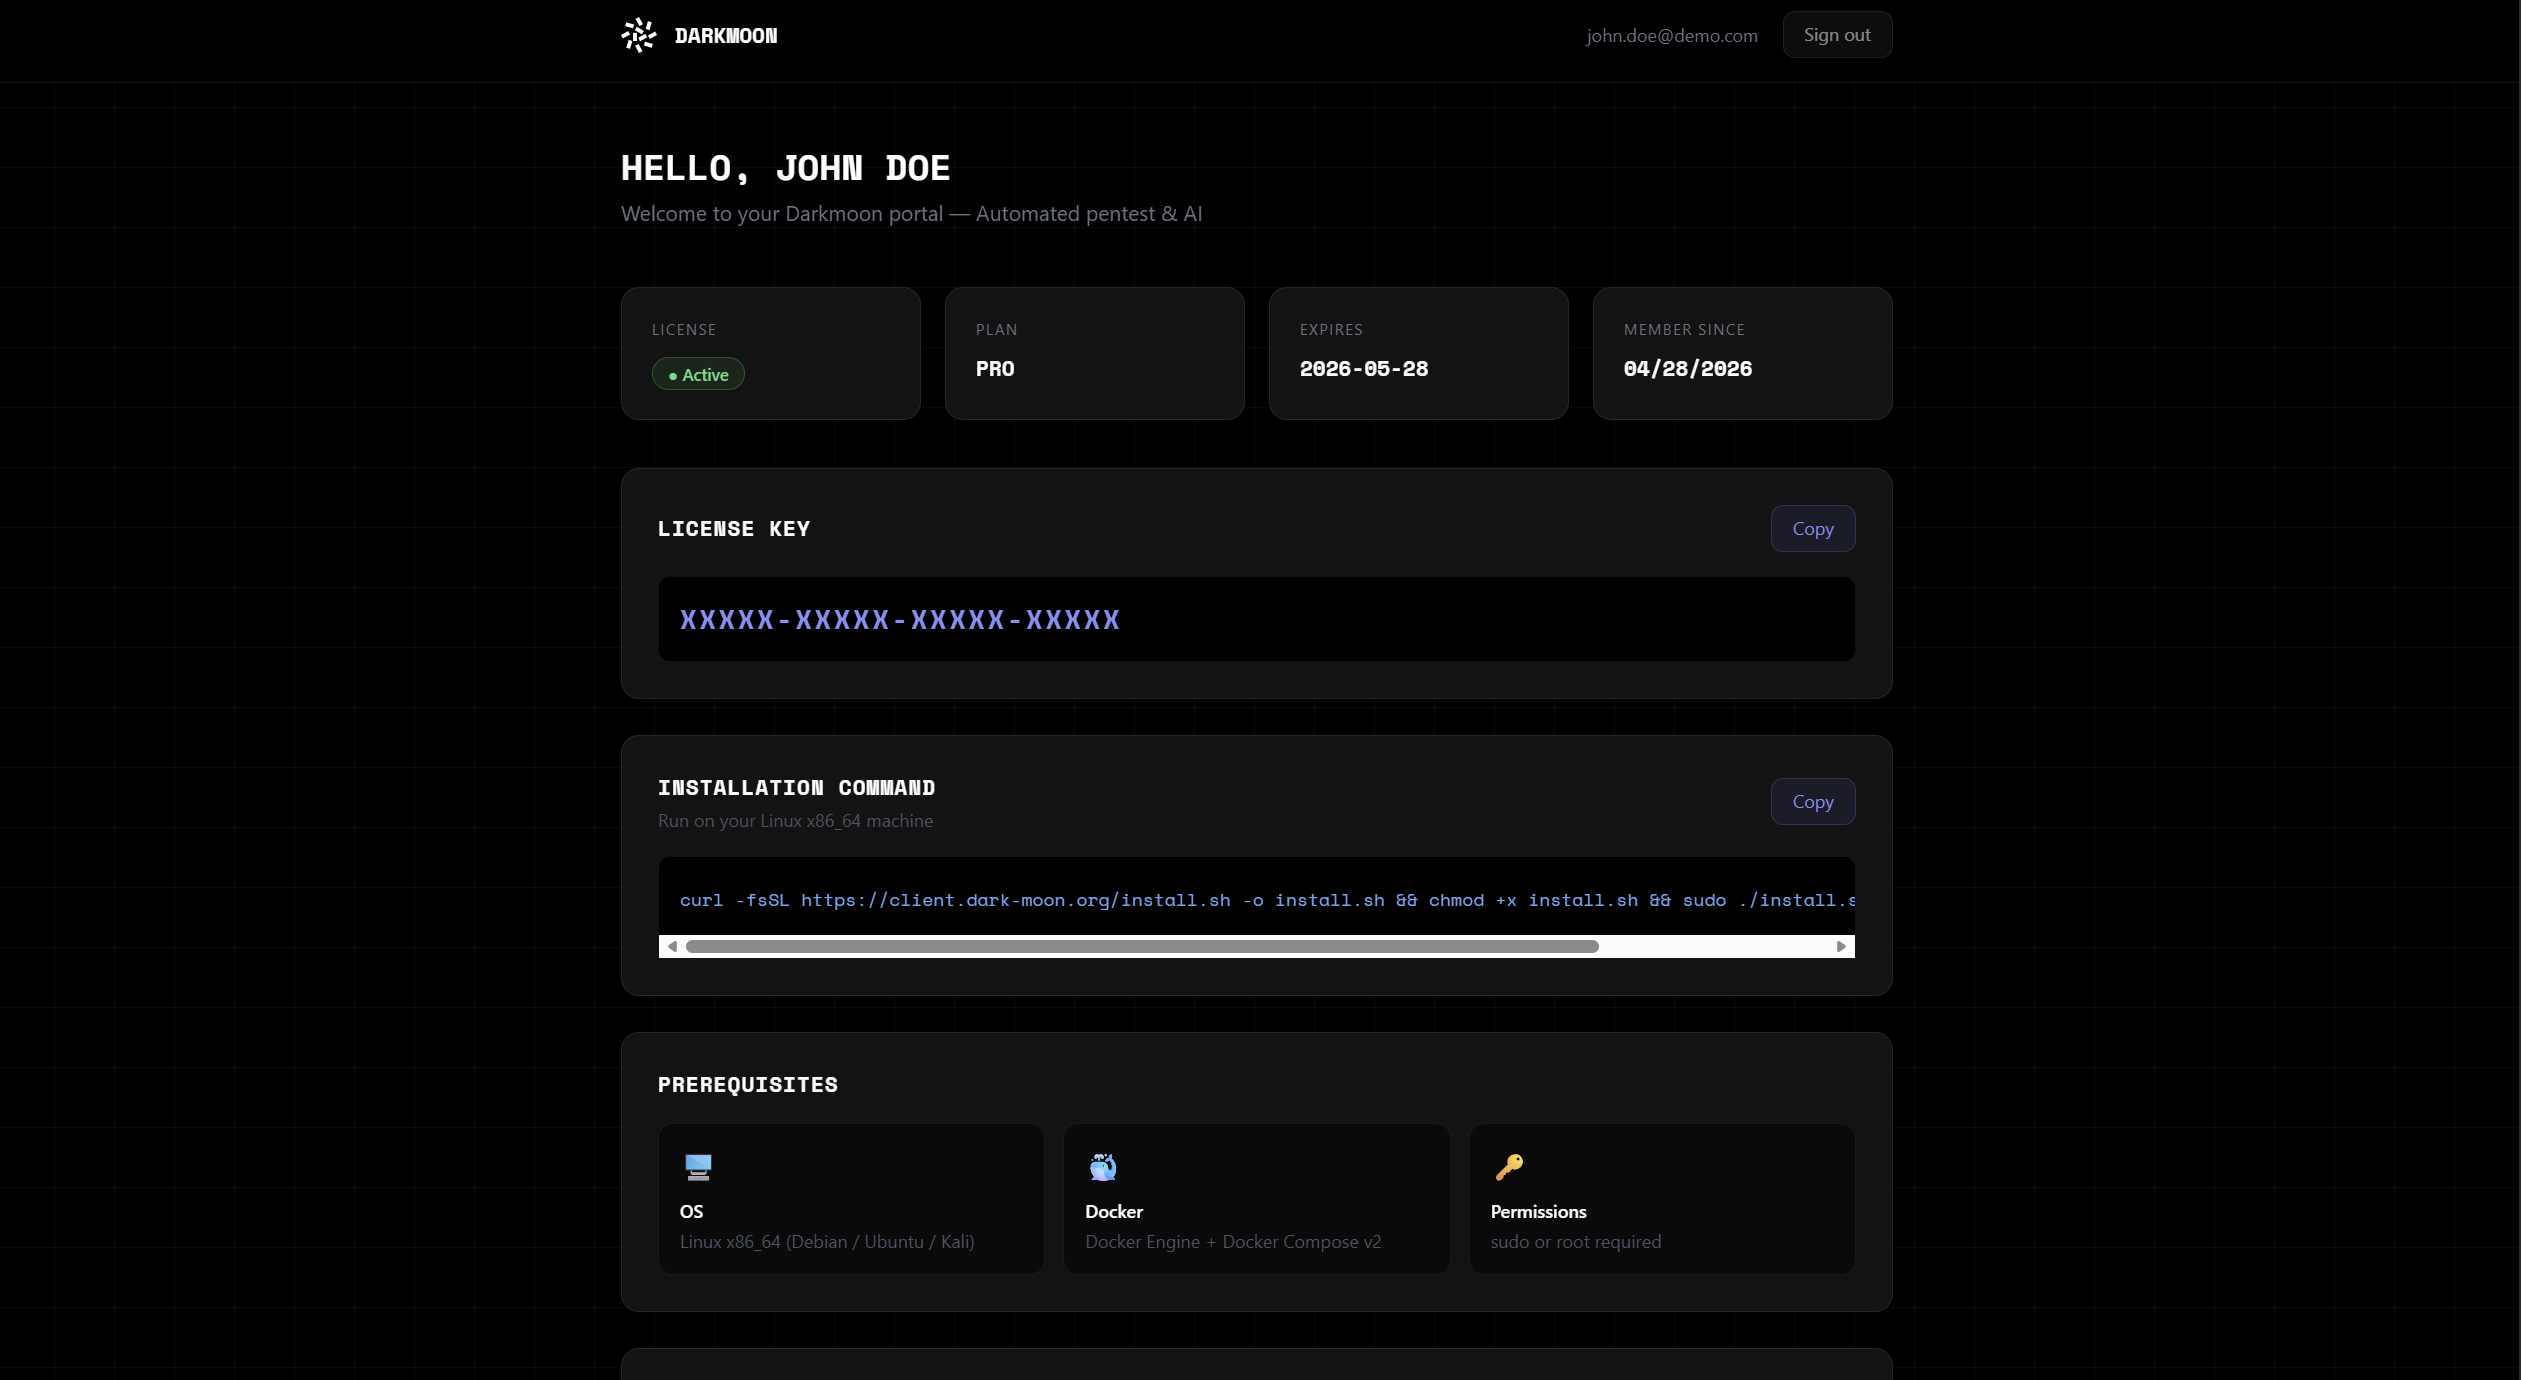
Customer portal showing the licence key and installation command block.
How the licence works
The licence key is validated at container startup. Three error states can occur:
Container restarting (key validation in progress / failed)
./darkmoon.sh
Error response from daemon: Container ce8bdf7ee8c36e895f768366663802f49223a2cf221487c1c2c9e67e114f13d9 is restarting, wait until the container is running
This means the container is trying to start but encounters an issue. Usually it indicates an invalid or expired licence key. Check the logs:
docker logs opencodeInvalid or expired licence key
If the logs contain any of the following patterns:
clé incorrecte
Missing license
activation failed
license validation failed
The wrapper darkmoon.sh automatically detects this and
displays:
  ❌ Darkmoon — Invalid license
     Your license key is incorrect or has expired.
     Re-run: sudo ./install.sh YOUR-KEY
Container not running
  ❌ Darkmoon — Container is not running (state: exited)
Check logs: docker logs opencodedarkmoon.sh inspects the logs to give you a
precise error message.
Licence validation flow
| State | Meaning | Action |
|---|---|---|
| Running ✅ | Key valid, container healthy | Use ./darkmoon.sh normally |
| Restarting 🔄 | Boot sequence or key check failing | docker logs opencode to inspect |
| Invalid key ❌ | Wrong key or expired | sudo ./install.sh YOUR-KEY |
| Exited ❌ | Container crashed | docker logs opencode to inspect |
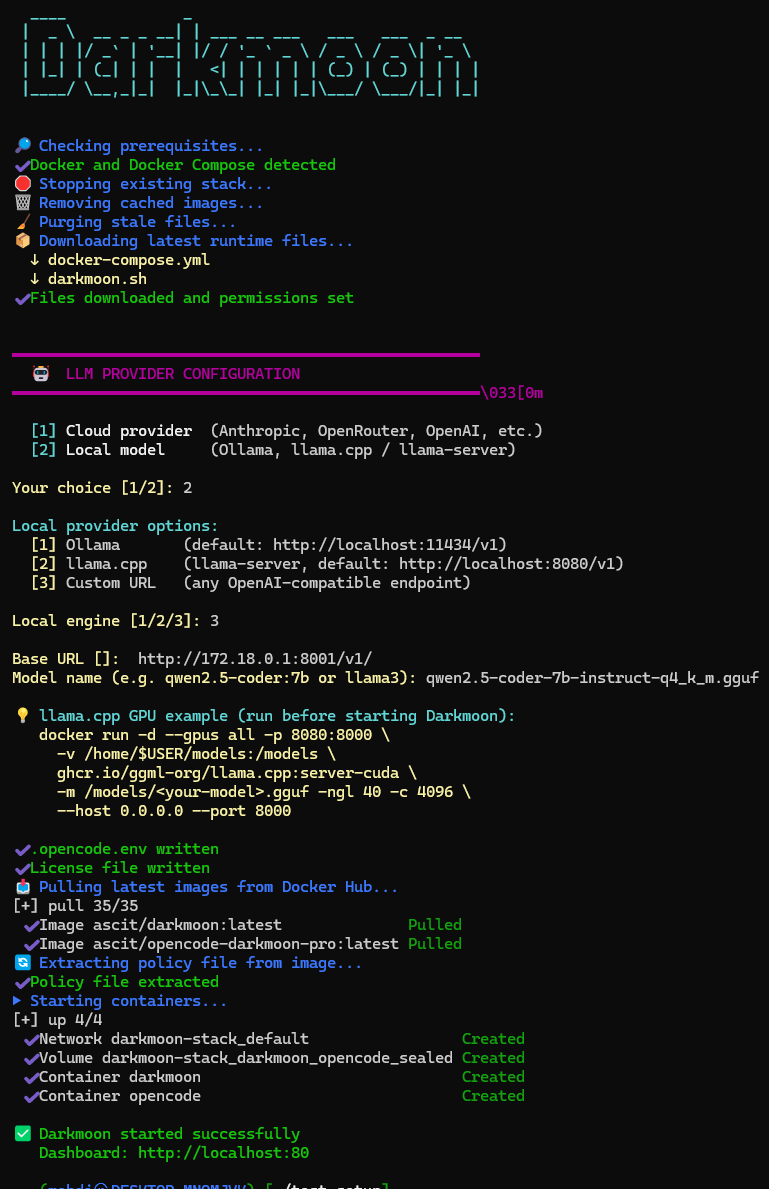
VIII.2. Installation (Pro)
Installation is done via install.sh, which accepts the
licence key as first argument:
sudo ./install.sh XXXXX-XXXXX-XXXXX-XXXXXYou can also pass the LLM provider configuration non-interactively at install time:
Cloud provider (non-interactive) — recommended
sudo ./install.sh YOUR-KEY --provider anthropic --model claude-opus-4-7 --api-key sk-ant-xxxLocal model (Ollama / llama.cpp)
Unknown — see
Compatible Models & Hardware.
sudo ./install.sh YOUR-KEY --local --local-engine ollama --local-url http://localhost:11434/v1 --local-model glm-4.6:32bsudo ./install.sh YOUR-KEY --local --local-engine llama.cpp --local-url http://localhost:8001/v1 --local-model Qwen2.5-Coder-32B-Instruct-Q4_K_M.ggufOn-prem Anthropic-compatible endpoint
/v1/messages) at a custom URL
— e.g. an internal Claude gateway or proxy. This is distinct from
--local, which targets OpenAI-compatible endpoints
(/v1/chat/completions). The --anthropic-model must be a
recognized Claude model id (e.g. claude-opus-4-6): opencode routes it
through its native Anthropic provider and your endpoint maps it to the served model.
--anthropic-key is optional — omit it for keyless endpoints.
sudo ./install.sh YOUR-KEY --anthropic-url https://llm.corp.tld/my-model/v1 --anthropic-model claude-opus-4-6 --anthropic-key sk-xxxOptions reference
| Option | Description |
|---|---|
--init |
Force LLM provider reconfiguration even if already configured |
--provider <name> |
Cloud provider name (e.g. anthropic, openai, openrouter) |
--model <name> |
Model name (e.g. claude-opus-4-6, gpt-4o) |
--api-key <key> |
Provider API key |
--local |
Enable local model mode |
--local-engine <engine> |
ollama / llama.cpp /
custom
|
--local-url <url> |
Base URL (e.g. http://localhost:8001/v1) |
--local-model <name> |
Model name |
--local-api-key <key> |
API key for authenticated OpenAI-compatible endpoints (optional) |
--anthropic-url <url> |
On-prem Anthropic-compatible base URL (e.g. https://llm.corp.tld/my-model/v1) |
--anthropic-model <name> |
Recognized Claude model id, mapped by the endpoint (e.g. claude-opus-4-6) |
--anthropic-key <key> |
API key (optional — omit for keyless endpoints) |
.opencode.env, running
./install.sh YOUR-KEY will reuse it without prompting.
Use --init to force reconfiguration.
VIII.3. Adding / Updating LLM Providers
In the Community edition, provider configuration
was done via darkmoon-settings/ files.
In the Pro edition, everything goes through
darkmoon.sh — no more manual file editing.
Add or update a provider
./darkmoon.sh --connectThis command prompts you for:
-
The provider name (e.g.
anthropic,openai,groq,openrouter,mistral) - The API key for that provider
The provider is then:
-
saved persistently in
.opencode.env(survives restarts), - applied live to the running container (no restart needed).
Adding a provider with ./darkmoon.sh --connect — the
key is saved and applied live.
Change the default model
./darkmoon.sh --set-defaultThis shows your configured providers and lets you pick the active model. The change is applied live and persists after restart.
Community vs Pro: provider management
| Feature | Community | Pro |
|---|---|---|
| Configure provider |
Edit .env or darkmoon-settings/
|
./darkmoon.sh --connect |
| Multiple providers | Manual JSON editing | Run --connect multiple times |
| Change default model | Edit opencode.json |
./darkmoon.sh --set-default |
| Live apply (no restart) | No | Yes |
| Persistent after restart | Yes | Yes |
VIII.3.b. Compatible Models & Hardware
Darkmoon is a fully autonomous pentest agent: a single campaign chains hundreds to thousands of tool calls, spawns sub-agents, and must drive the whole methodology (Discovery → Validation → Reporting → Finalization) to completion on its own. This places a hard requirement on the underlying LLM — it must be excellent at long-horizon reasoning and strict, repeated tool-calling.
Why small models do not work
A 7B or 13B model (e.g. a generic llama3, a 7B coder)
cannot hold the autonomous loop: it emits malformed tool calls,
loses track over long sessions, and never reaches the final
finish_scan / campaign-finalization step. The visible
symptom is a campaign that stays in
Unknown forever and a scan that never
reaches Finished.
This is a model-capability limit, not a Darkmoon bug.
Cloud models (recommended)
| Model | Provider | Status |
|---|---|---|
claude-opus-4-7 |
Anthropic | Reference — optimal |
claude-opus-4-6 |
Anthropic | Recommended |
claude-sonnet-4-6 |
Anthropic | Good (faster / cheaper, slightly less depth) |
★ Local Opus-class equivalents (highlighted)
If you need an on-premise / air-gapped deployment but want results as close as possible to Claude Opus 4.6 / 4.7, use one of these frontier-grade open-weight models. They are large Mixture-of-Experts models that top the agentic and function-calling leaderboards (Berkeley Function Calling Leaderboard, SWE-Bench) in 2026 — the only open models that reliably drive Darkmoon's autonomous loop end-to-end.
| Model | Size (total / active) | Why it qualifies | HuggingFace |
|---|---|---|---|
DeepSeek-V3.2 /
V4-Pro
|
671B MoE / 37B active | Near-frontier reasoning, native “thinking with tools” tool-calling | deepseek-ai/DeepSeek-V3.2 |
Kimi-K2-Thinking (K2.6)
|
1T MoE / 32B active | Best-in-class agentic intelligence, 256K context | moonshotai/Kimi-K2-Thinking |
GLM-4.6 (GLM-4.7 / GLM-5
family)
|
357B MoE / 32B active | Strongest all-round open coding/agentic model, 200K context | zai-org/GLM-4.6 |
Qwen3-Coder-480B-A35B-Instruct
|
480B MoE / 35B active | SOTA open agentic tool-use, comparable to Claude Sonnet 4, 256K–1M ctx | Qwen/Qwen3-Coder-480B-A35B-Instruct |
Local models — efficient single-workstation options
When a multi-GPU server is not available, these run on a single high-end GPU while still completing real campaigns (MoE designs keep only a few billion parameters active per token):
| Model | Size (total / active) | Notes | HuggingFace |
|---|---|---|---|
Qwen3-Coder-30B-A3B-Instruct |
30B MoE / 3B active | Best efficiency — fits a single 24 GB GPU, strong agentic tool-use | Qwen/Qwen3-Coder-30B-A3B-Instruct |
Qwen3-Coder-Next |
MoE | Highest capability-per-active-parameter | Qwen/Qwen3-Coder-Next |
Qwen2.5-Coder-32B-Instruct |
32B dense | Dense fallback, excellent tool-calling | Qwen/Qwen2.5-Coder-32B-Instruct |
Security / pentest-specialised models
Models fine-tuned for offensive security write deeper exploit code and reason about CVEs more directly. They are best used in addition to a strong agentic driver — on their own the smaller ones still won't sustain a full autonomous campaign.
| Model | Focus | HuggingFace / source |
|---|---|---|
WhiteRabbitNeo (Deep Hat) |
Uncensored red/blue-team, exploit generation, CVE reasoning | WhiteRabbitNeo/* · deephat.ai |
llama3, Phi, Gemma 9B,
the older WhiteRabbitNeo-13B, etc.). Fine for quick experiments, but
they will not finish a real campaign — the scan stays in
Unknown.
Recommended hardware (local inference)
The Opus-class models above are 355B–1T-parameter MoE. Figures assume the listed quantization and a single concurrent campaign; more VRAM / additional GPUs shorten run time and raise precision.
| Target | VRAM | System RAM | Example hardware |
|---|---|---|---|
| Opus-class MoE — full precision (DeepSeek-V3.2, Kimi K2, GLM-4.6, Qwen3-Coder-480B) | multi-GPU, ≥ 8× 80 GB (up to 16–32× H100 for the largest) | 512 GB – 1 TB+ | H100 / H200 NVLink server |
| Opus-class MoE — 4-bit GGUF (workstation, MoE offload) | 1× 40–48 GB | ~205 GB | A6000 / RTX 6000 Ada + 256 GB RAM |
| Opus-class MoE — 2-bit GGUF (slow, workstation) | 1× 24 GB | 128 GB | RTX 4090 + 128 GB RAM (~few tok/s) |
| Efficient MoE 30B-A3B (Qwen3-Coder-30B-A3B) | ~16–24 GB | 32–64 GB | RTX 4090 / 3090 — fast, single GPU |
| Dense 32B (Qwen2.5-Coder-32B, Q4) | ~22–24 GB | 32–64 GB | RTX 4090 / 3090, A5000 |
VRAM / RAM figures for GLM-4.6 quantization are from Unsloth & apxml; MoE “active parameters” explain why a 30B-A3B model runs far lighter than a 32B dense model.
Ideal on-premise workstation (single-GPU)
- GPU: NVIDIA RTX 4090 24 GB minimum — RTX 6000 Ada / A6000 48 GB to run Opus-class MoE in 4-bit
- CPU: 16+ cores (Ryzen 9 / Threadripper / Core i9)
- RAM: 128 GB (256 GB for 4-bit Opus-class MoE offload)
- Disk: NVMe SSD, 200 GB+ free (Docker images + quantized weights — a 4-bit 355B model is ~135–200 GB)
- OS: Linux x86_64 (native preferred; WSL2 supported)
claude-opus-4-7 — zero local hardware, best results.
Local Opus-class models are for fully air-gapped / on-premise
constraints; for a single 24 GB GPU,
Qwen3-Coder-30B-A3B is the most practical starting
point.
VIII.4. Lab Networking & Container Targets
Targeting a local Docker lab (same host)
When your pentest target (e.g. Juice Shop, DVGA) is a Docker
container running on the same machine, use
docker inspect to get its IP:
docker inspect -f '{{range.NetworkSettings.Networks}}{{.IPAddress}}{{end}}' monlabExample result: 172.19.0.3
TARGET: http://172.19.0.3:3000This works because both containers share the same Docker bridge network.
Targeting an on-premise Ollama instance (local LLM)
docker inspect does NOT work for Ollama
on WSLThe
opencode container in the Pro
docker-compose.yml is
not configured with network_mode: "host". It runs in bridge network mode.Therefore, using
docker inspect to get the container IP
will not be reachable from within the
opencode container for Ollama.
The correct approach when using Ollama on-premise (e.g. on WSL or the host machine) is to use the host machine IP address, not the container IP.
On WSL — find the host IP
# From inside WSL, get the Windows host IP
cat /etc/resolv.conf | grep nameserver | awk '{print $2}'
# or
hostname -I | awk '{print $1}'
Use this IP as the Ollama base URL:
sudo ./install.sh YOUR-KEY --local --local-engine ollama --local-url http://172.x.x.x:11434/v1 --local-model glm-4.6:32bOn native Linux — find the Docker bridge IP
ip addr show docker0 | grep 'inet ' | awk '{print $2}' | cut -d/ -f1Typical result: 172.17.0.1
sudo ./install.sh YOUR-KEY --local --local-engine ollama --local-url http://172.17.0.1:11434/v1 --local-model glm-4.6:32bSummary
| Scenario | What to use as URL |
|---|---|
| Target is a local Docker container (pentest lab) | docker inspect IP of the target container |
| Ollama running on WSL host | Windows host IP from /etc/resolv.conf |
| Ollama running on native Linux host |
Docker bridge IP (docker0 interface, typically
172.17.0.1)
|
| Ollama running in another container with host network |
The container IP if network_mode: host, otherwise
bridge IP
|
VIII.5. Hardening & Runtime Guard
Docker Compose hardening
The Pro docker-compose.yml applies multiple hardening
layers to the opencode container:
| Measure | Setting | Effect |
|---|---|---|
| Read-only filesystem | read_only: true |
No writes to container FS (except explicit tmpfs) |
| No new privileges | no-new-privileges:true |
Prevents privilege escalation inside container |
| All caps dropped | cap_drop: ALL |
Only minimal capabilities explicitly re-added |
| PID limit | pids_limit: 512 |
Prevents fork bombs |
| tmpfs for volatile data | tmpfs: (many mounts) |
Sensitive dirs in RAM only, never on disk |
| Sealed volume | darkmoon_opencode_sealed |
Encrypted persistent state |
| Log rotation | max-size: 10m, max-file: 3 |
Prevents log flooding |
| Grace period | stop_grace_period: 45s |
Clean shutdown for ongoing sessions |
Runtime Guard (darkmoon-runtime-guard.sh)
At startup, the Runtime Guard is the first process to run inside the container. It acts as a security watchdog before OpenCode is even allowed to start.
What the Guard does
| Check | Description |
|---|---|
| Licence validation | Verifies the licence key against the server (or cache) before booting |
| Hardware fingerprint | Derives a machine fingerprint (DMI/CPU identifiers) to bind the licence to the hardware |
| Compose policy integrity |
Computes SHA-256 of docker-compose-dev.yml and
compares against the expected hash baked into the image —
refuses to start if tampered
|
| Runtime file hashes | Verifies SHA-256 of the guard script itself, the OpenCode wrapper, the real OpenCode binary, and the entrypoint — detects in-place binary replacement |
| Compromise marker | If a compromise is detected, writes a marker file that prevents any future start until the sealed state is explicitly reset |
| Debugger detection | Detects attached tracers (ptrace, strace, etc.) and terminates if found |
| no-new-privileges check |
Verifies the container was started with
no-new-privileges — refuses to run otherwise
|
| Policy watchdog | Background process that continuously re-verifies compose policy integrity every N seconds while running |
| Self-integrity watchdog | Background process that re-checks the guard and binaries every N seconds |
| AES-GCM sealed state | Sensitive bootstrapped data (agents, workflows) is AES-GCM encrypted in the sealed volume using a key derived from licence + machine fingerprint |
What the user can and cannot do
| Action | Allowed? | Notes |
|---|---|---|
Run ./darkmoon.sh |
Yes | Normal usage |
Add / modify agents via --connect |
Yes | Managed operations |
Access logs via docker logs opencode |
Yes | Read-only |
docker exec -ti opencode bash |
Limited | For debug only — read-only FS, tmpfs only |
Modify docker-compose.yml |
Blocked | Hash mismatch → container refuses to start |
| Replace OpenCode binary | Blocked | Runtime hash check detects it → compromise marker set |
| Attach a debugger (strace, ptrace) | Blocked | Tracer detection → immediate termination |
| Bypass licence check | Blocked | AES-GCM sealed bootstrap key derived from licence + hardware |
| Start without valid licence | Blocked | Guard exits 111 before OpenCode loads |
Attacks the Guard protects against
- Binary substitution — replacing the OpenCode binary with a malicious one
-
Compose policy tampering — modifying
docker-compose.ymlto remove security constraints - Licence bypass — attempting to start without a valid key
- Debugger attachment — attaching strace/ptrace to extract secrets
- Privilege escalation — no-new-privileges + all caps dropped
- Container escape via FS writes — read-only filesystem + tmpfs
- Fork bomb / resource exhaustion — pids_limit + tmpfs sizing
- Log flooding — log rotation enforced
- Replay after compromise — compromise marker prevents any restart until explicit reset
- Cross-machine licence abuse — key bound to hardware fingerprint
VIII.6. Darkmoon UI
The Darkmoon Pro web interface is accessible at:
http://localhost:80A live demo is available at demo.dark-moon.org.
VIII.6.a. Login & Authentication
Default credentials
On first access, use the default credentials:
Username: admin
Password: admin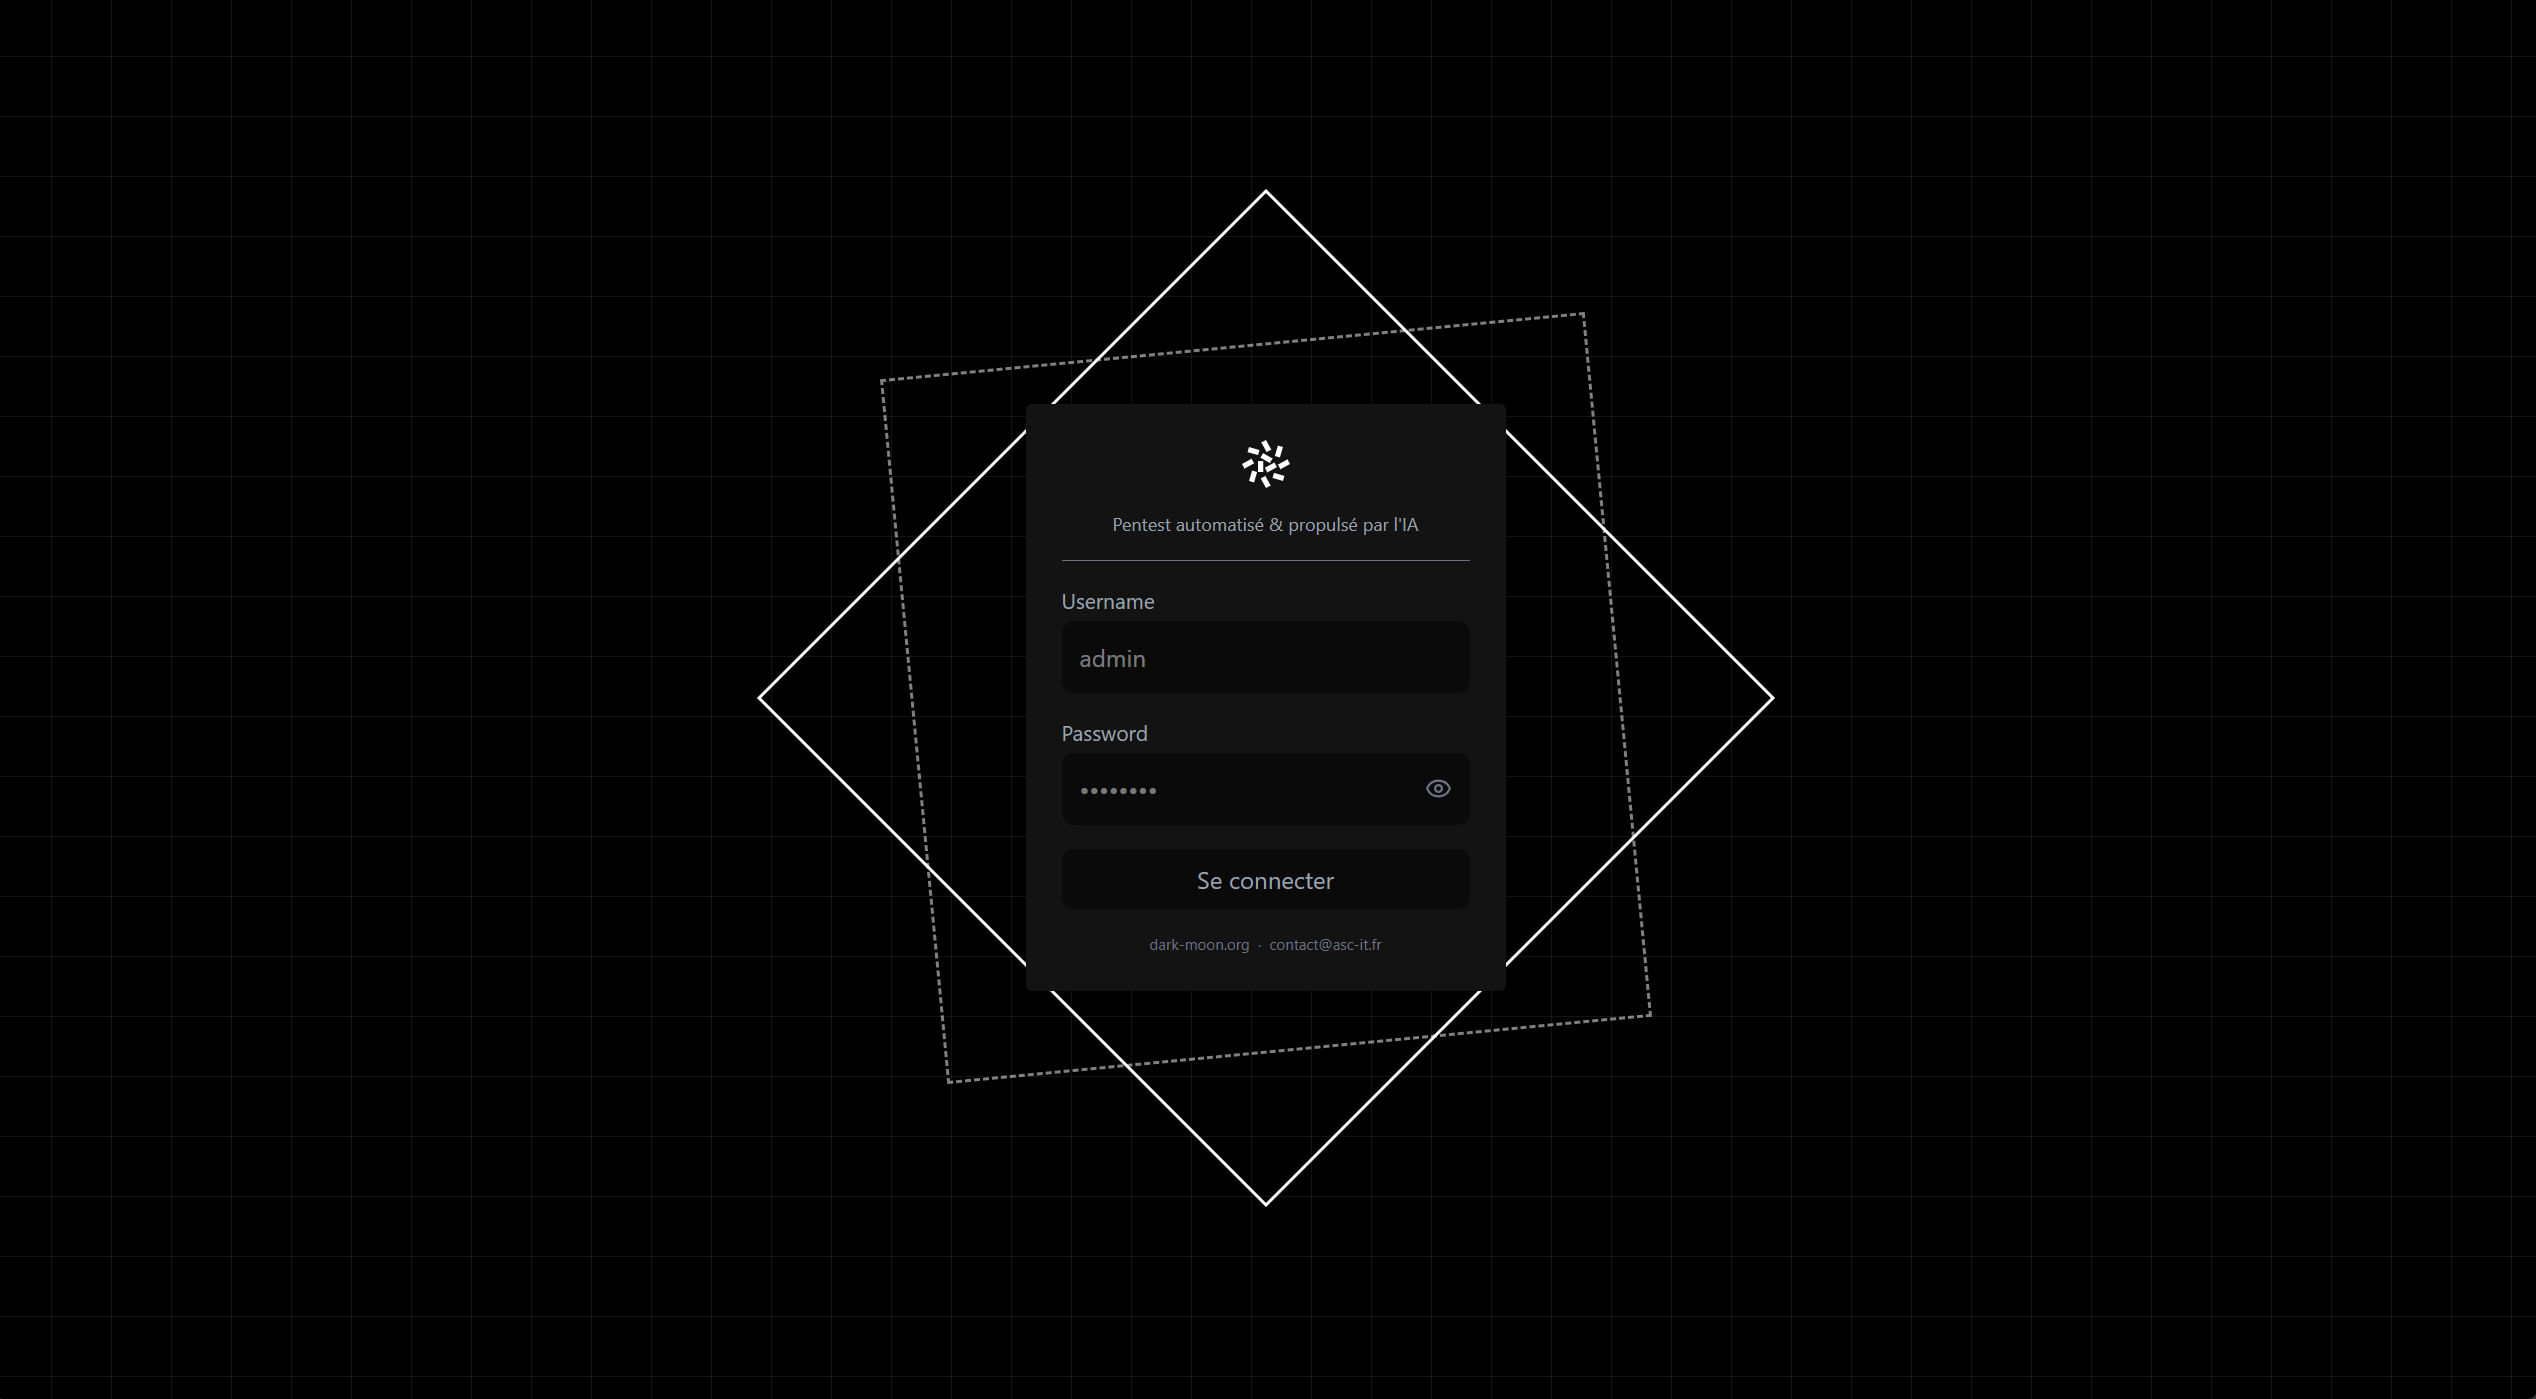
Login screen — enter admin / admin on first
access.
After login, you are immediately prompted to change your password. Once changed, you are redirected to the home page.
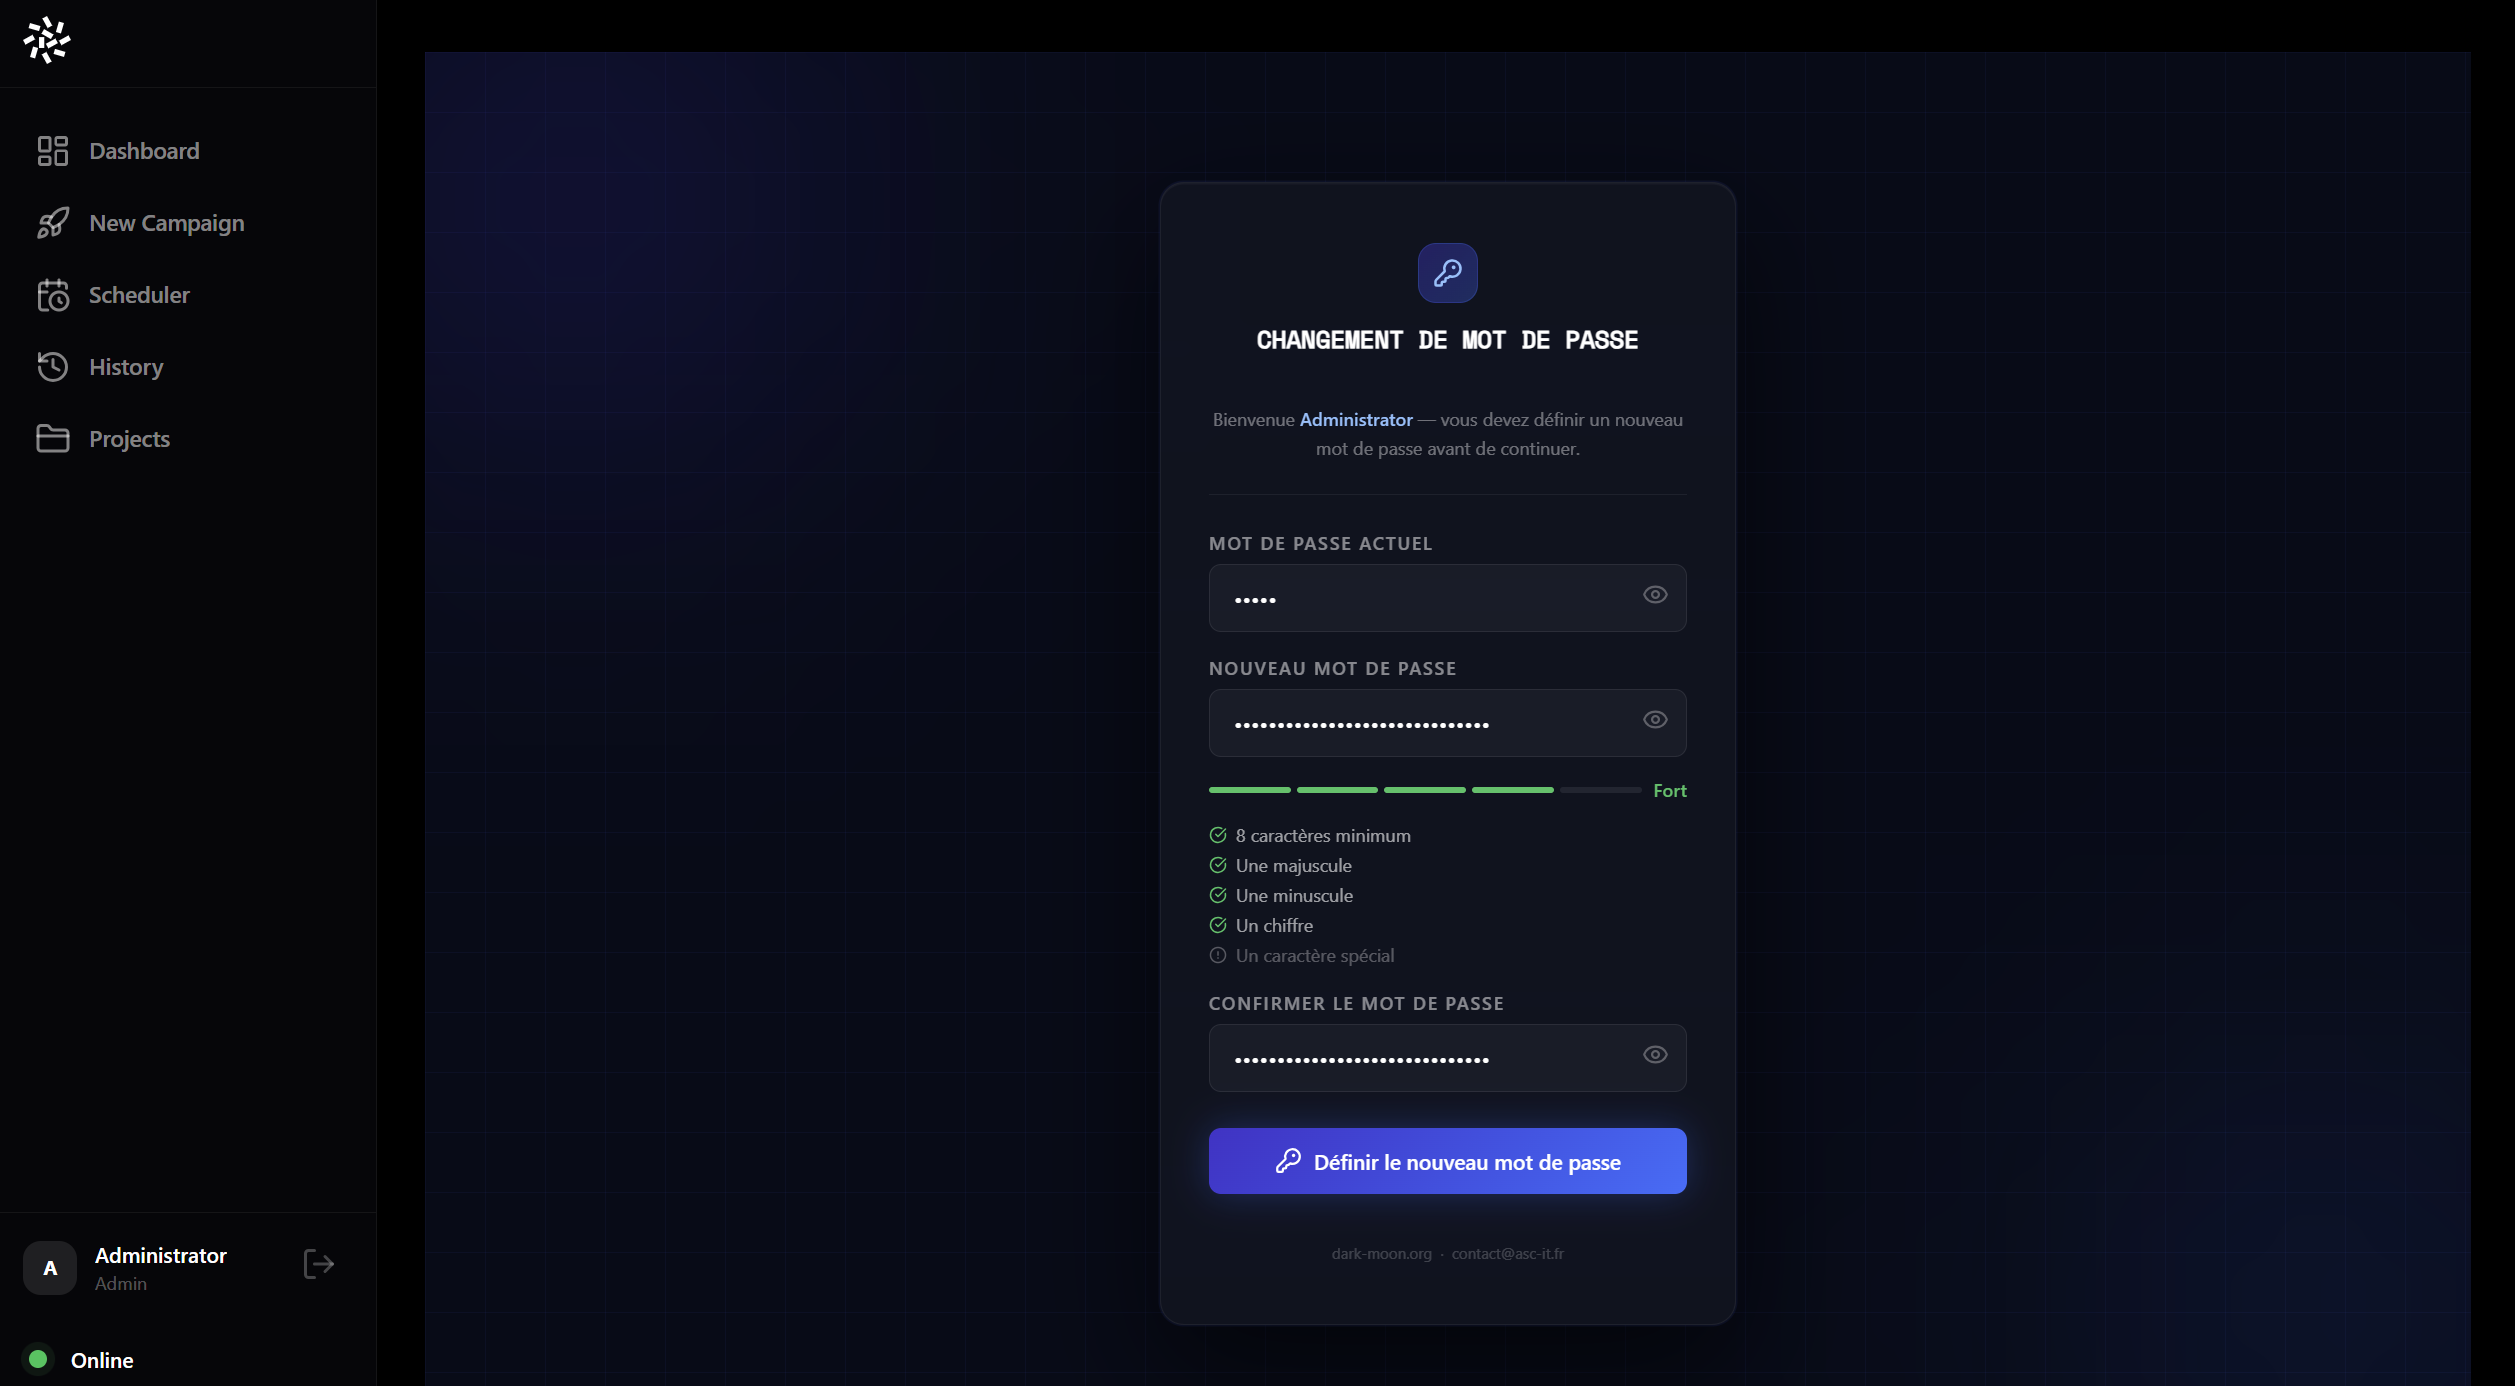
Password change prompt — mandatory on first login.
SSO Compatibility
The authentication layer is powered by Authelia, which implements the OpenID Connect (OIDC) protocol. This makes Darkmoon Pro compatible with any SSO provider that supports OIDC:
- Keycloak
- Okta
- Azure AD / Entra ID
- Google Workspace
- Auth0
- Any OIDC-compliant IdP
Authelia is configured in
authelia/config/configuration.yml and exposes an OIDC
client (darkmoon-frontend) with openid,
profile, and email scopes.
https://localhost/callback (or your
production domain) and update
authelia/config/configuration.yml with your IdP's OIDC
settings.
VIII.6.b. Creating a New Campaign
A campaign corresponds to a pentest run against a specific target. Multiple campaigns can be run against the same target over time.
Navigate to New Campaign in the left sidebar.
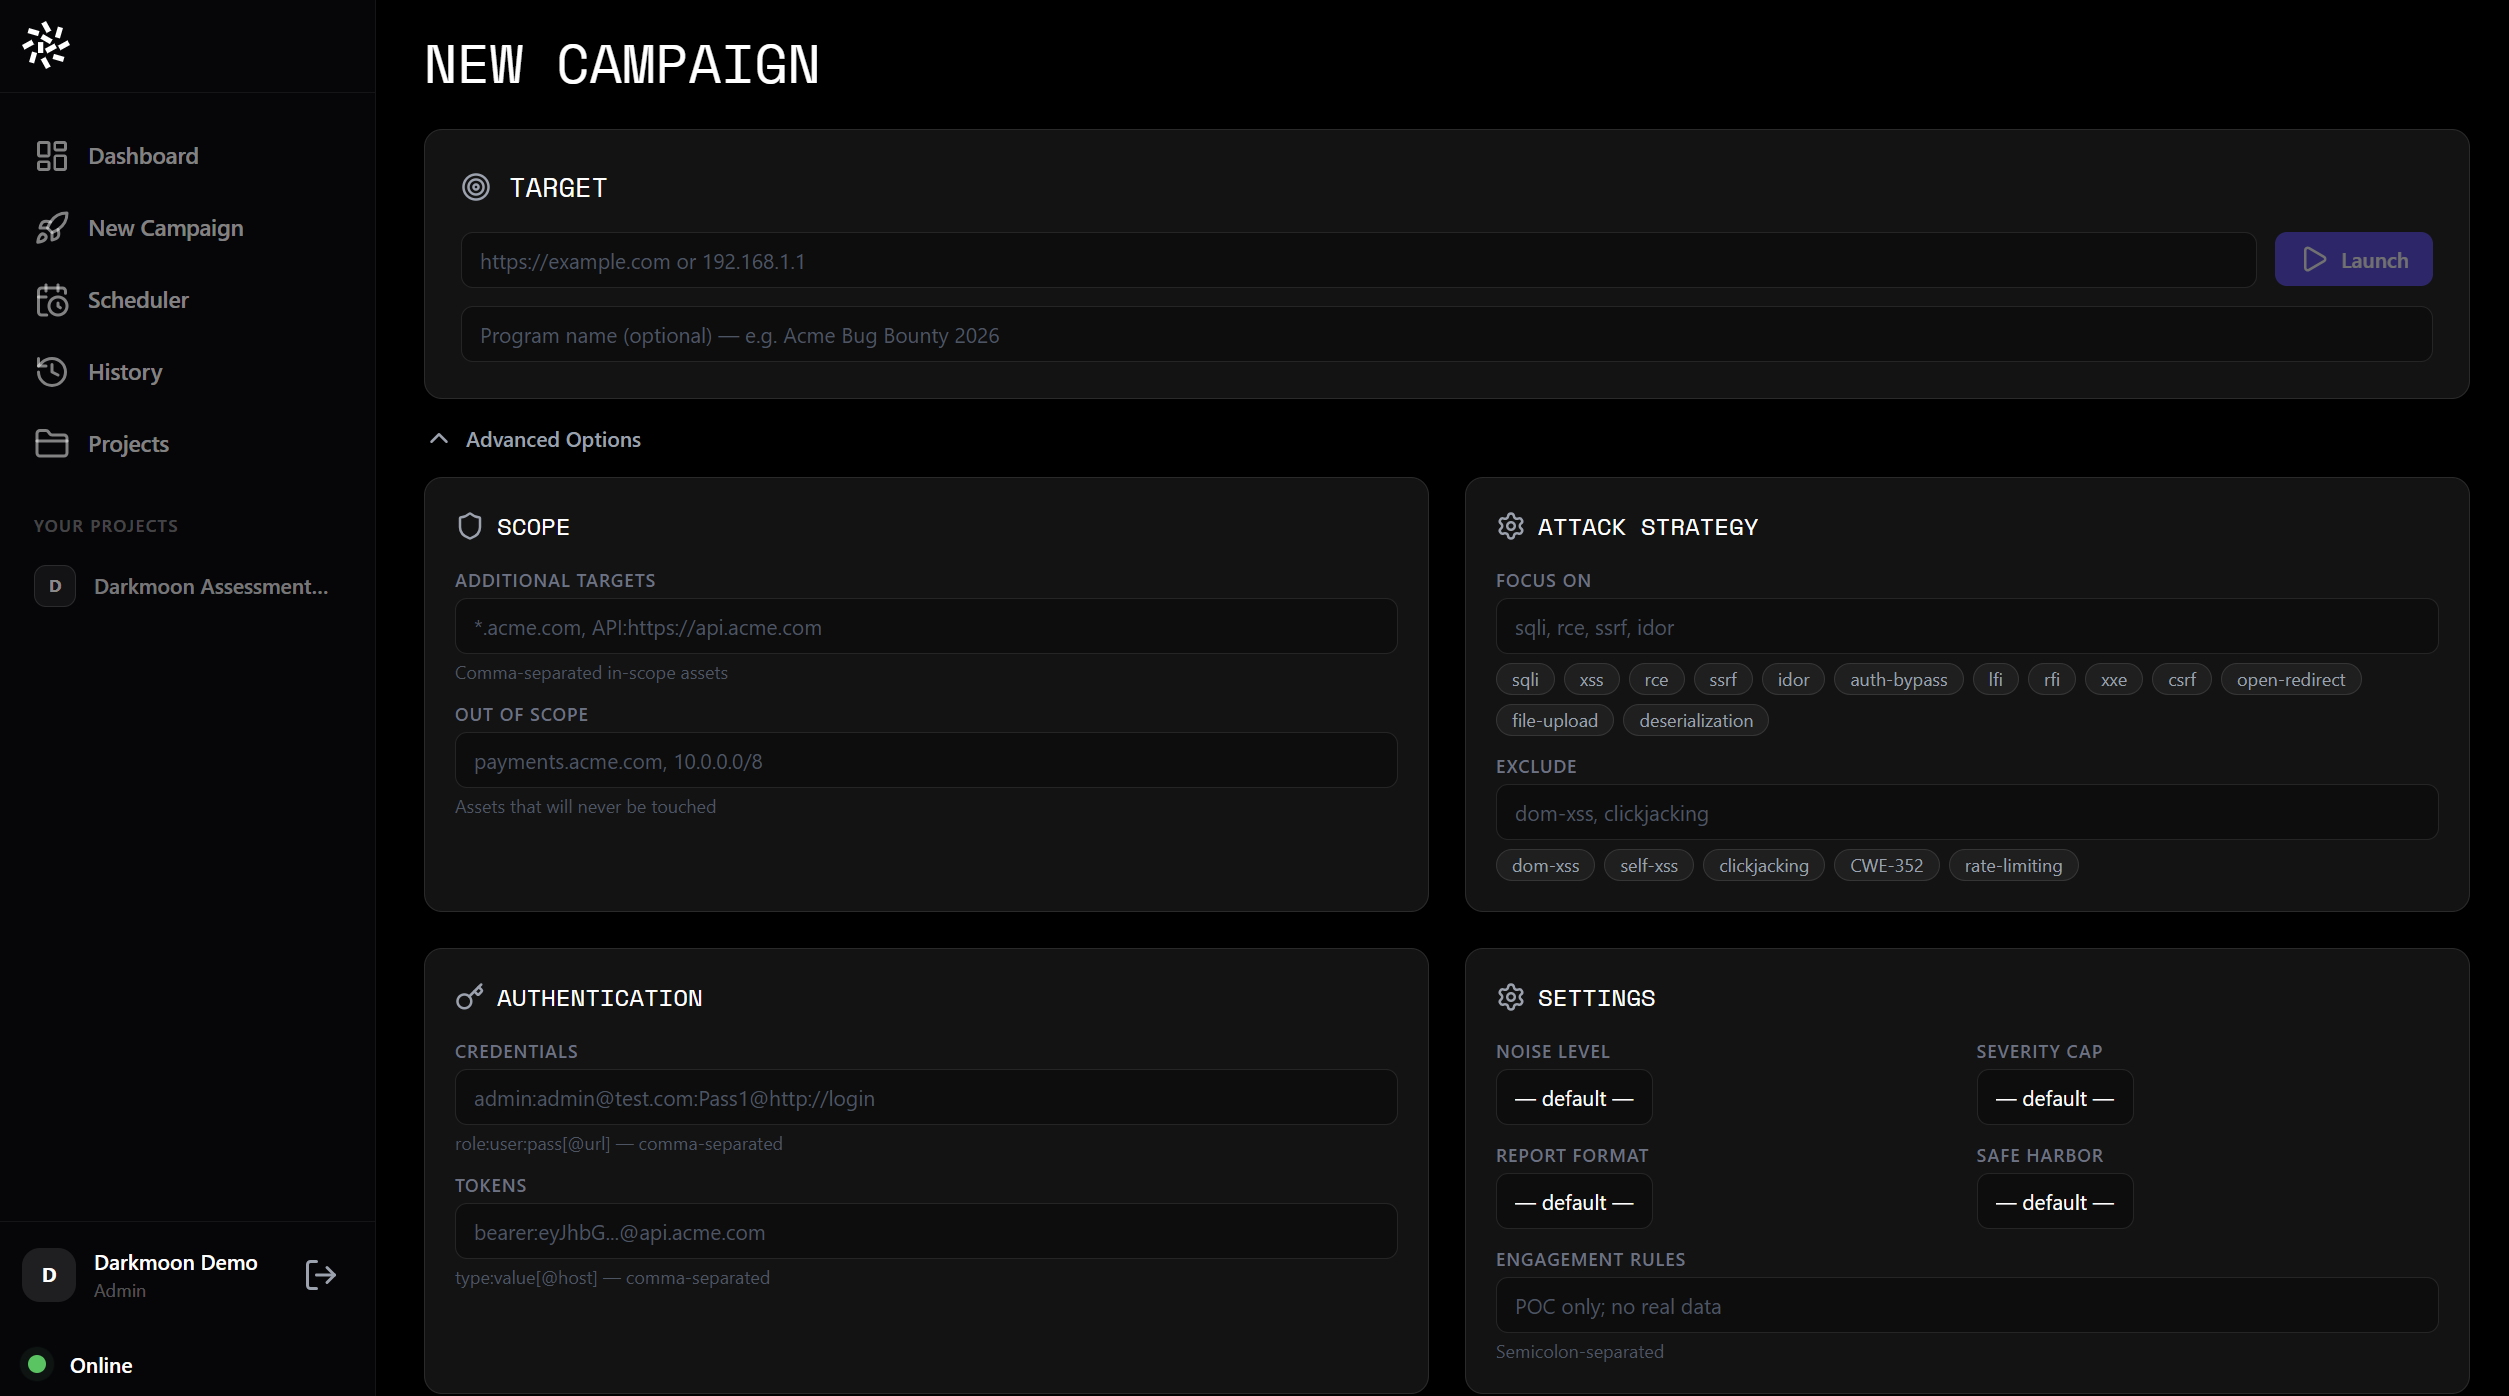
New Campaign — fill in the target and optional parameters.
Campaign parameters
| Parameter | Description |
|---|---|
| Target | Main target IP, domain or URL |
| Report format | Standard, HackerOne, Bugcrowd, custom |
| Attack type & methodology | Include / exclude specific attack types (SQLi, XSS, SSRF, RCE, etc.) |
| Additional targets | Extra in-scope assets to include |
| Exclusions | Out-of-scope assets or attack types to skip |
Scheduling a campaign
Campaigns can be scheduled for future execution using the built-in scheduler.
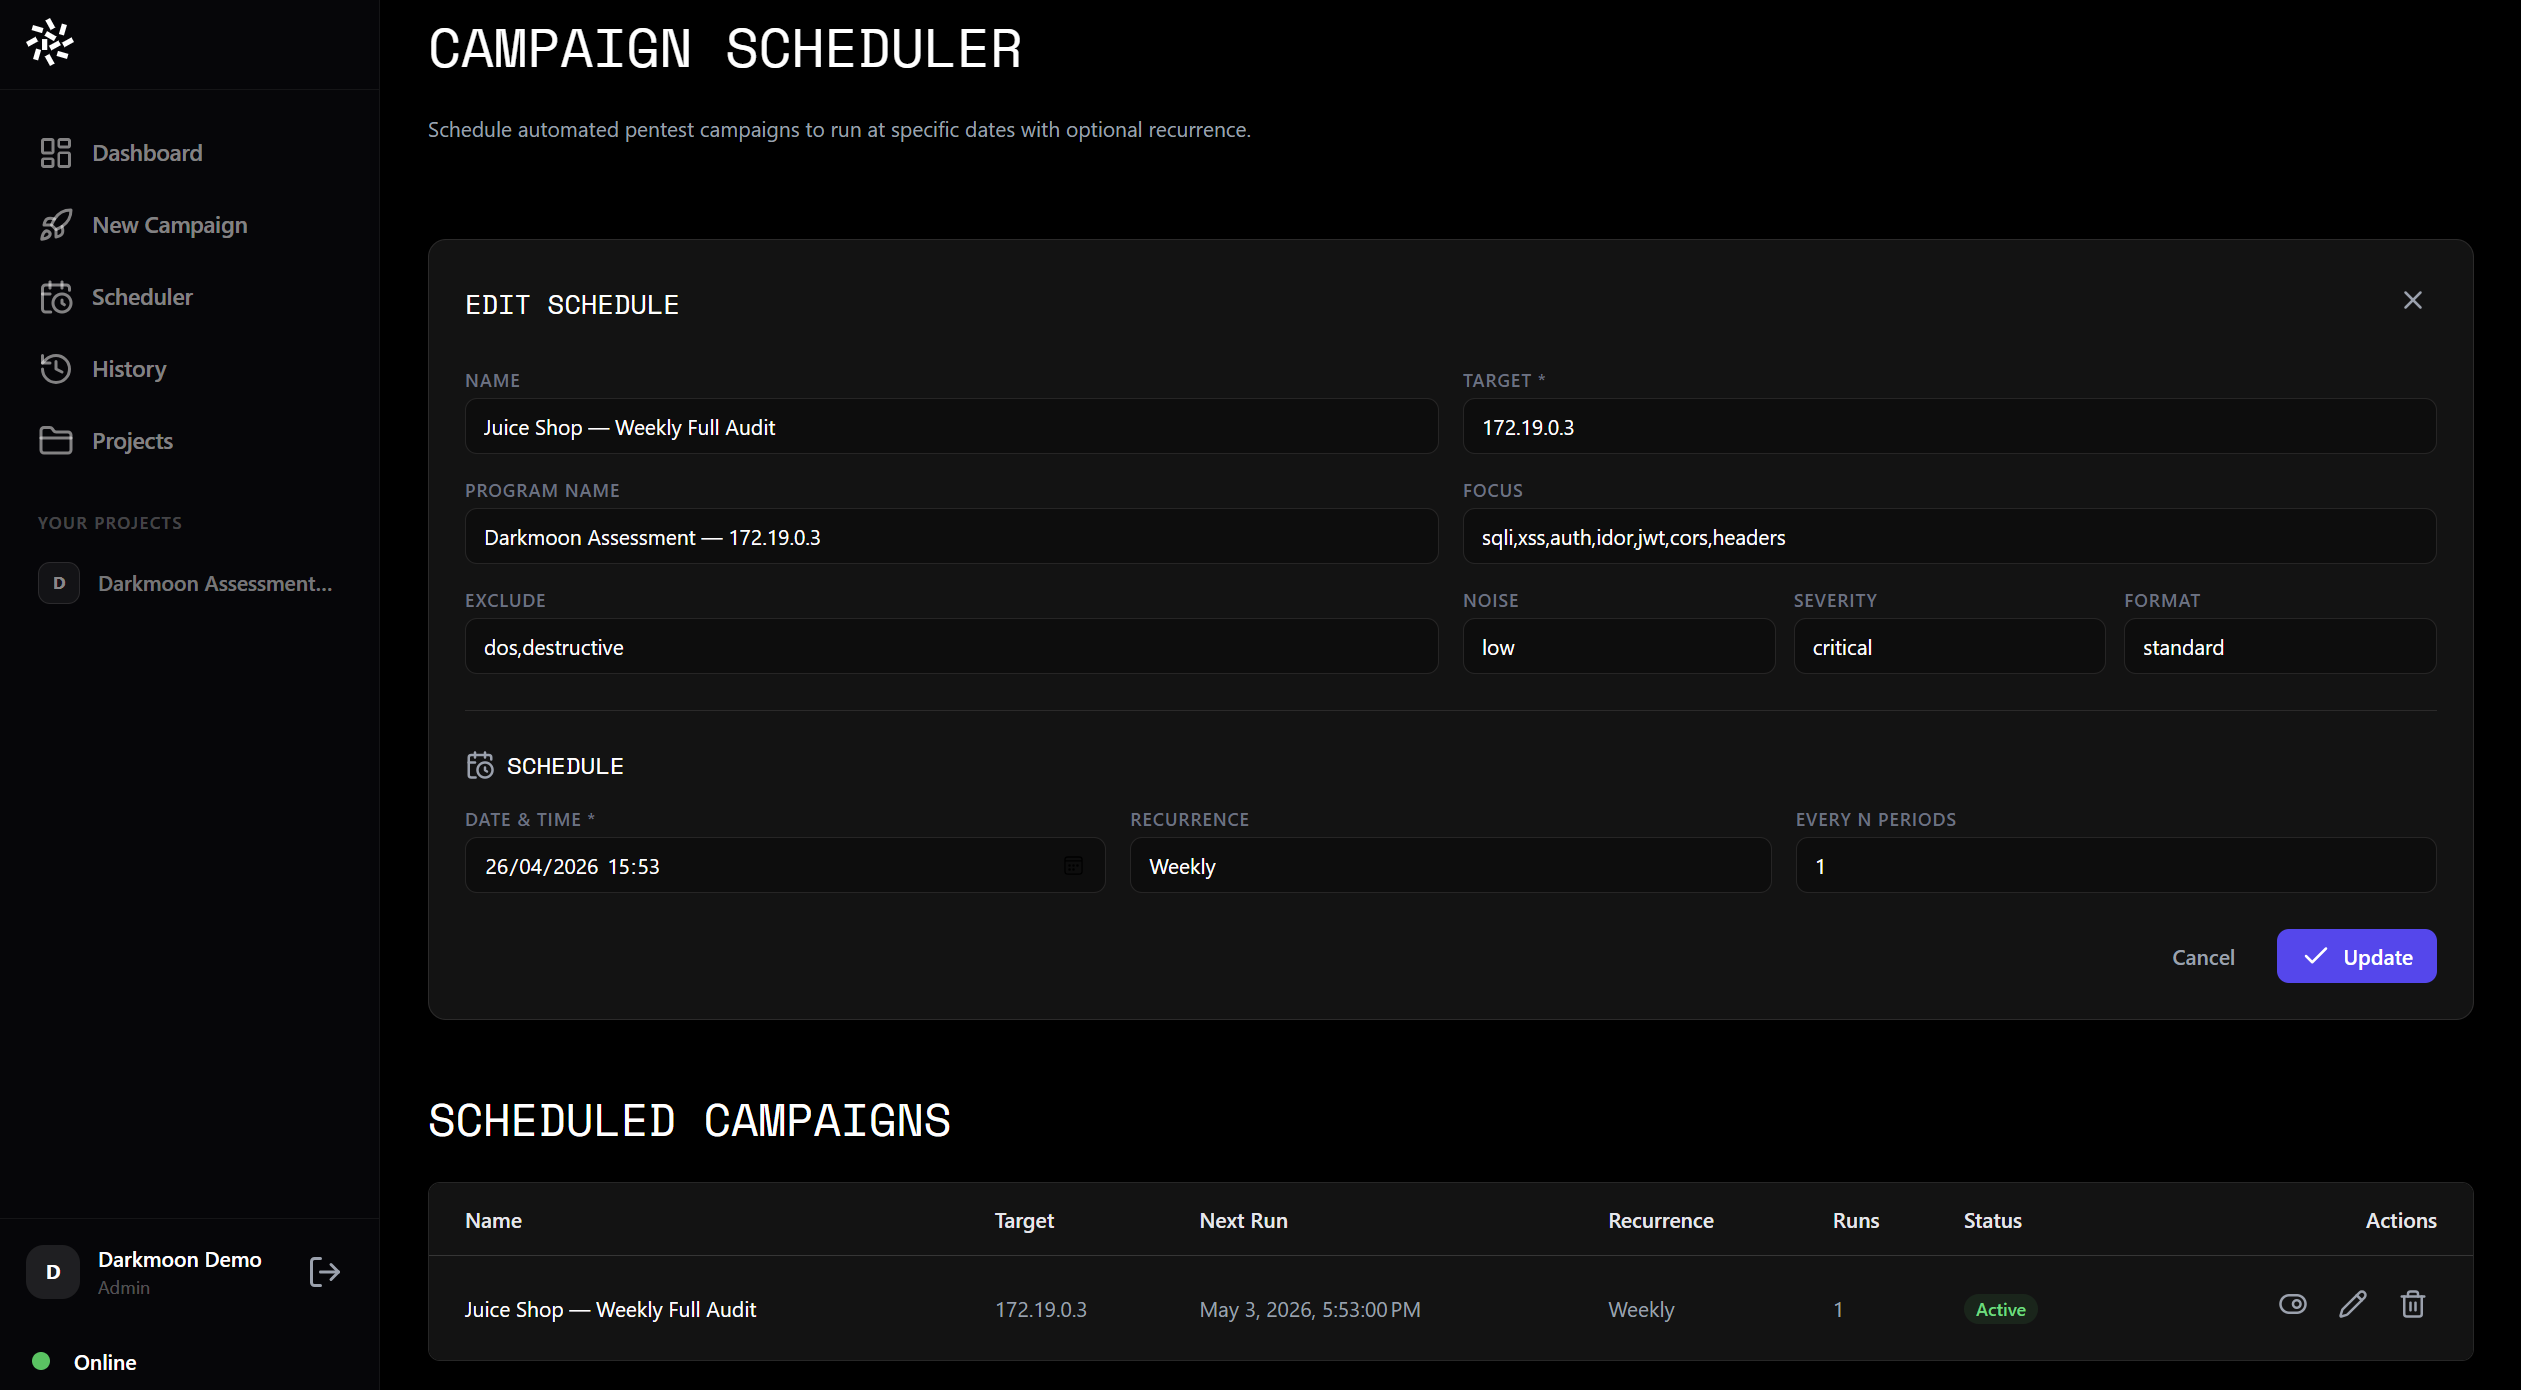
Scheduler — plan a campaign to run at a specific date and time.
VIII.6.c. Real-Time Monitoring
Once a campaign is launched, you can monitor the pentest in real time from the UI. The same log stream visible in the TUI is available in the dashboard.
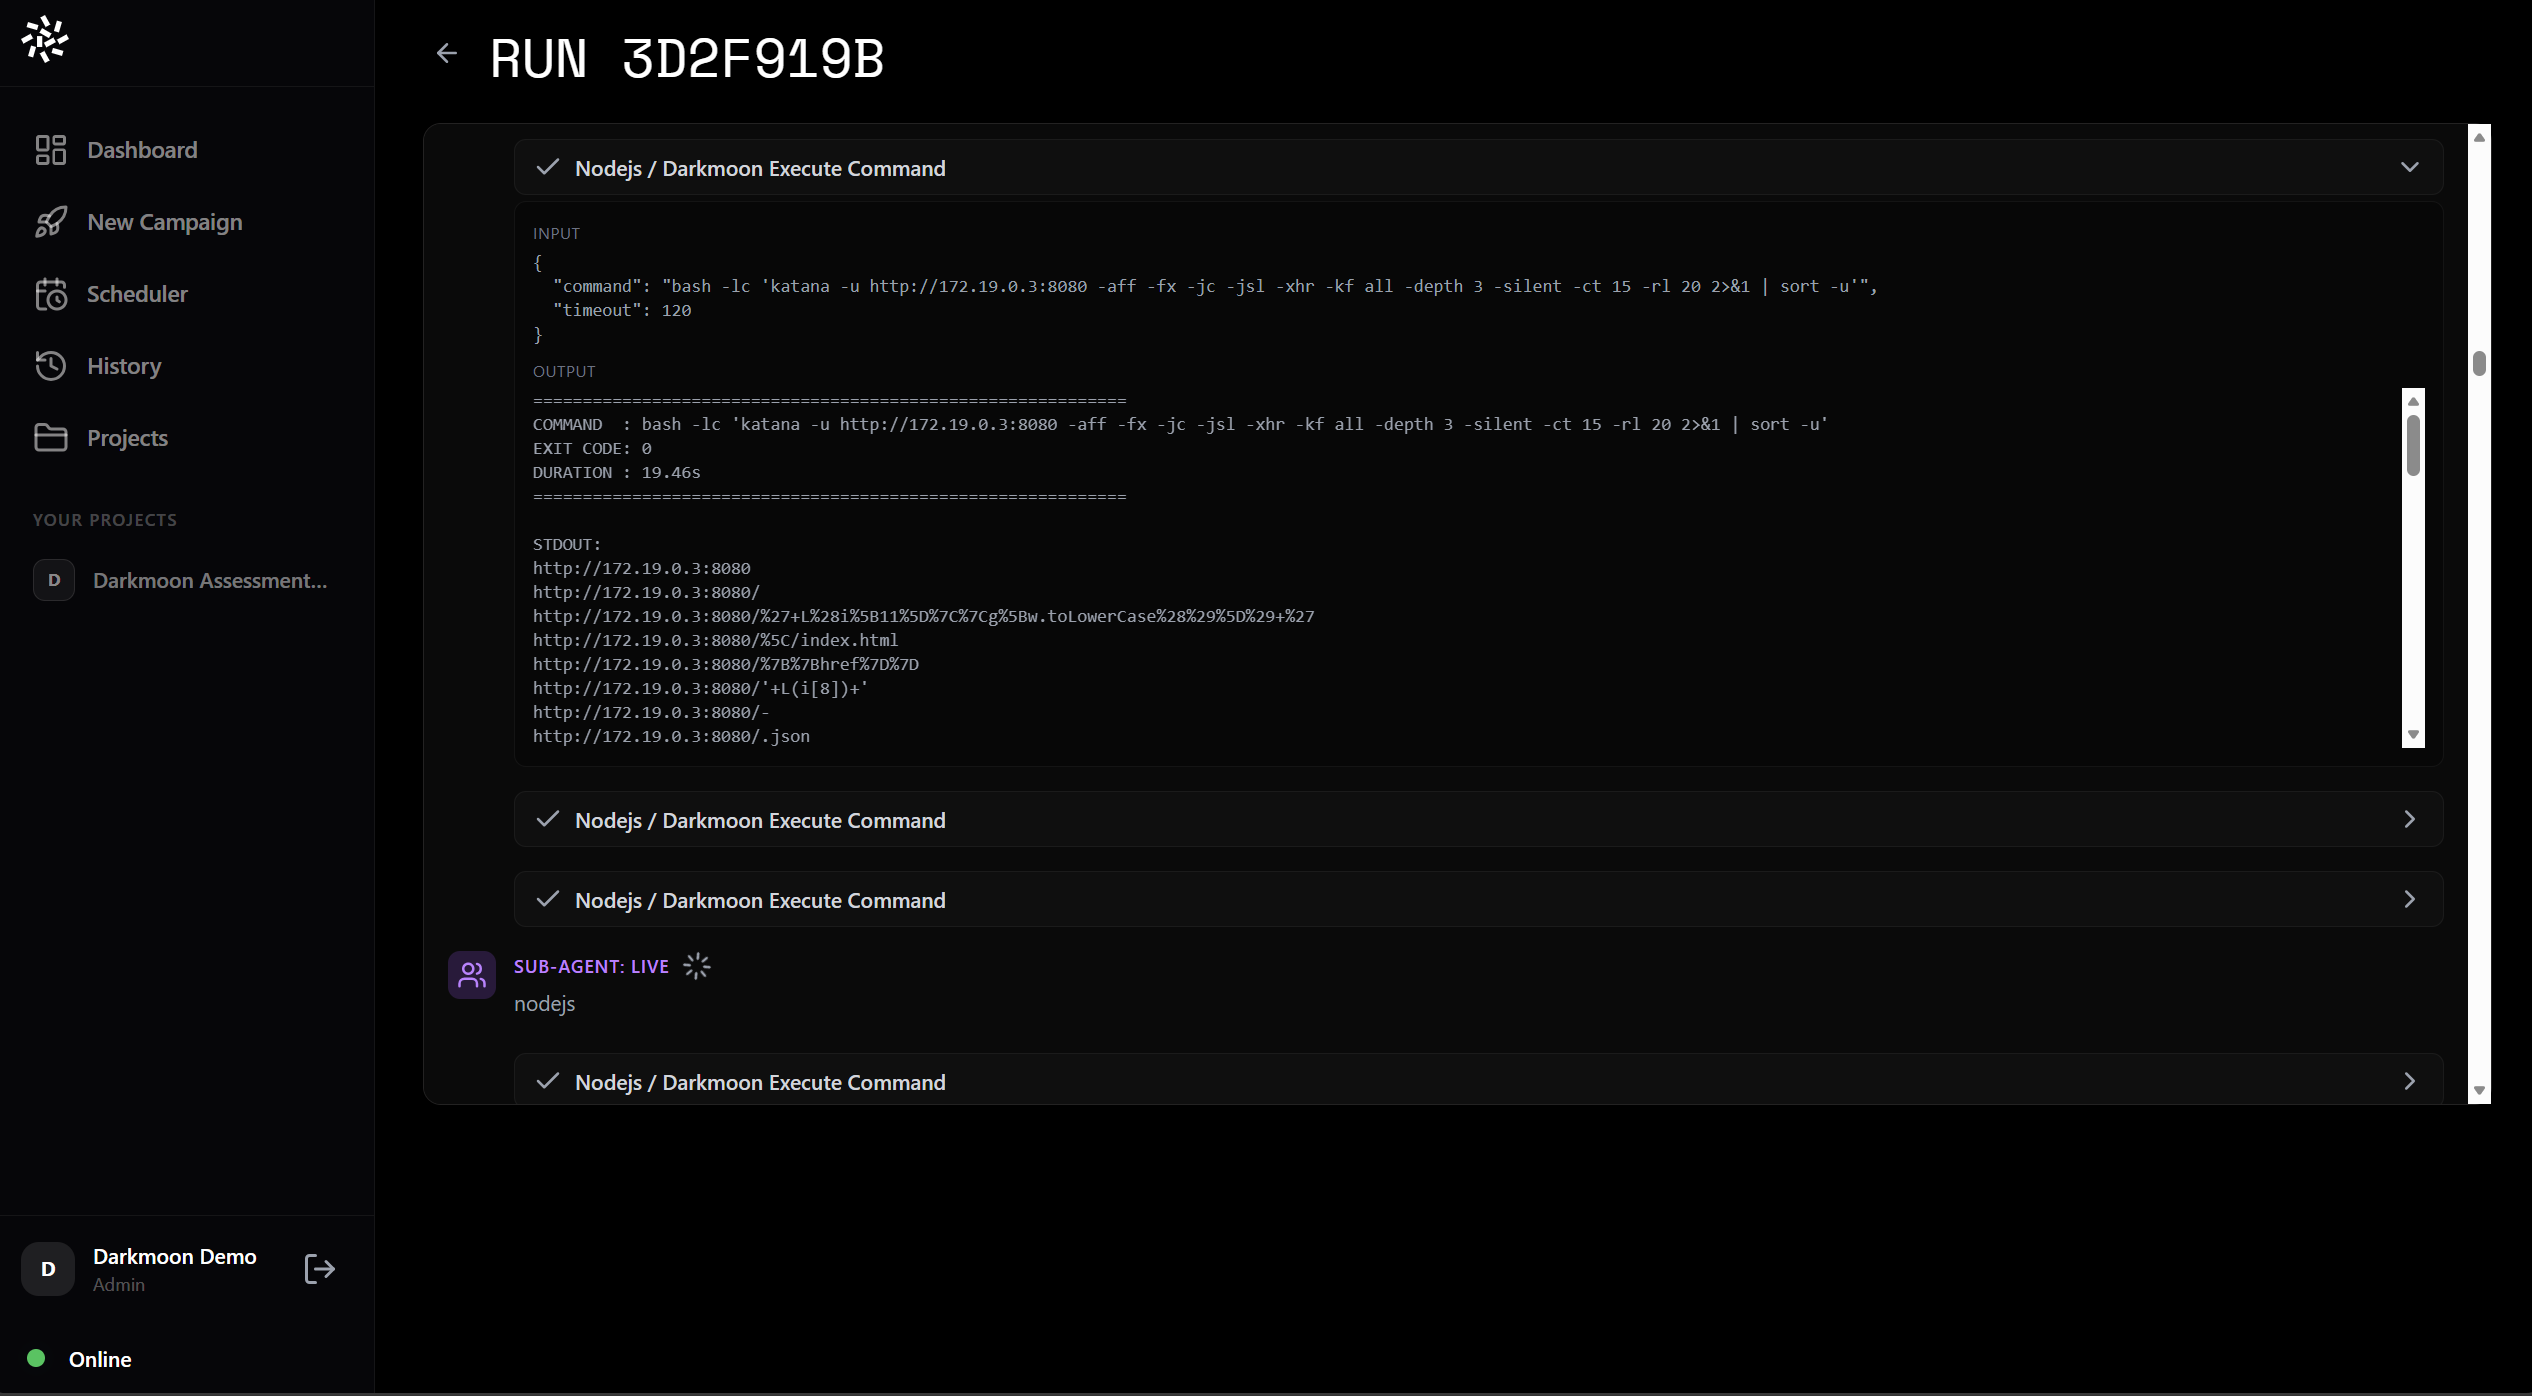
Campaign history — click on any campaign to view its real-time or past logs.
For a running campaign, you see the live agent output, tool executions, and intermediate findings as they are discovered.
VIII.6.d. Project View & Vulnerability Analytics
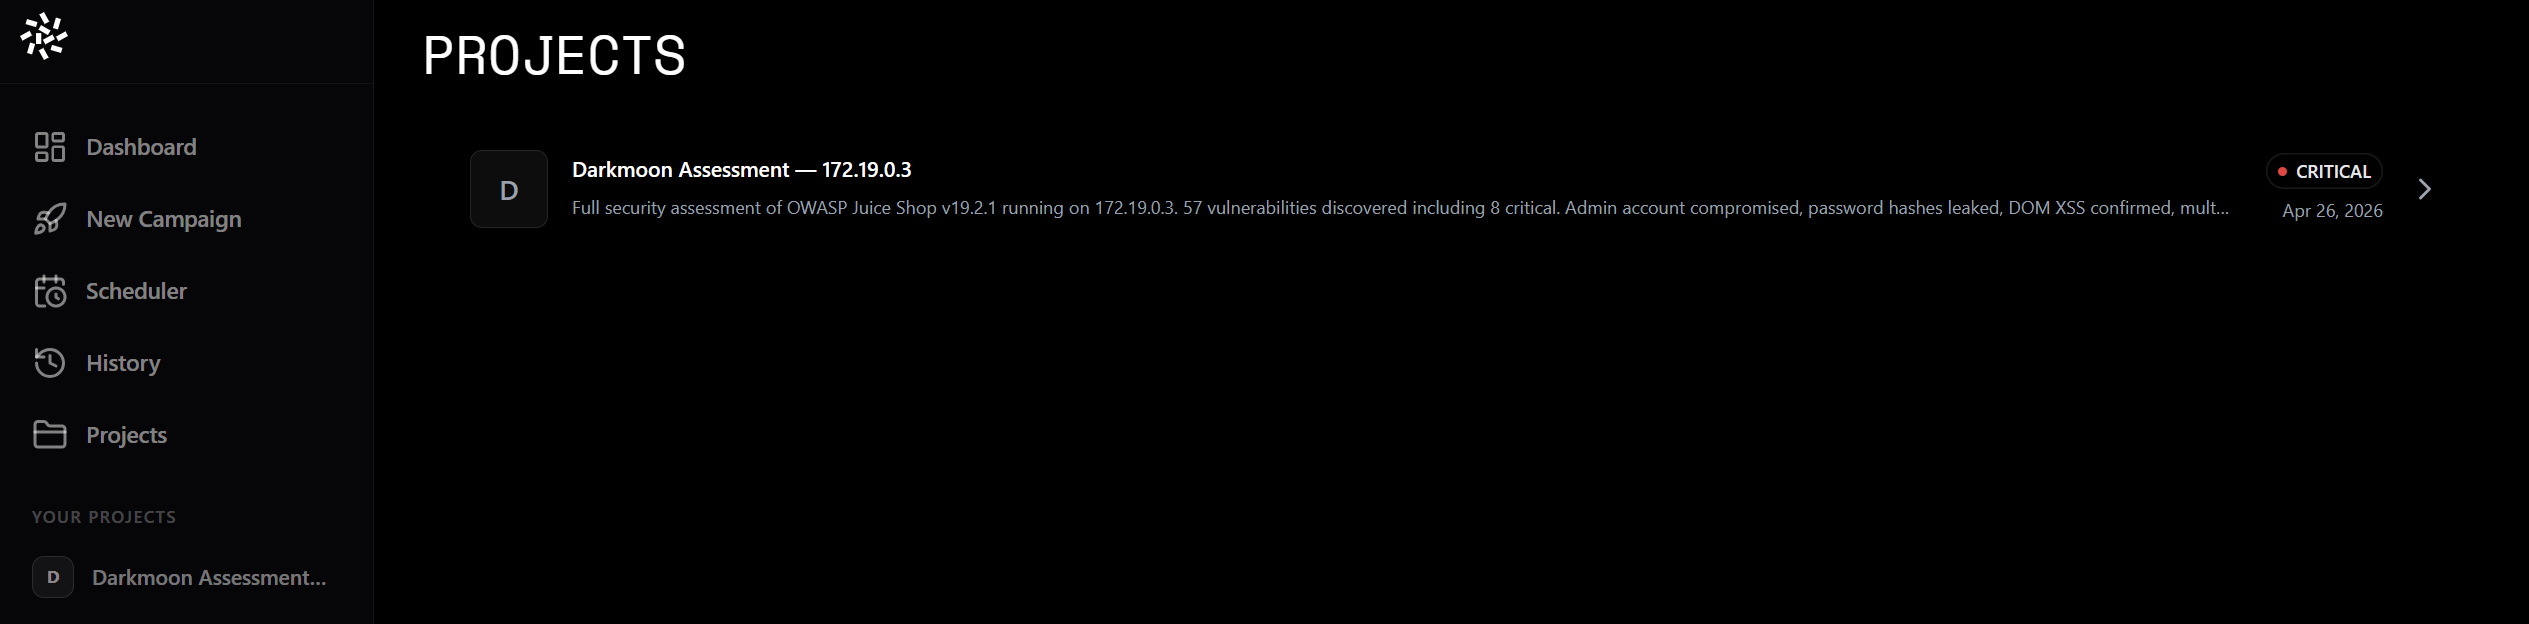
The Project view (accessible from the left sidebar or the home page) groups campaigns by target and provides cross-campaign vulnerability analytics.
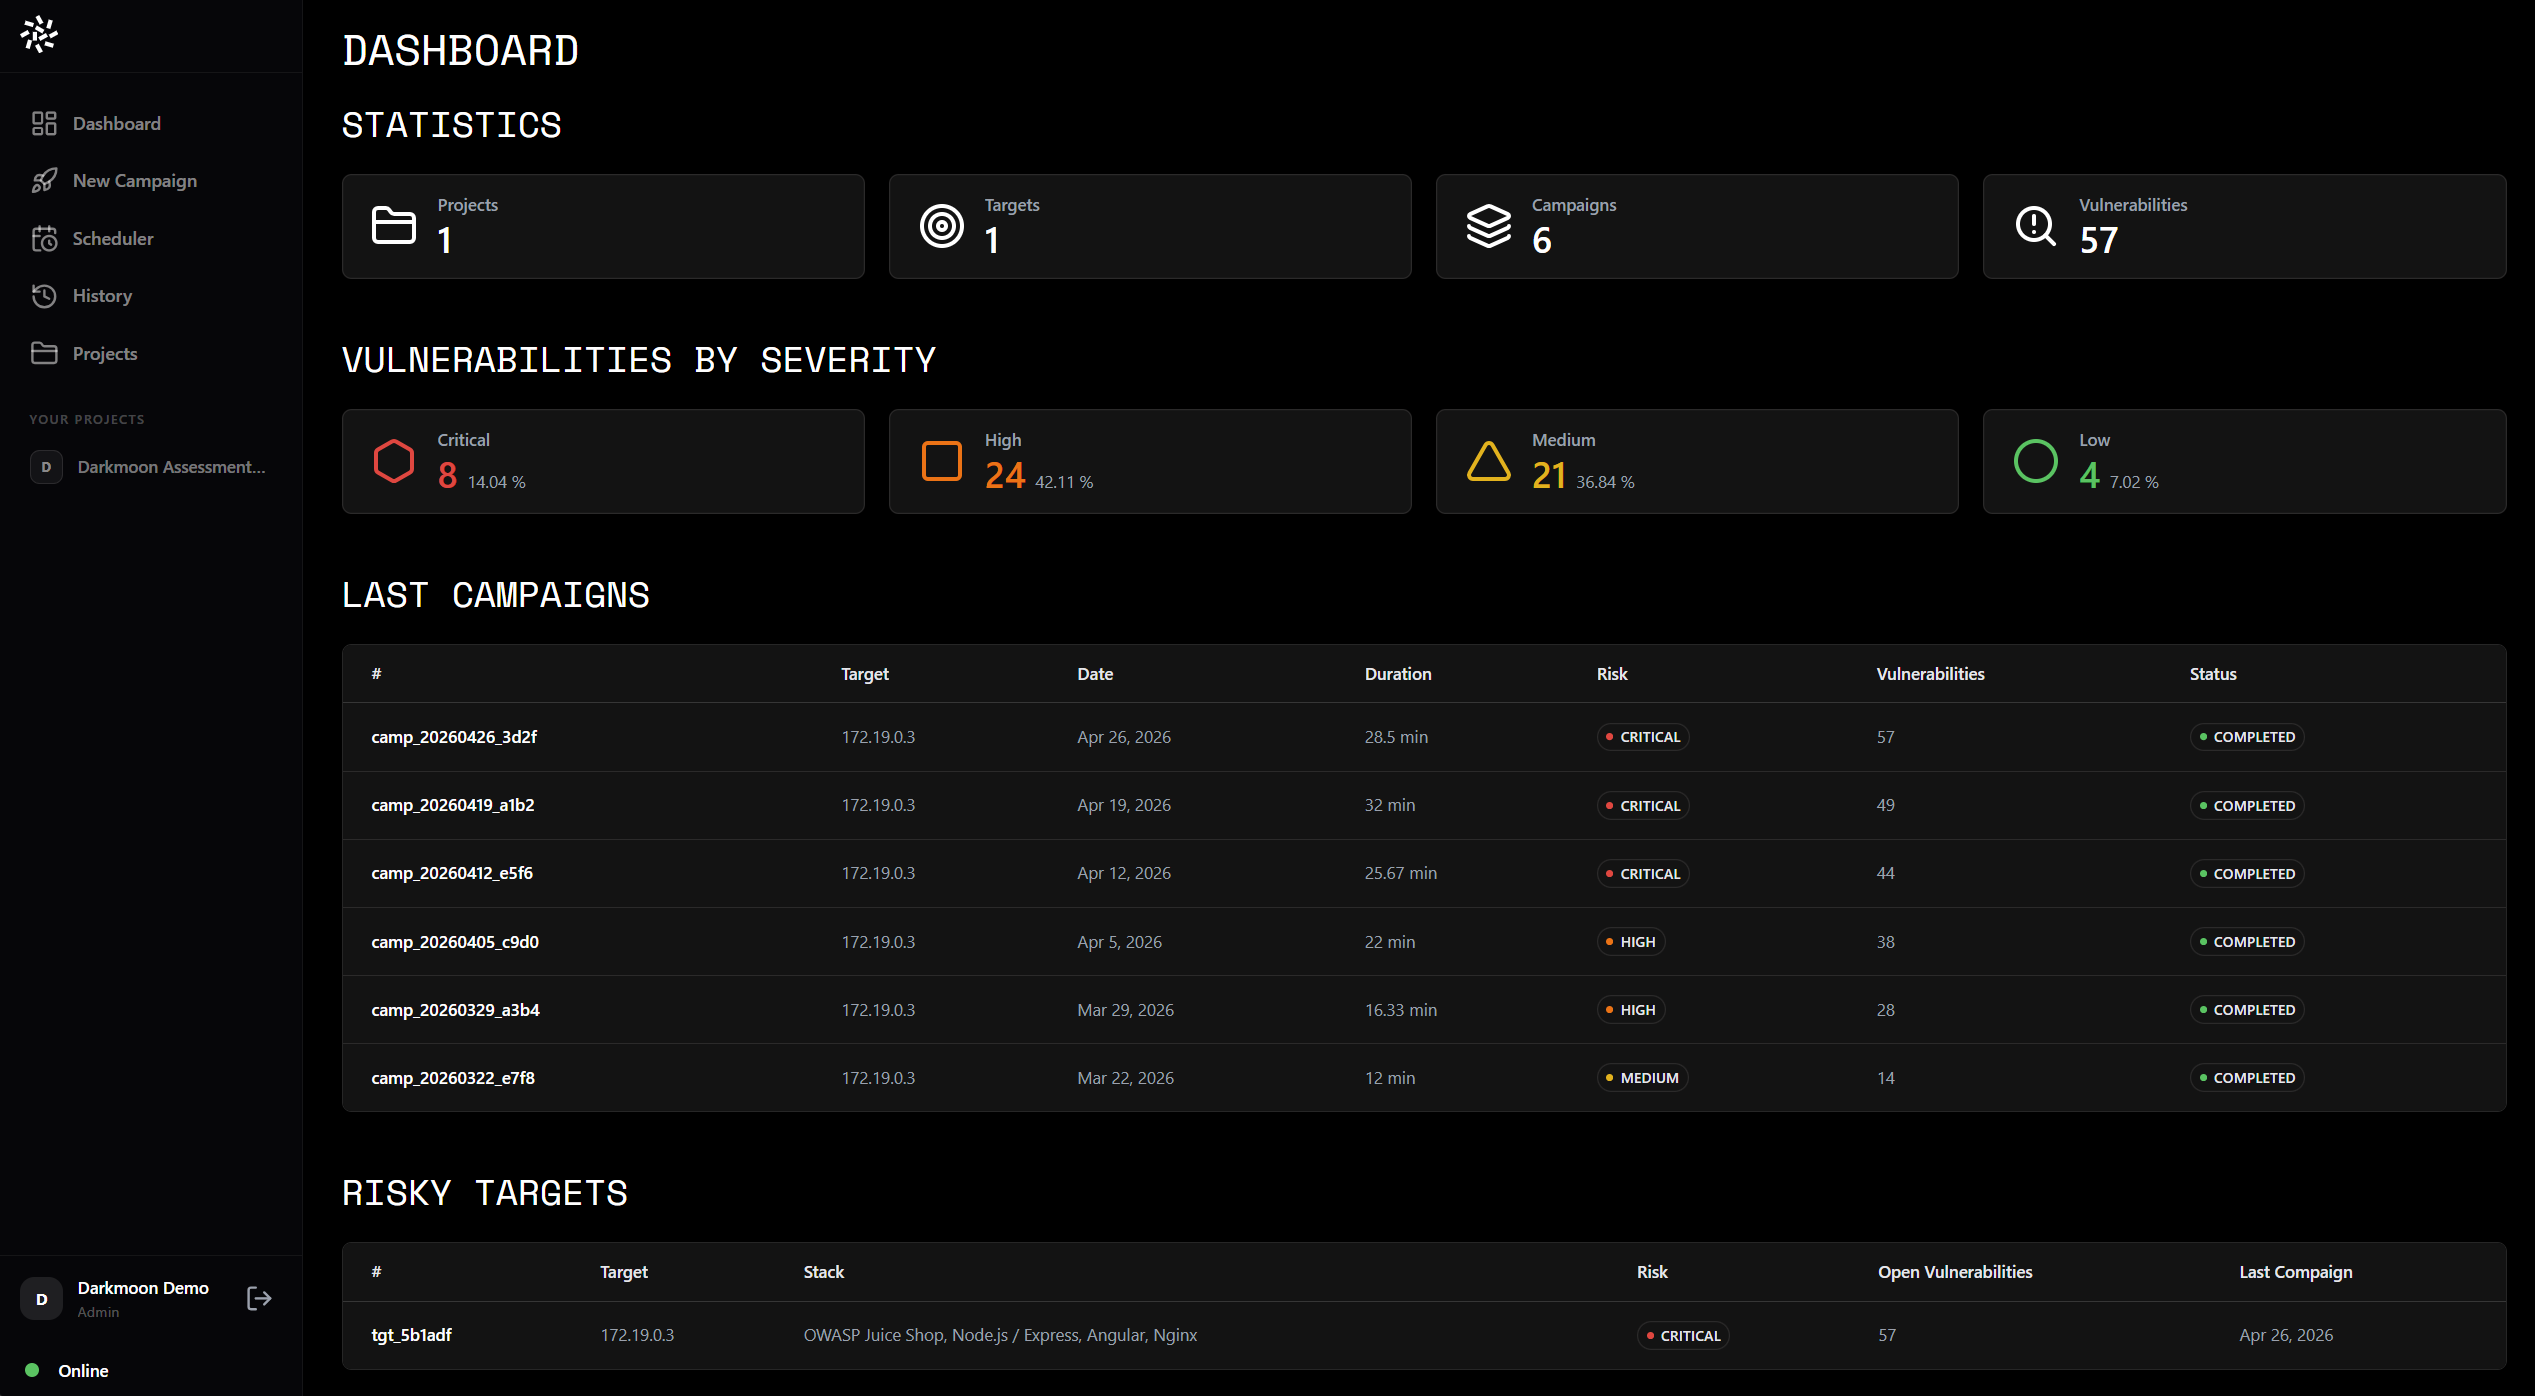
Home page — real-time overview of all active and past campaigns with vulnerability counts.
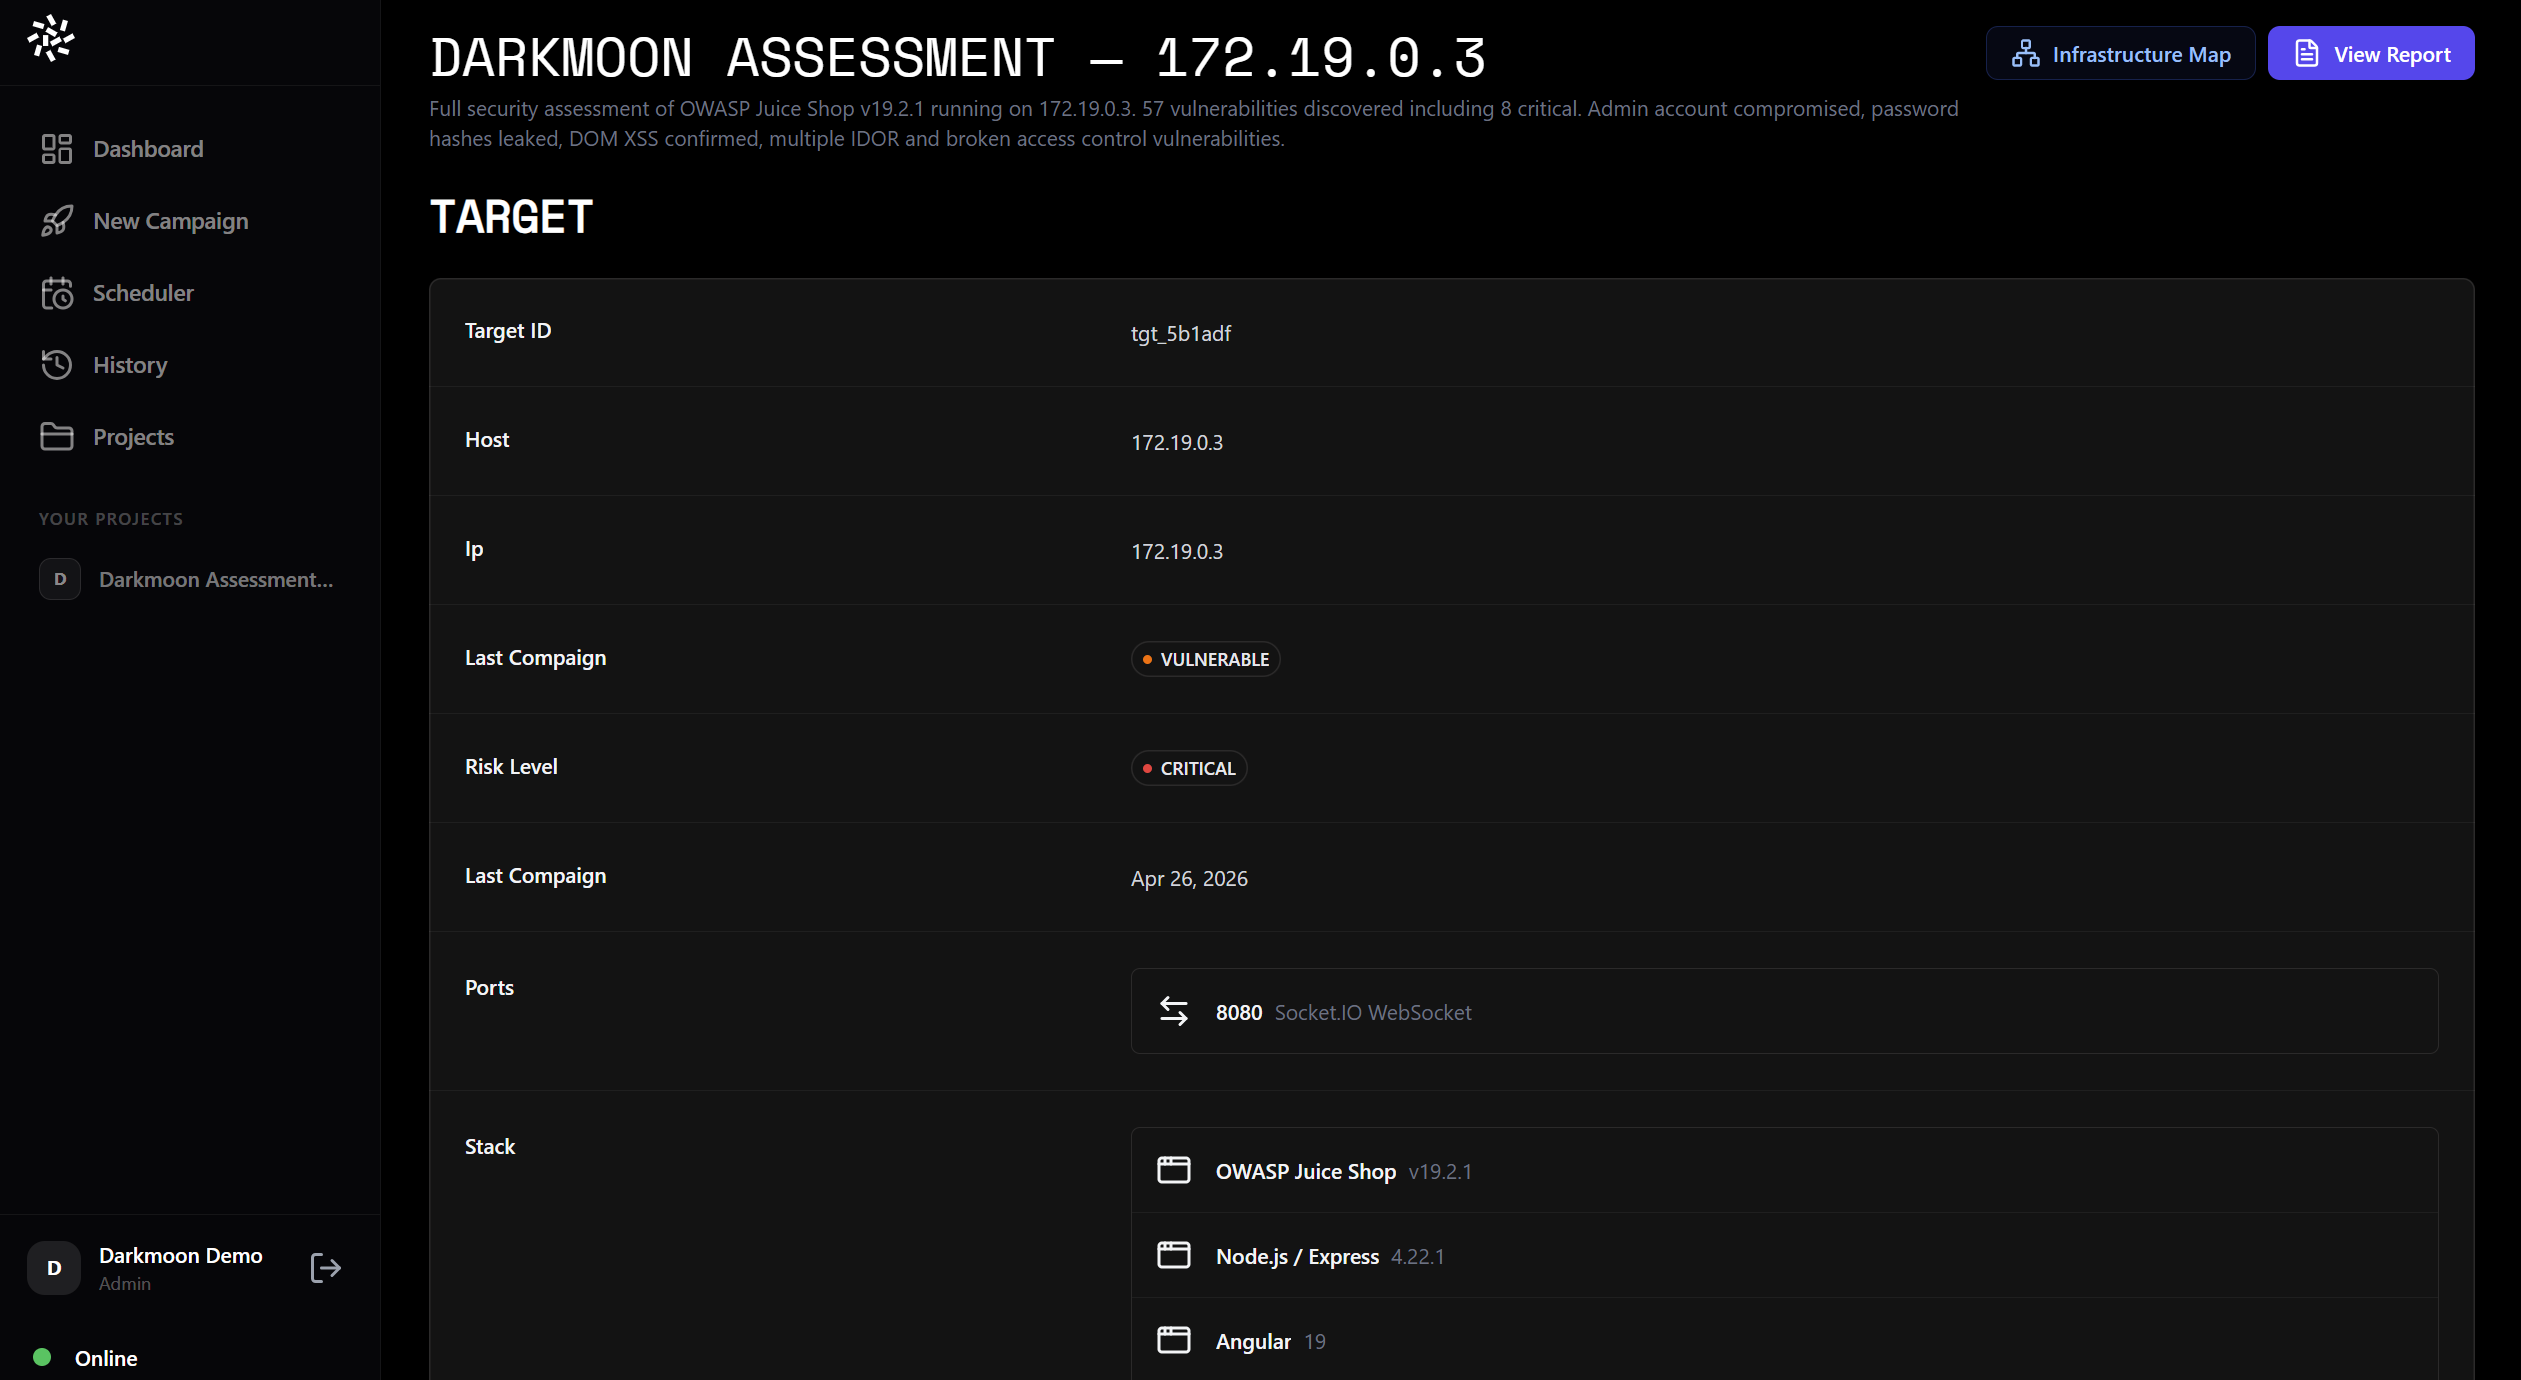
Project view — all campaigns for a given target, with global vulnerability statistics.
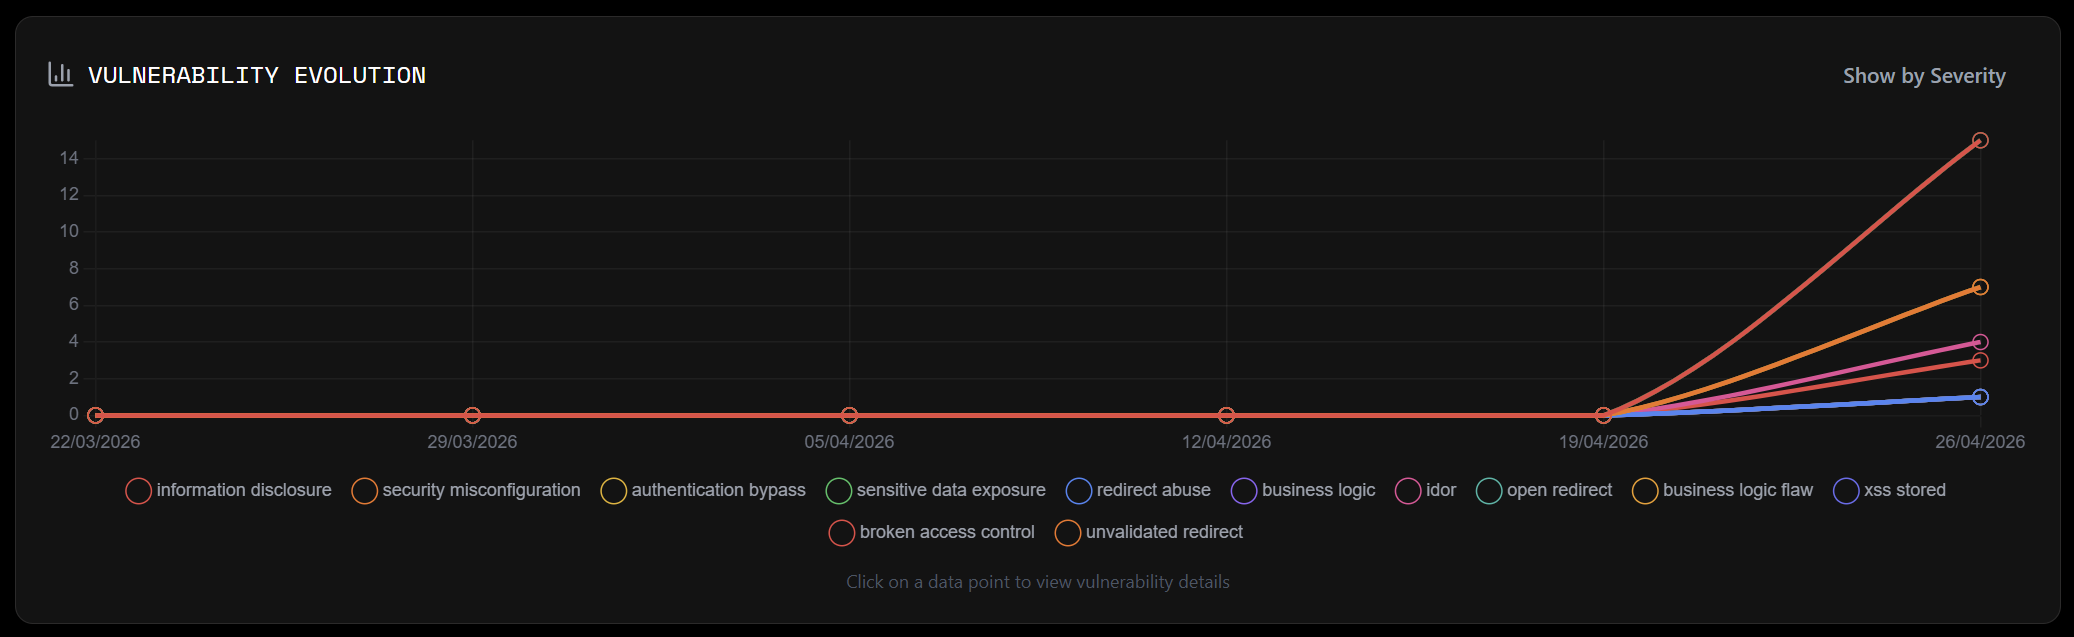
Vulnerability breakdown by type and severity across all campaigns of a project.
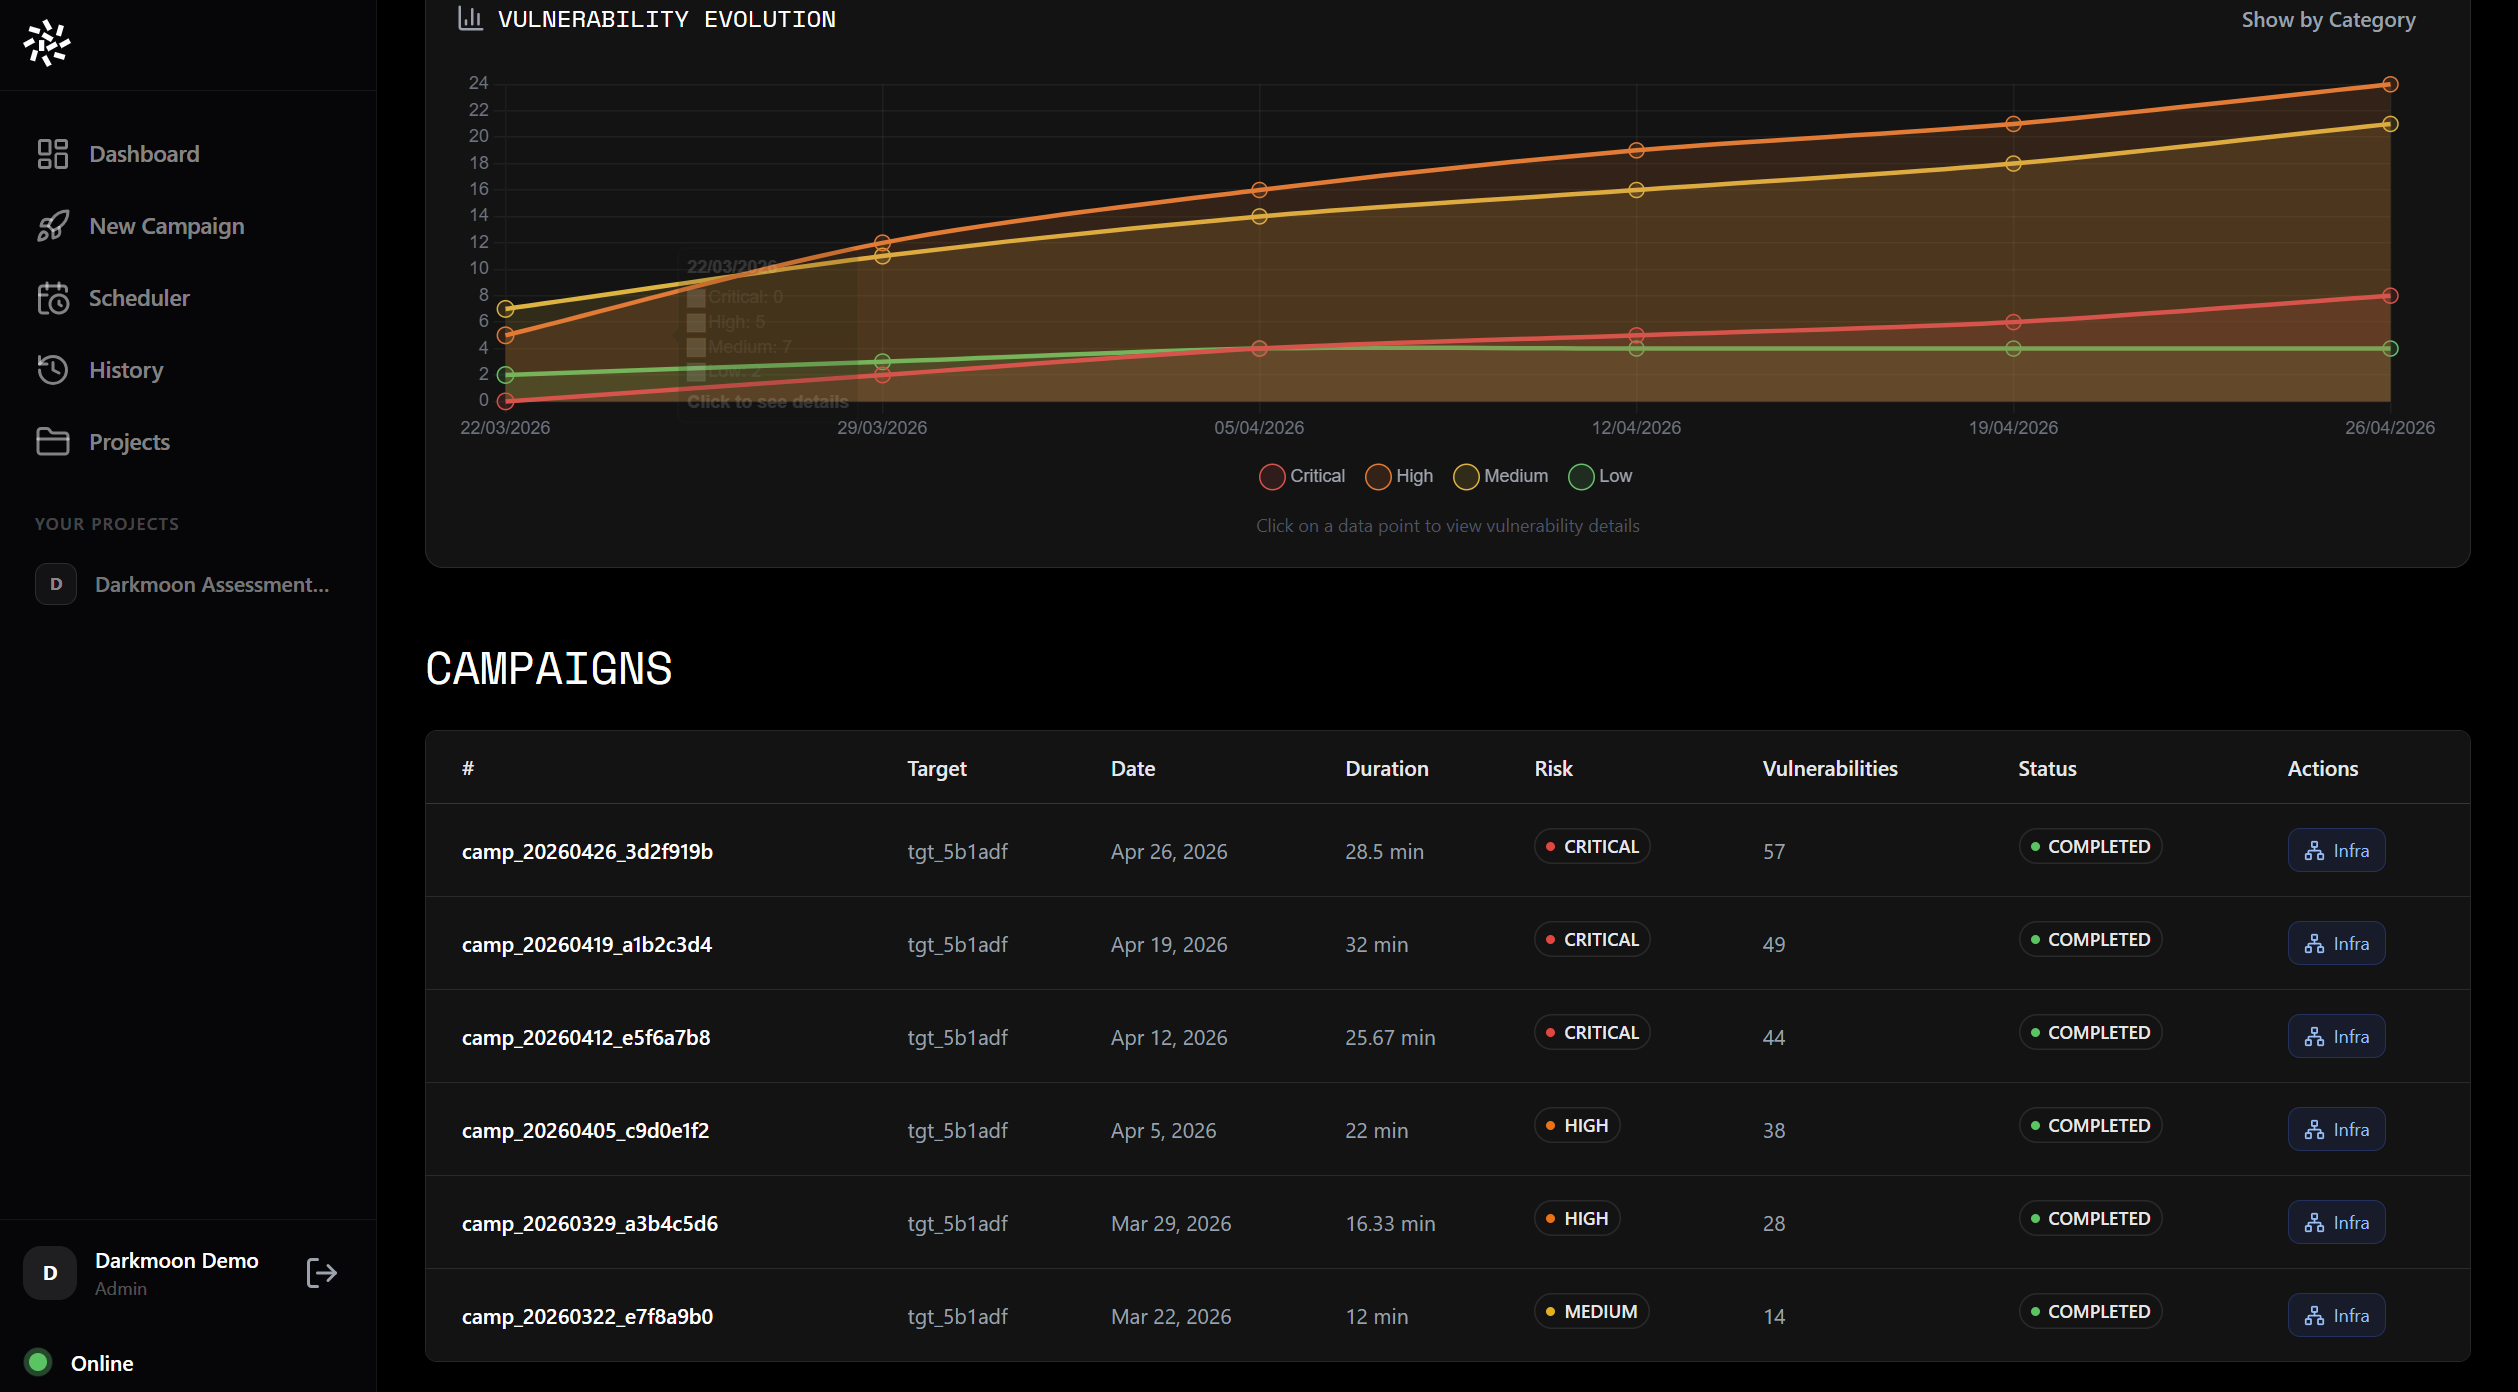
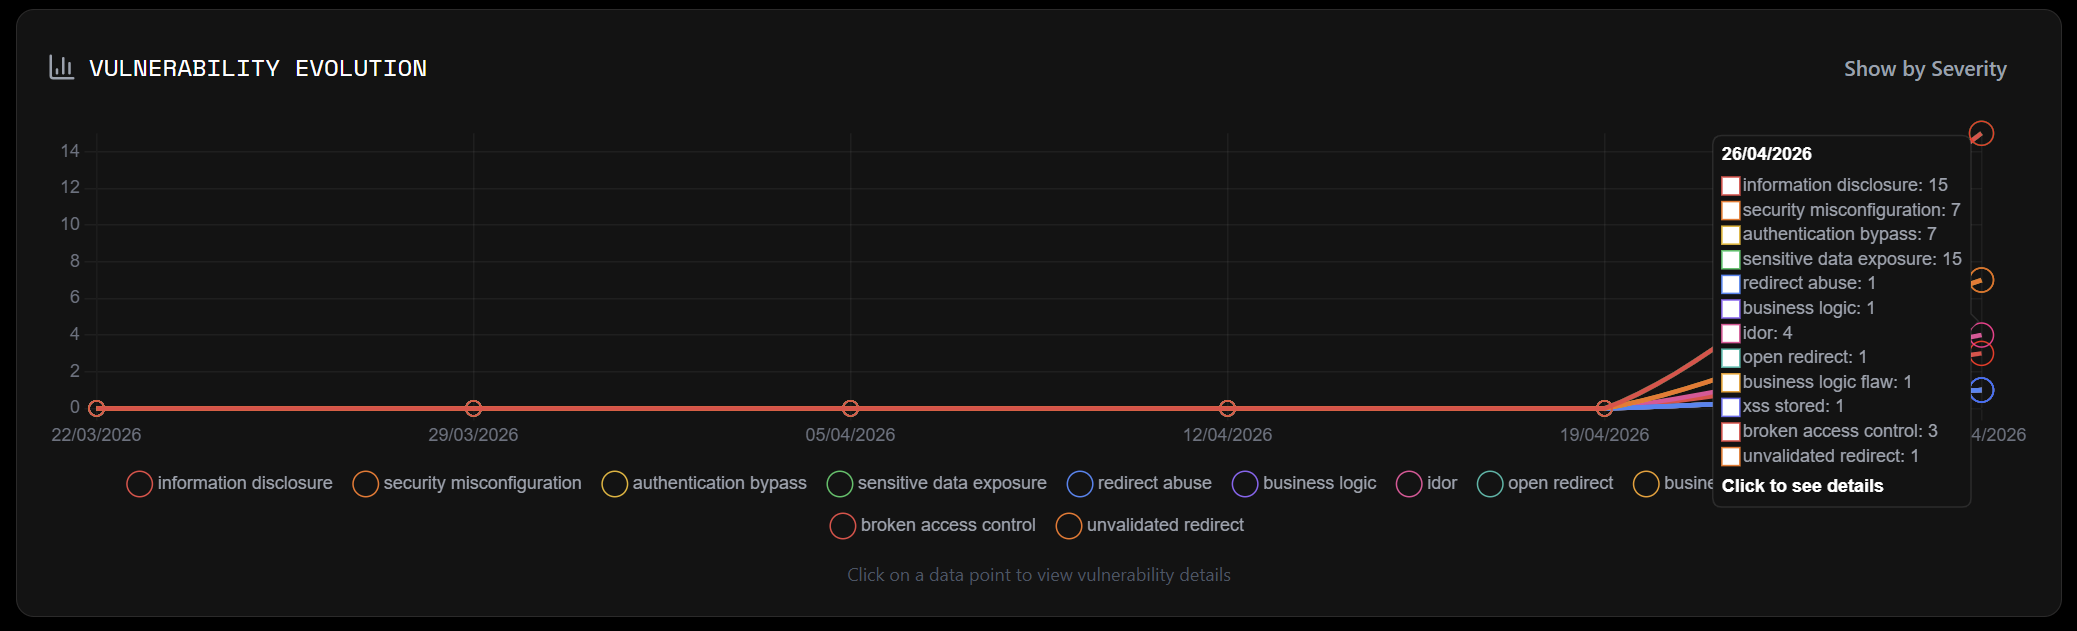
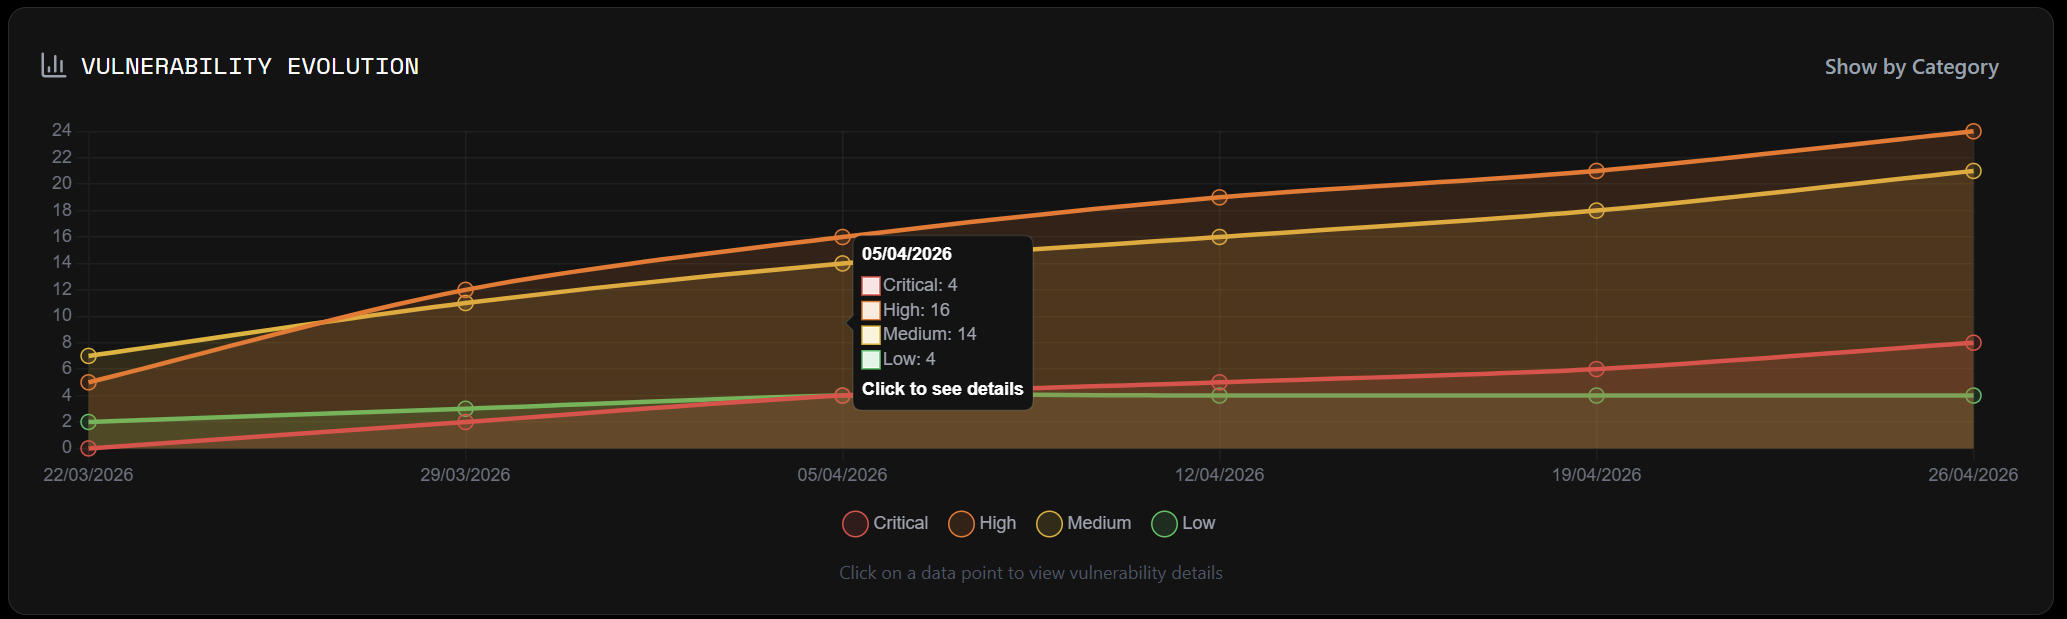
Vulnerability evolution graphs
Track how vulnerabilities evolve across campaigns over time. Graphs show whether new vulnerabilities are being discovered or remediation is effective.
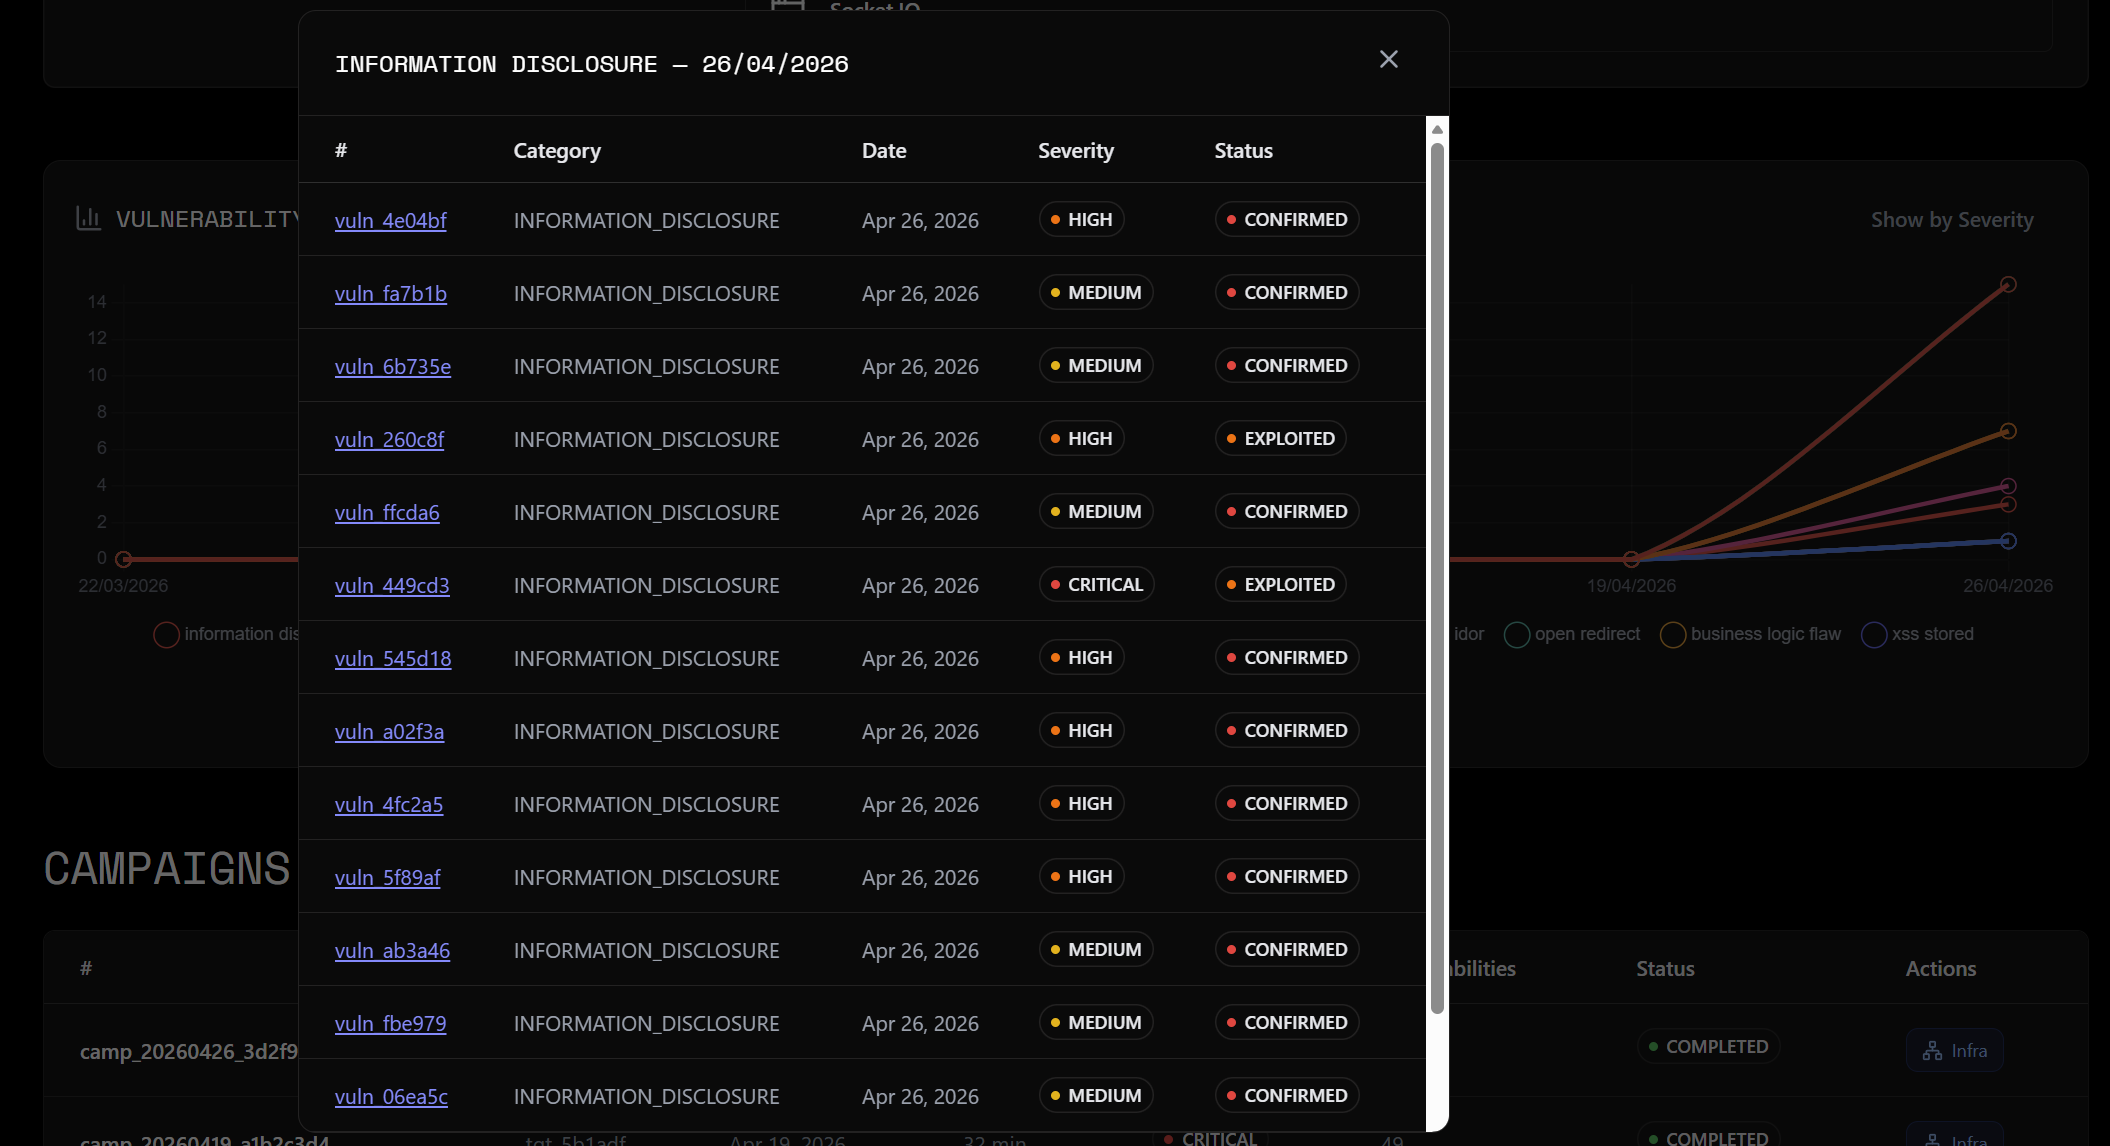
Campaign detail view
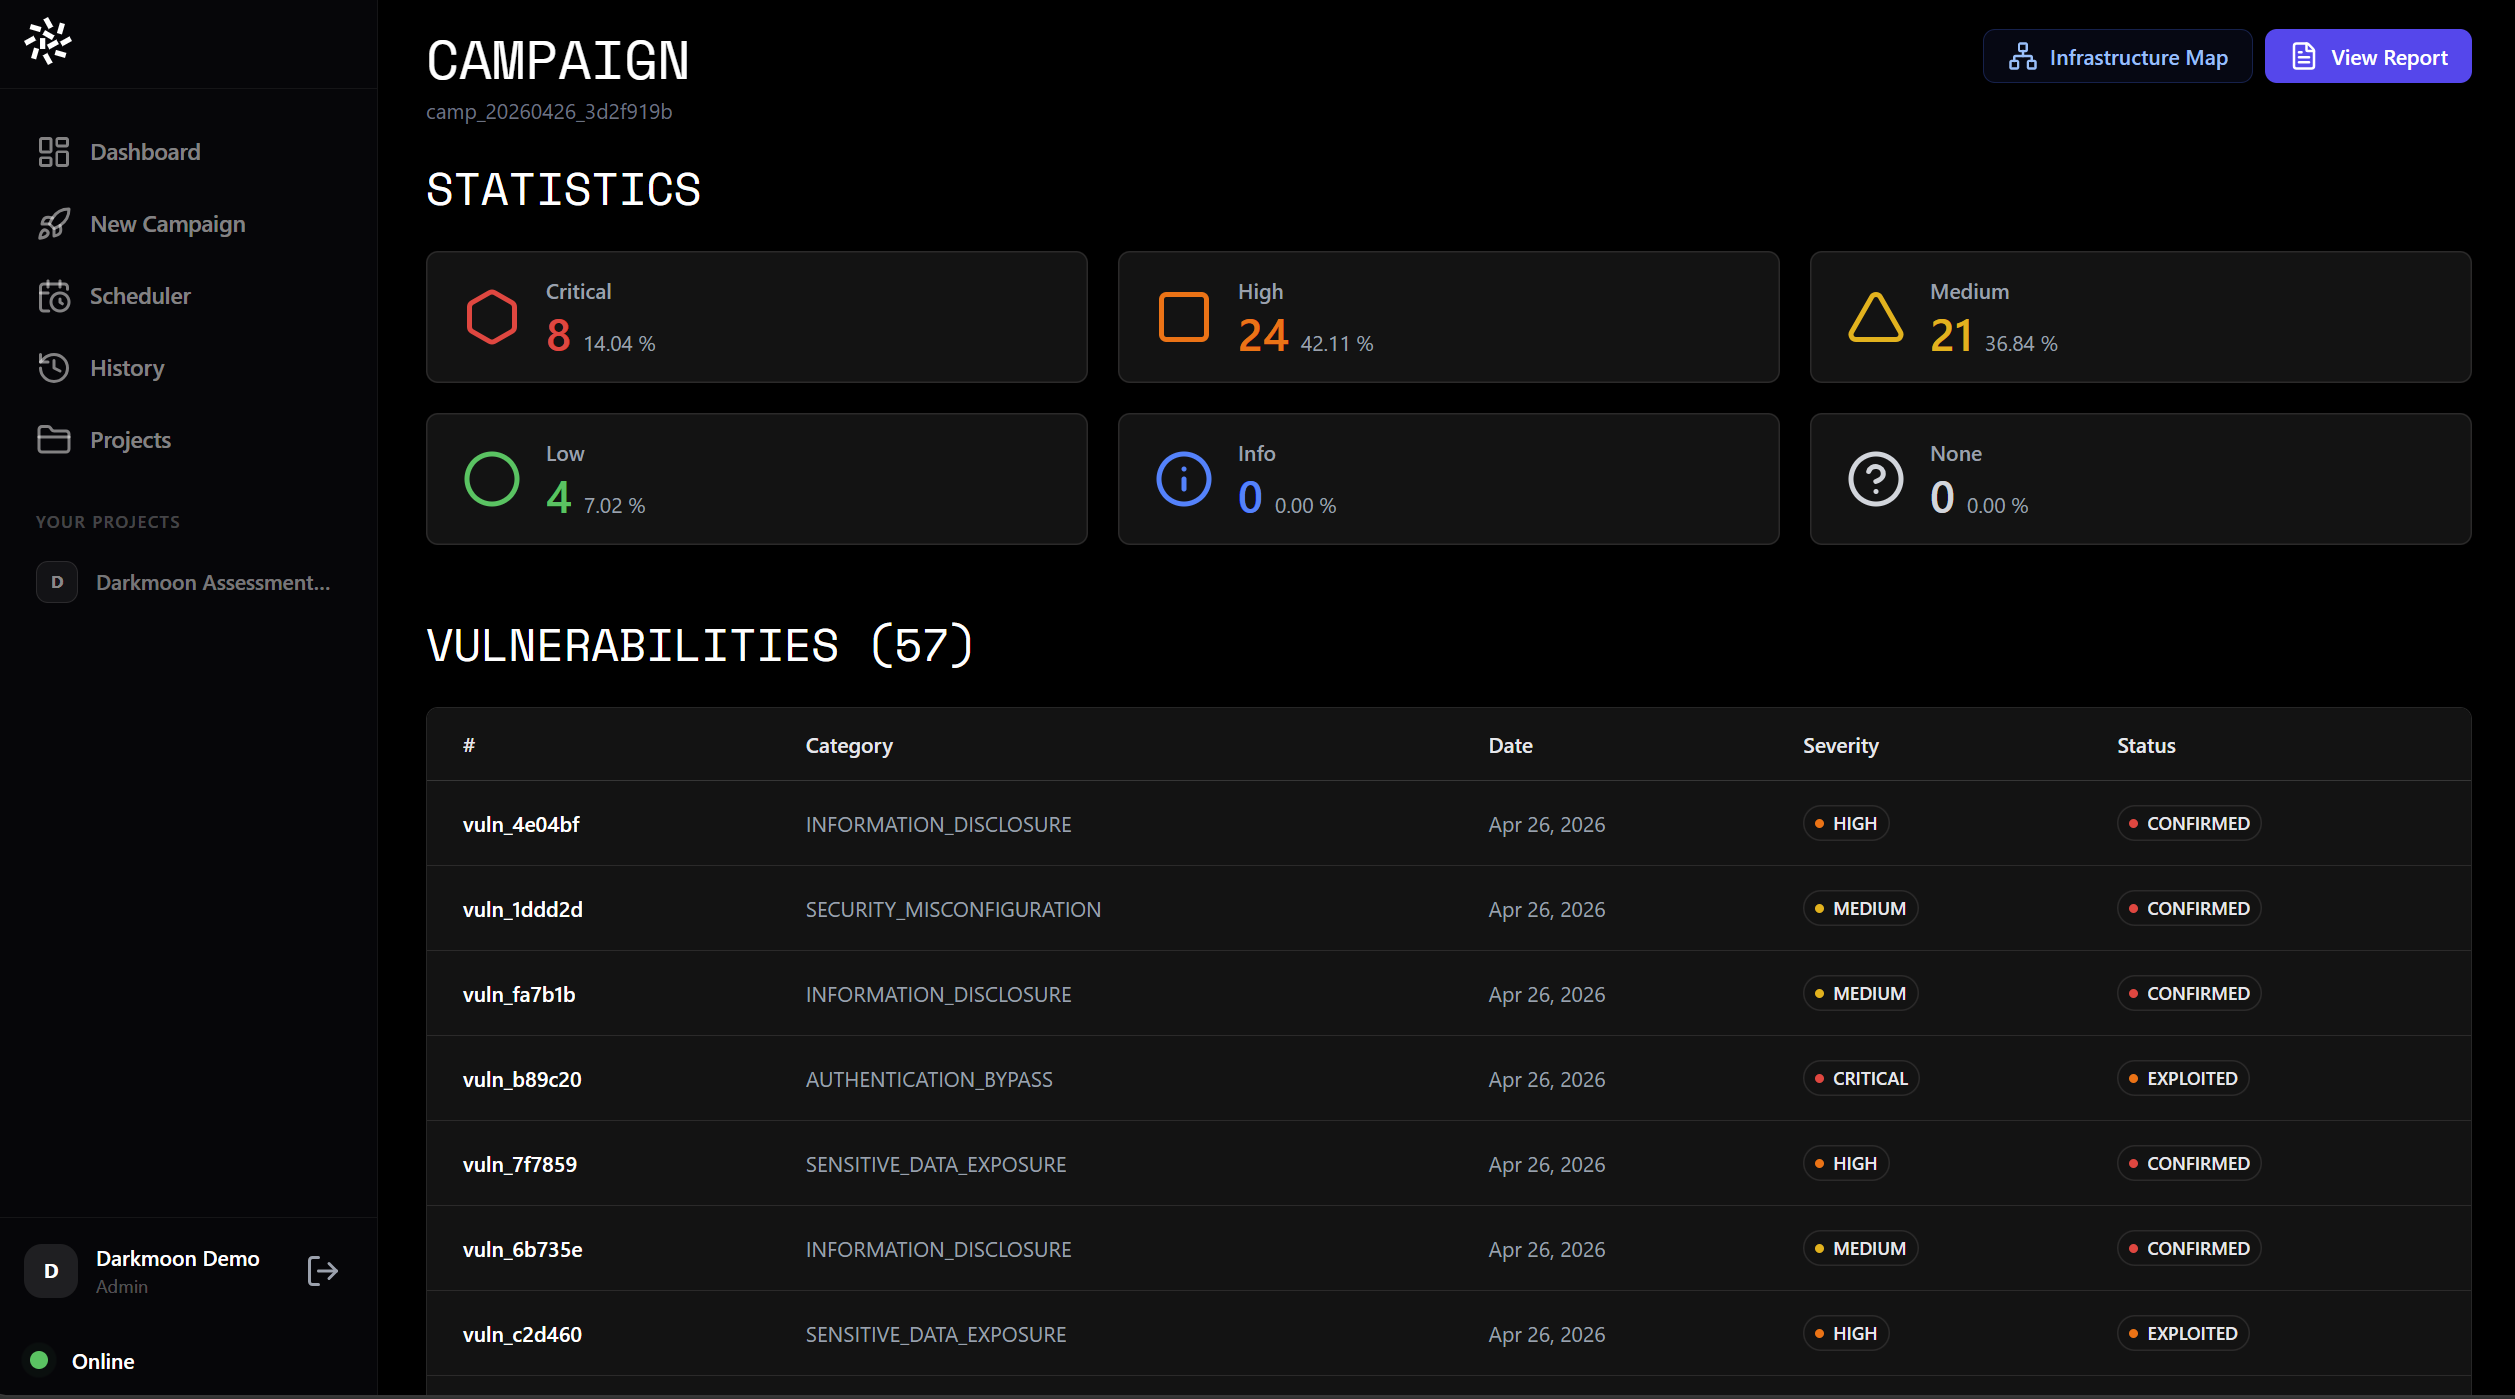
Campaign detail — list of discovered vulnerabilities with severity, category, and status.
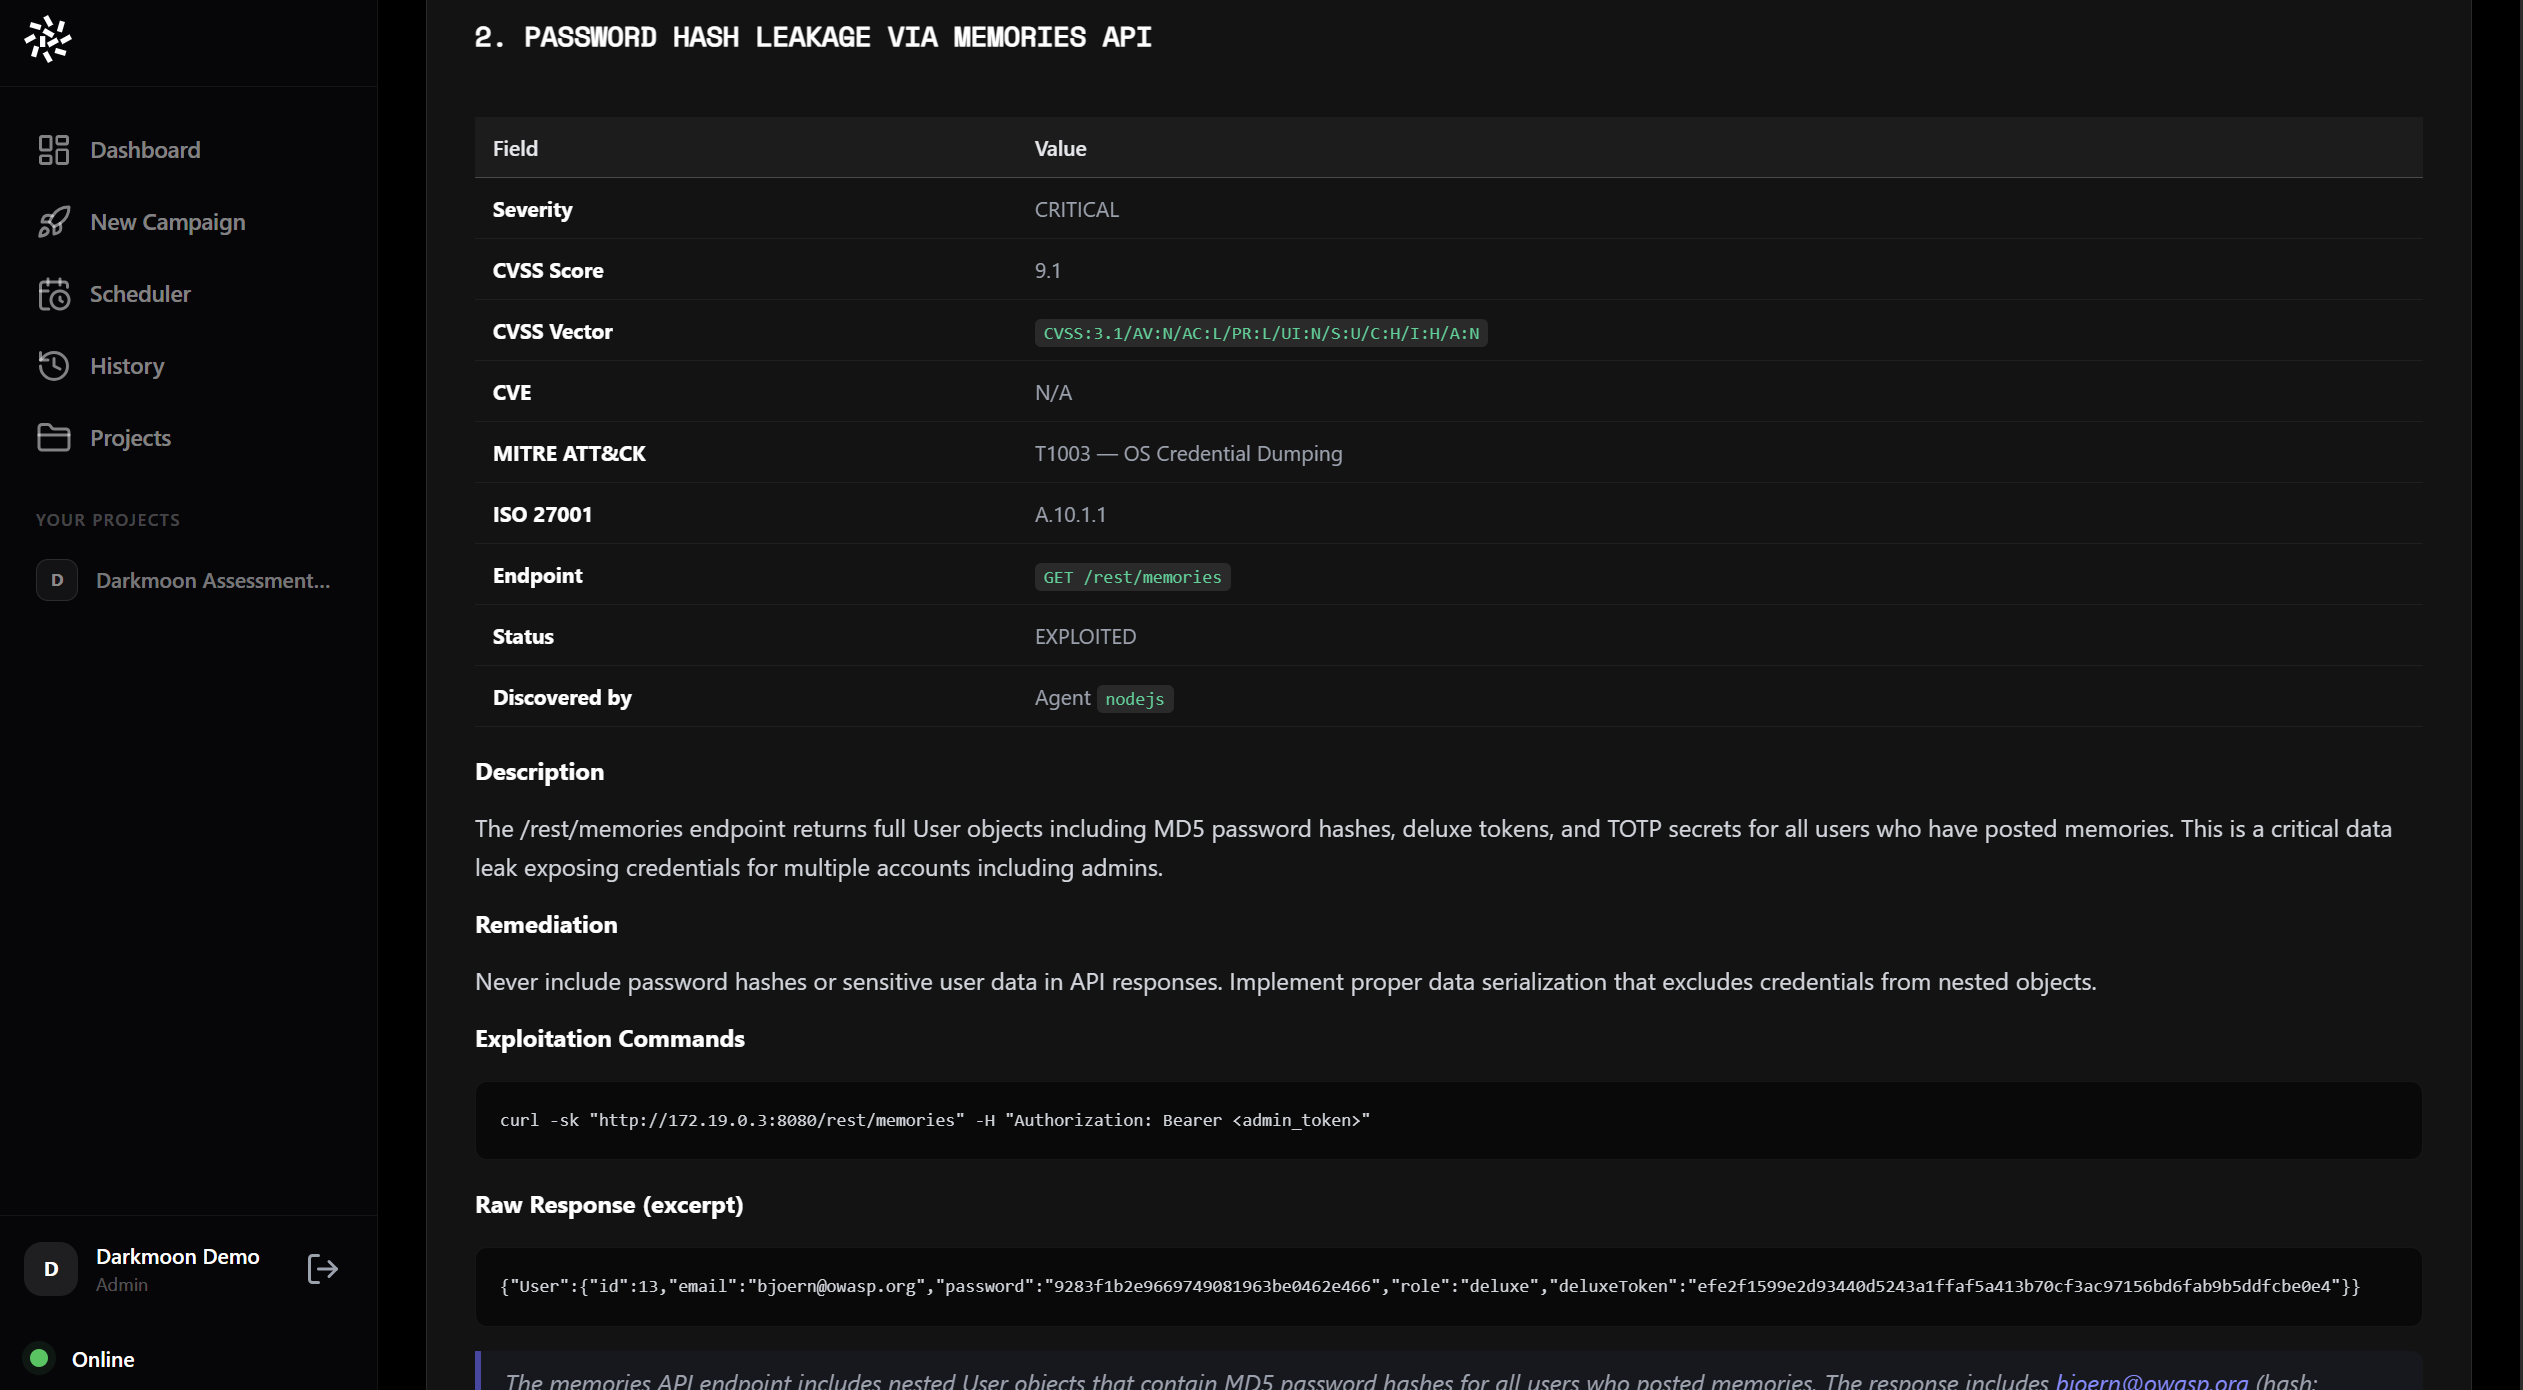
Vulnerability detail
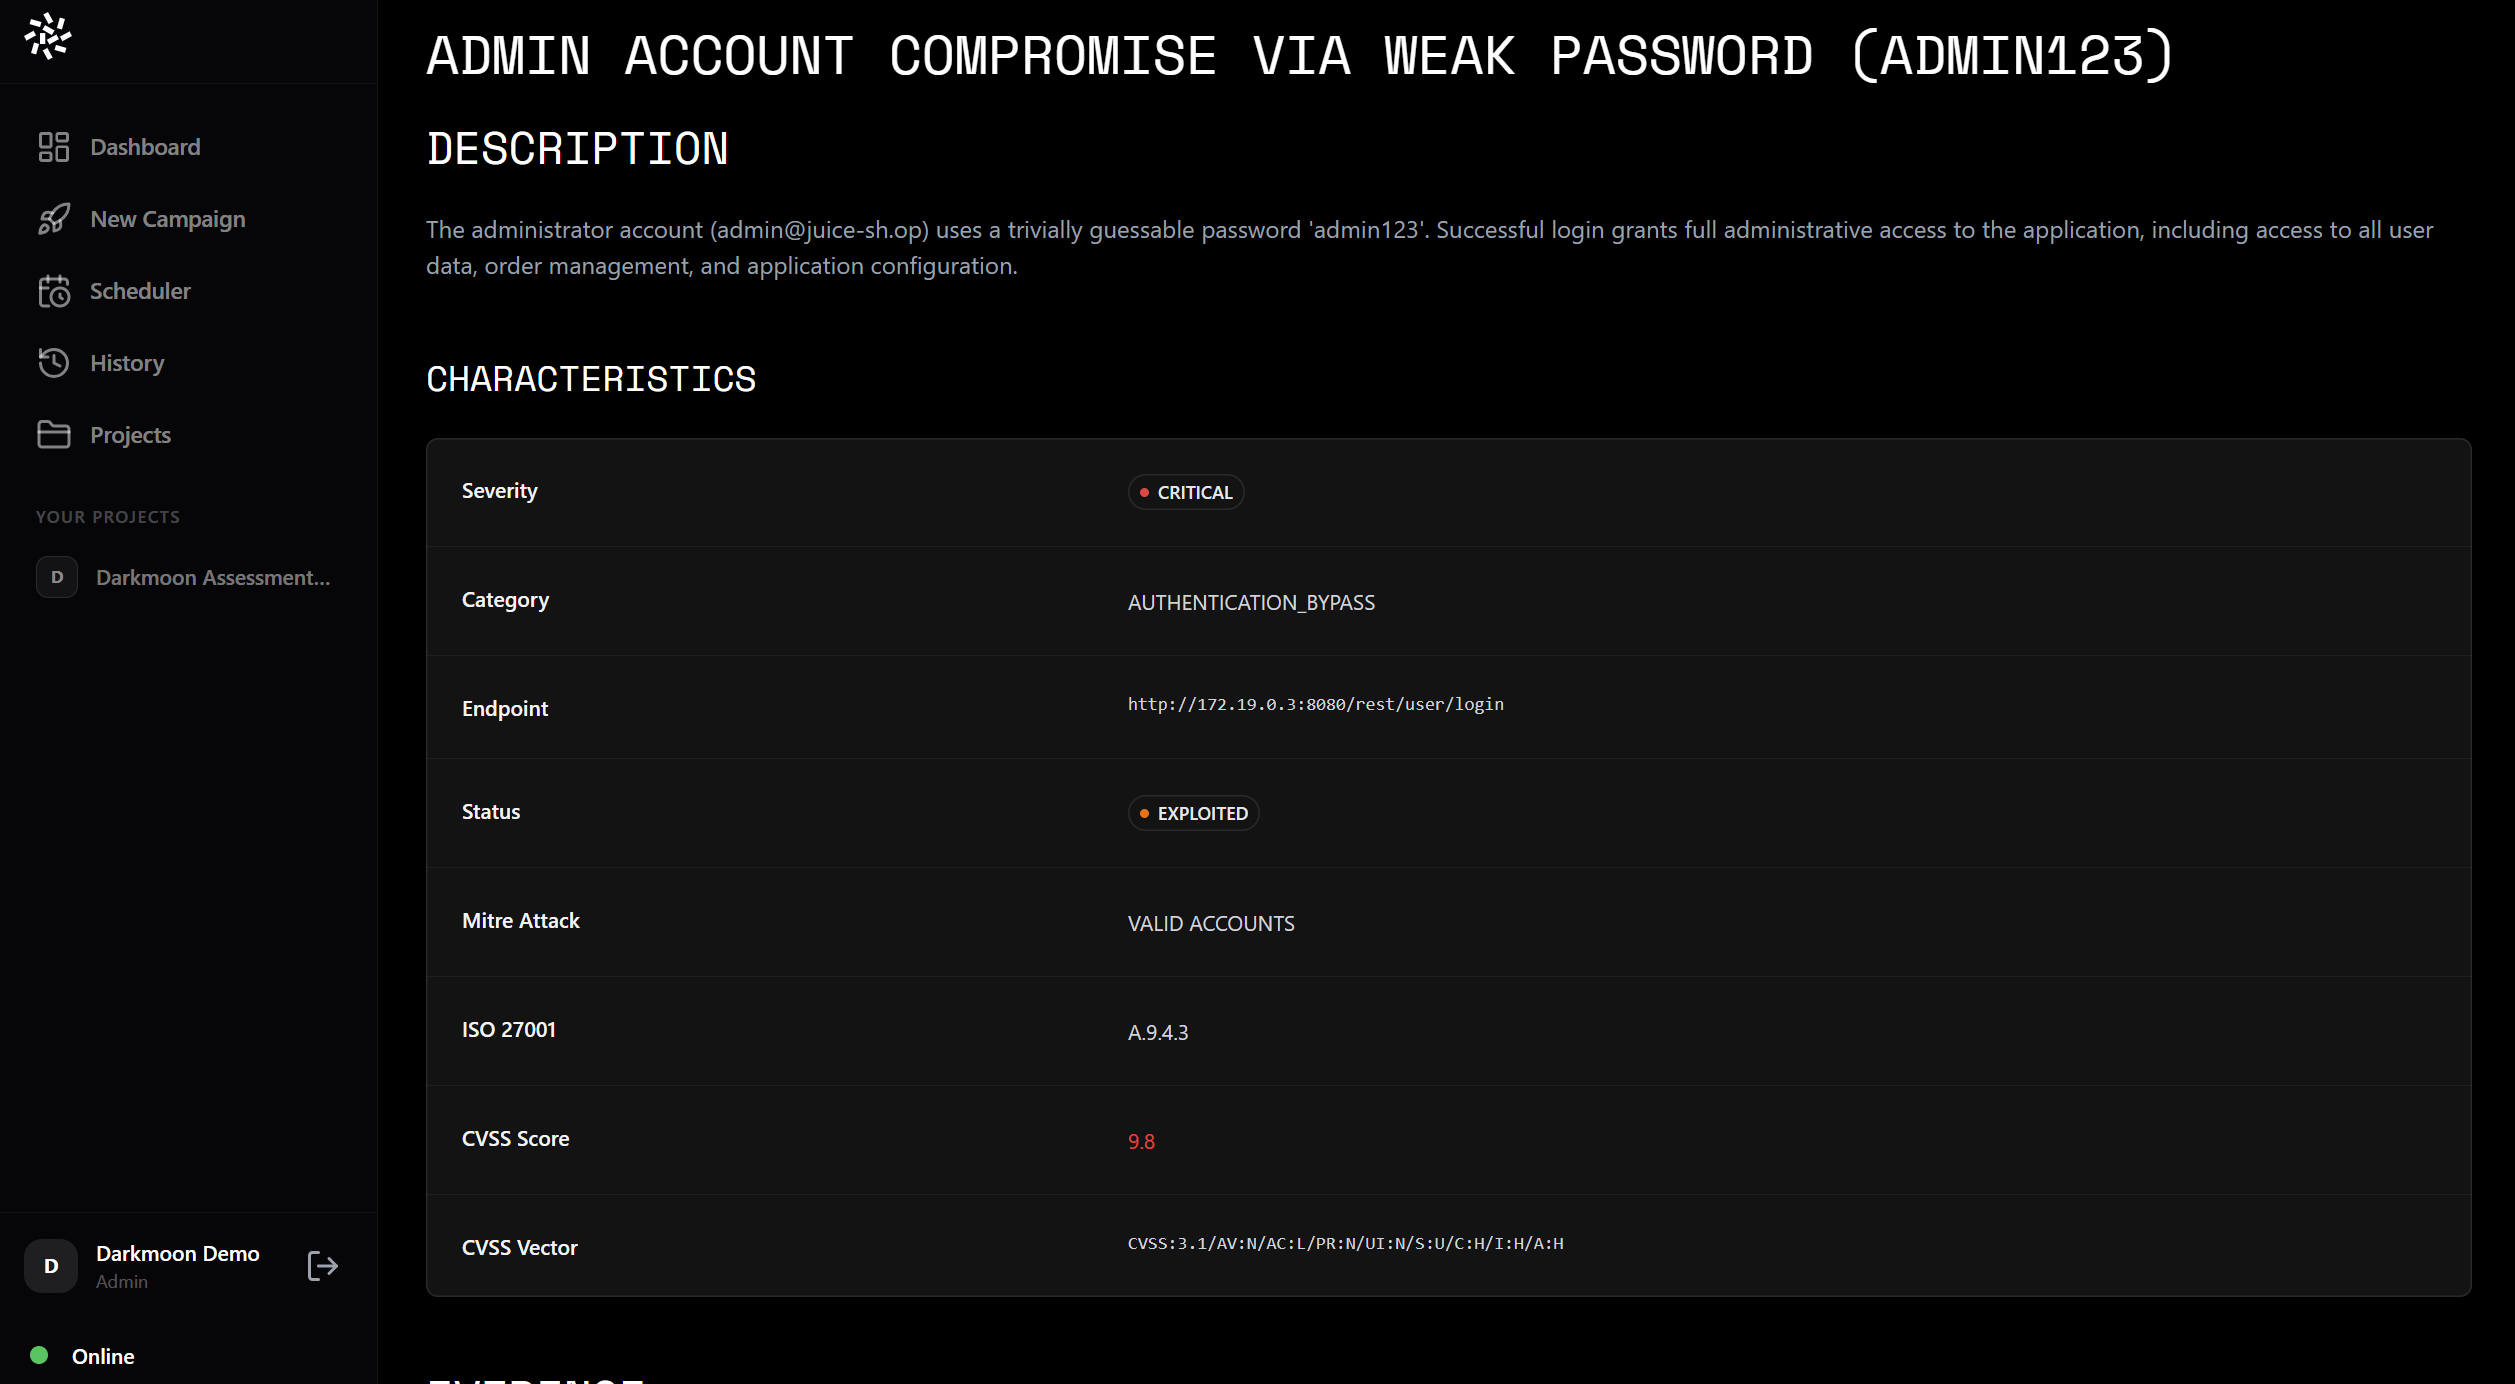
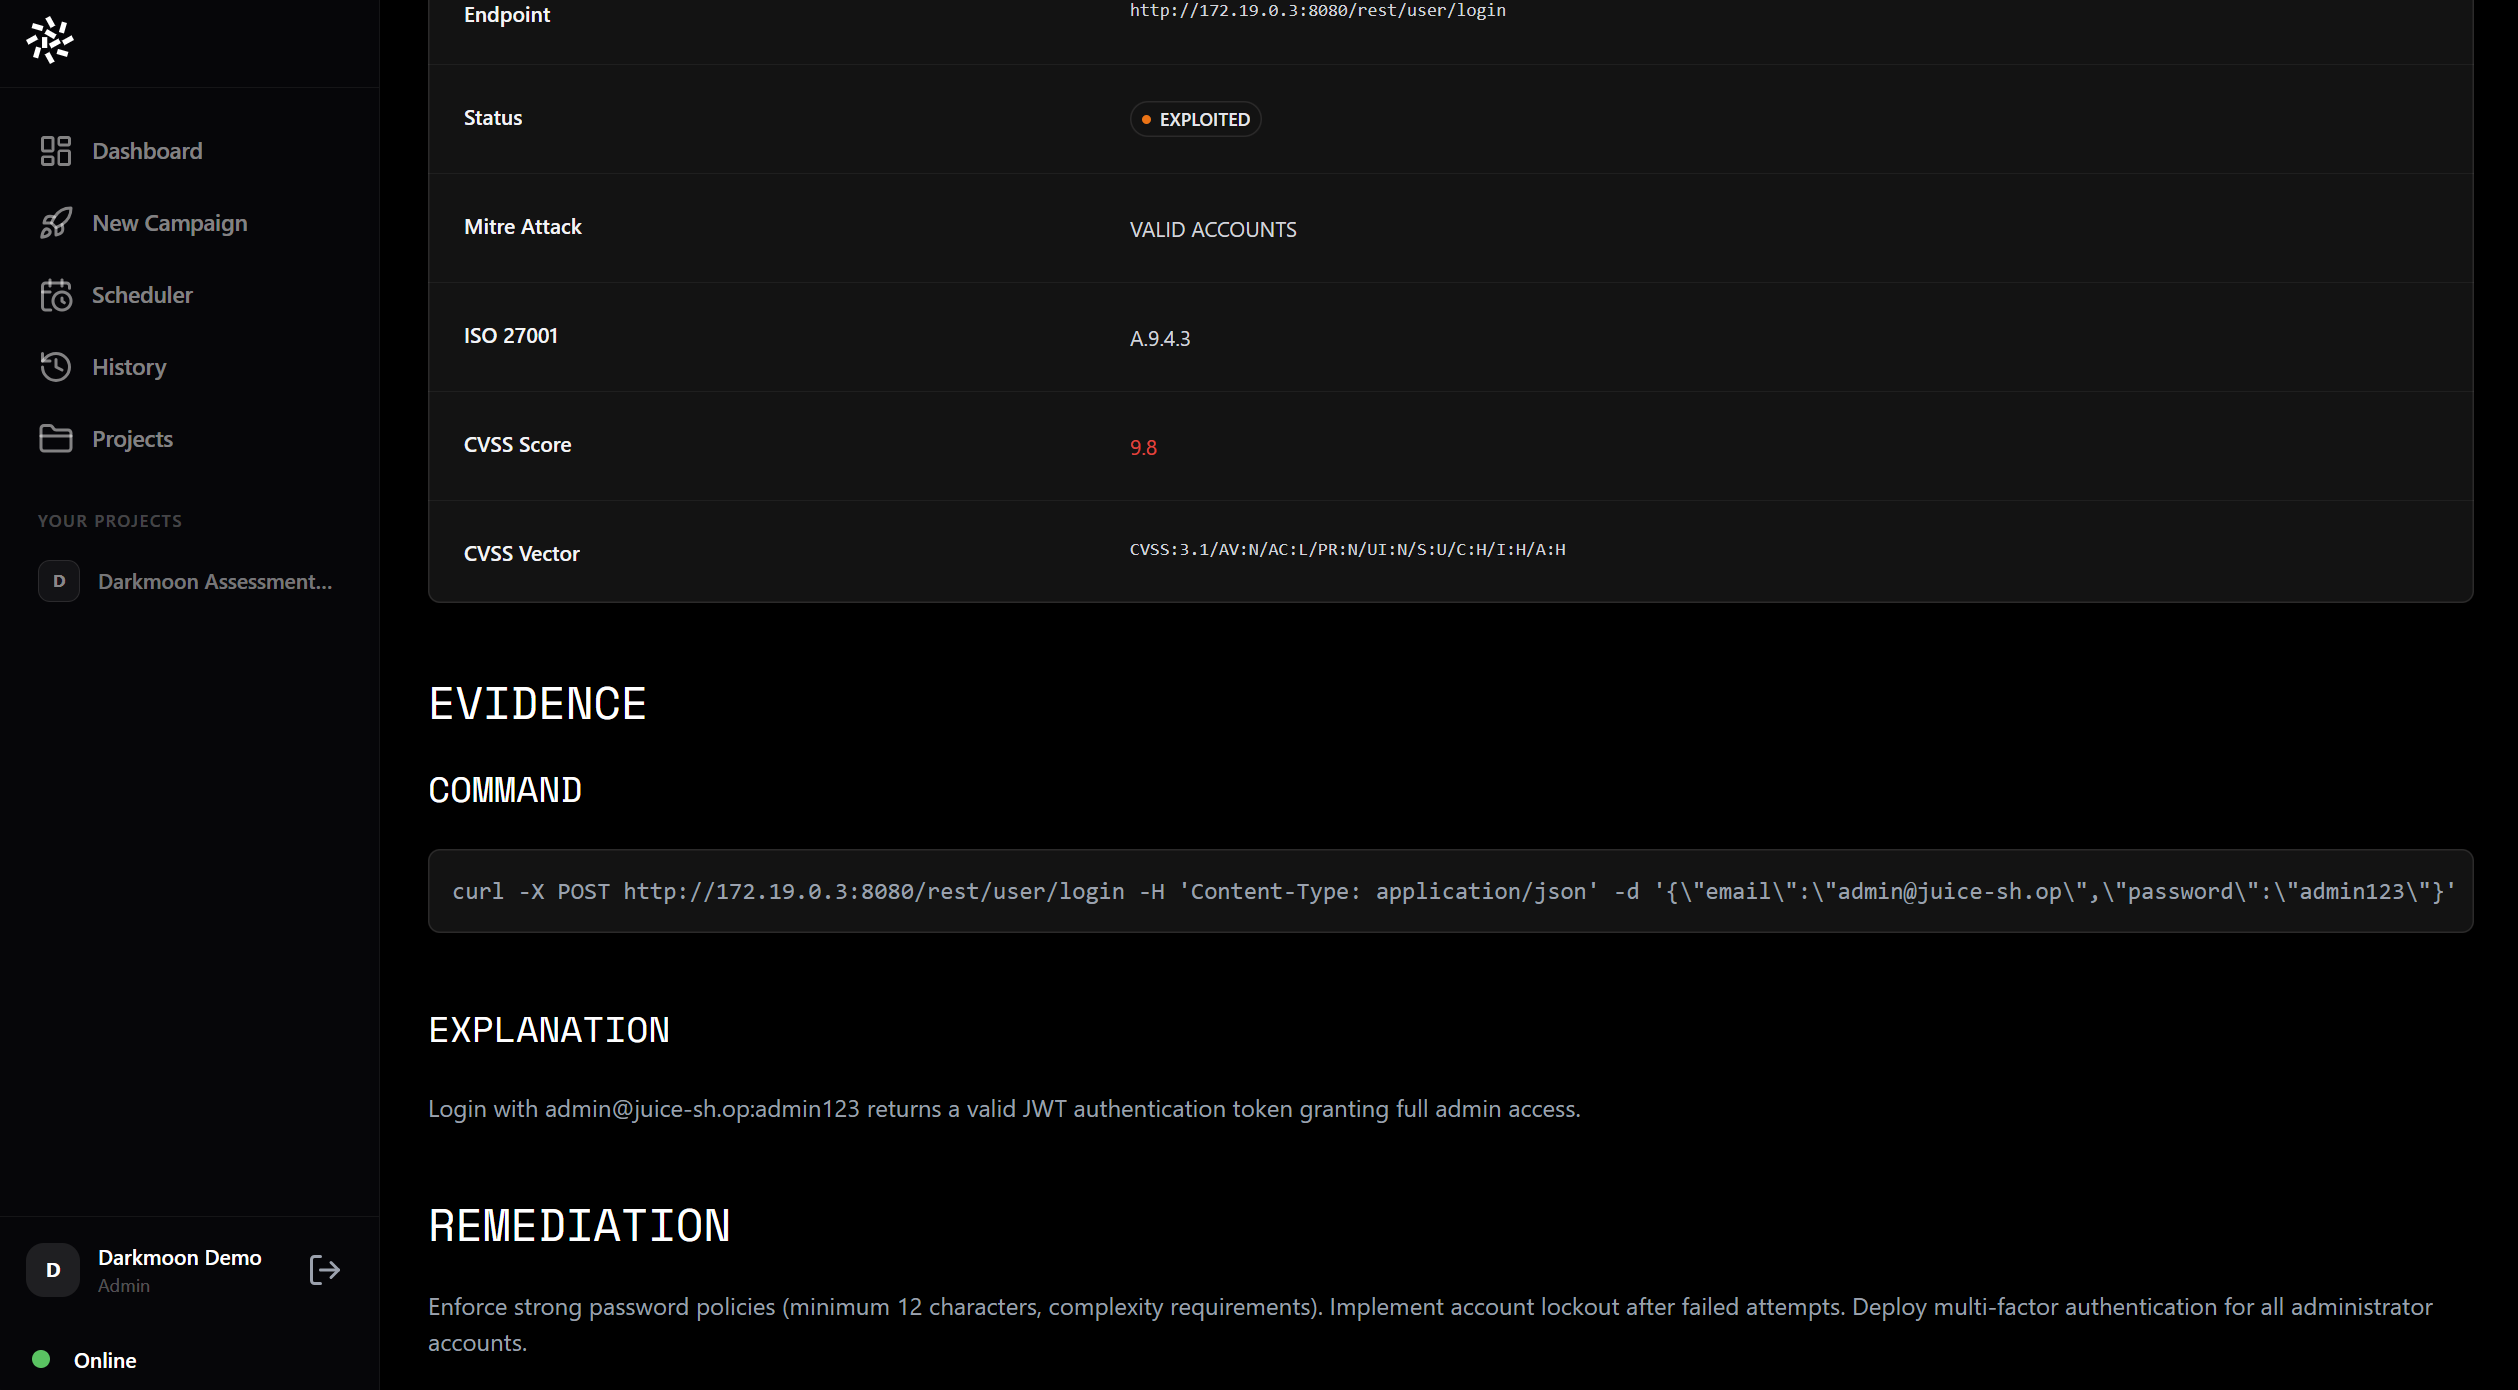
Vulnerability detail — summary, evidence logs, and remediation recommendations.
Infrastructure map
For each campaign, a deployment graph shows the attack surface as an interactive node map. Sensitive nodes with associated vulnerabilities are highlighted and clickable.
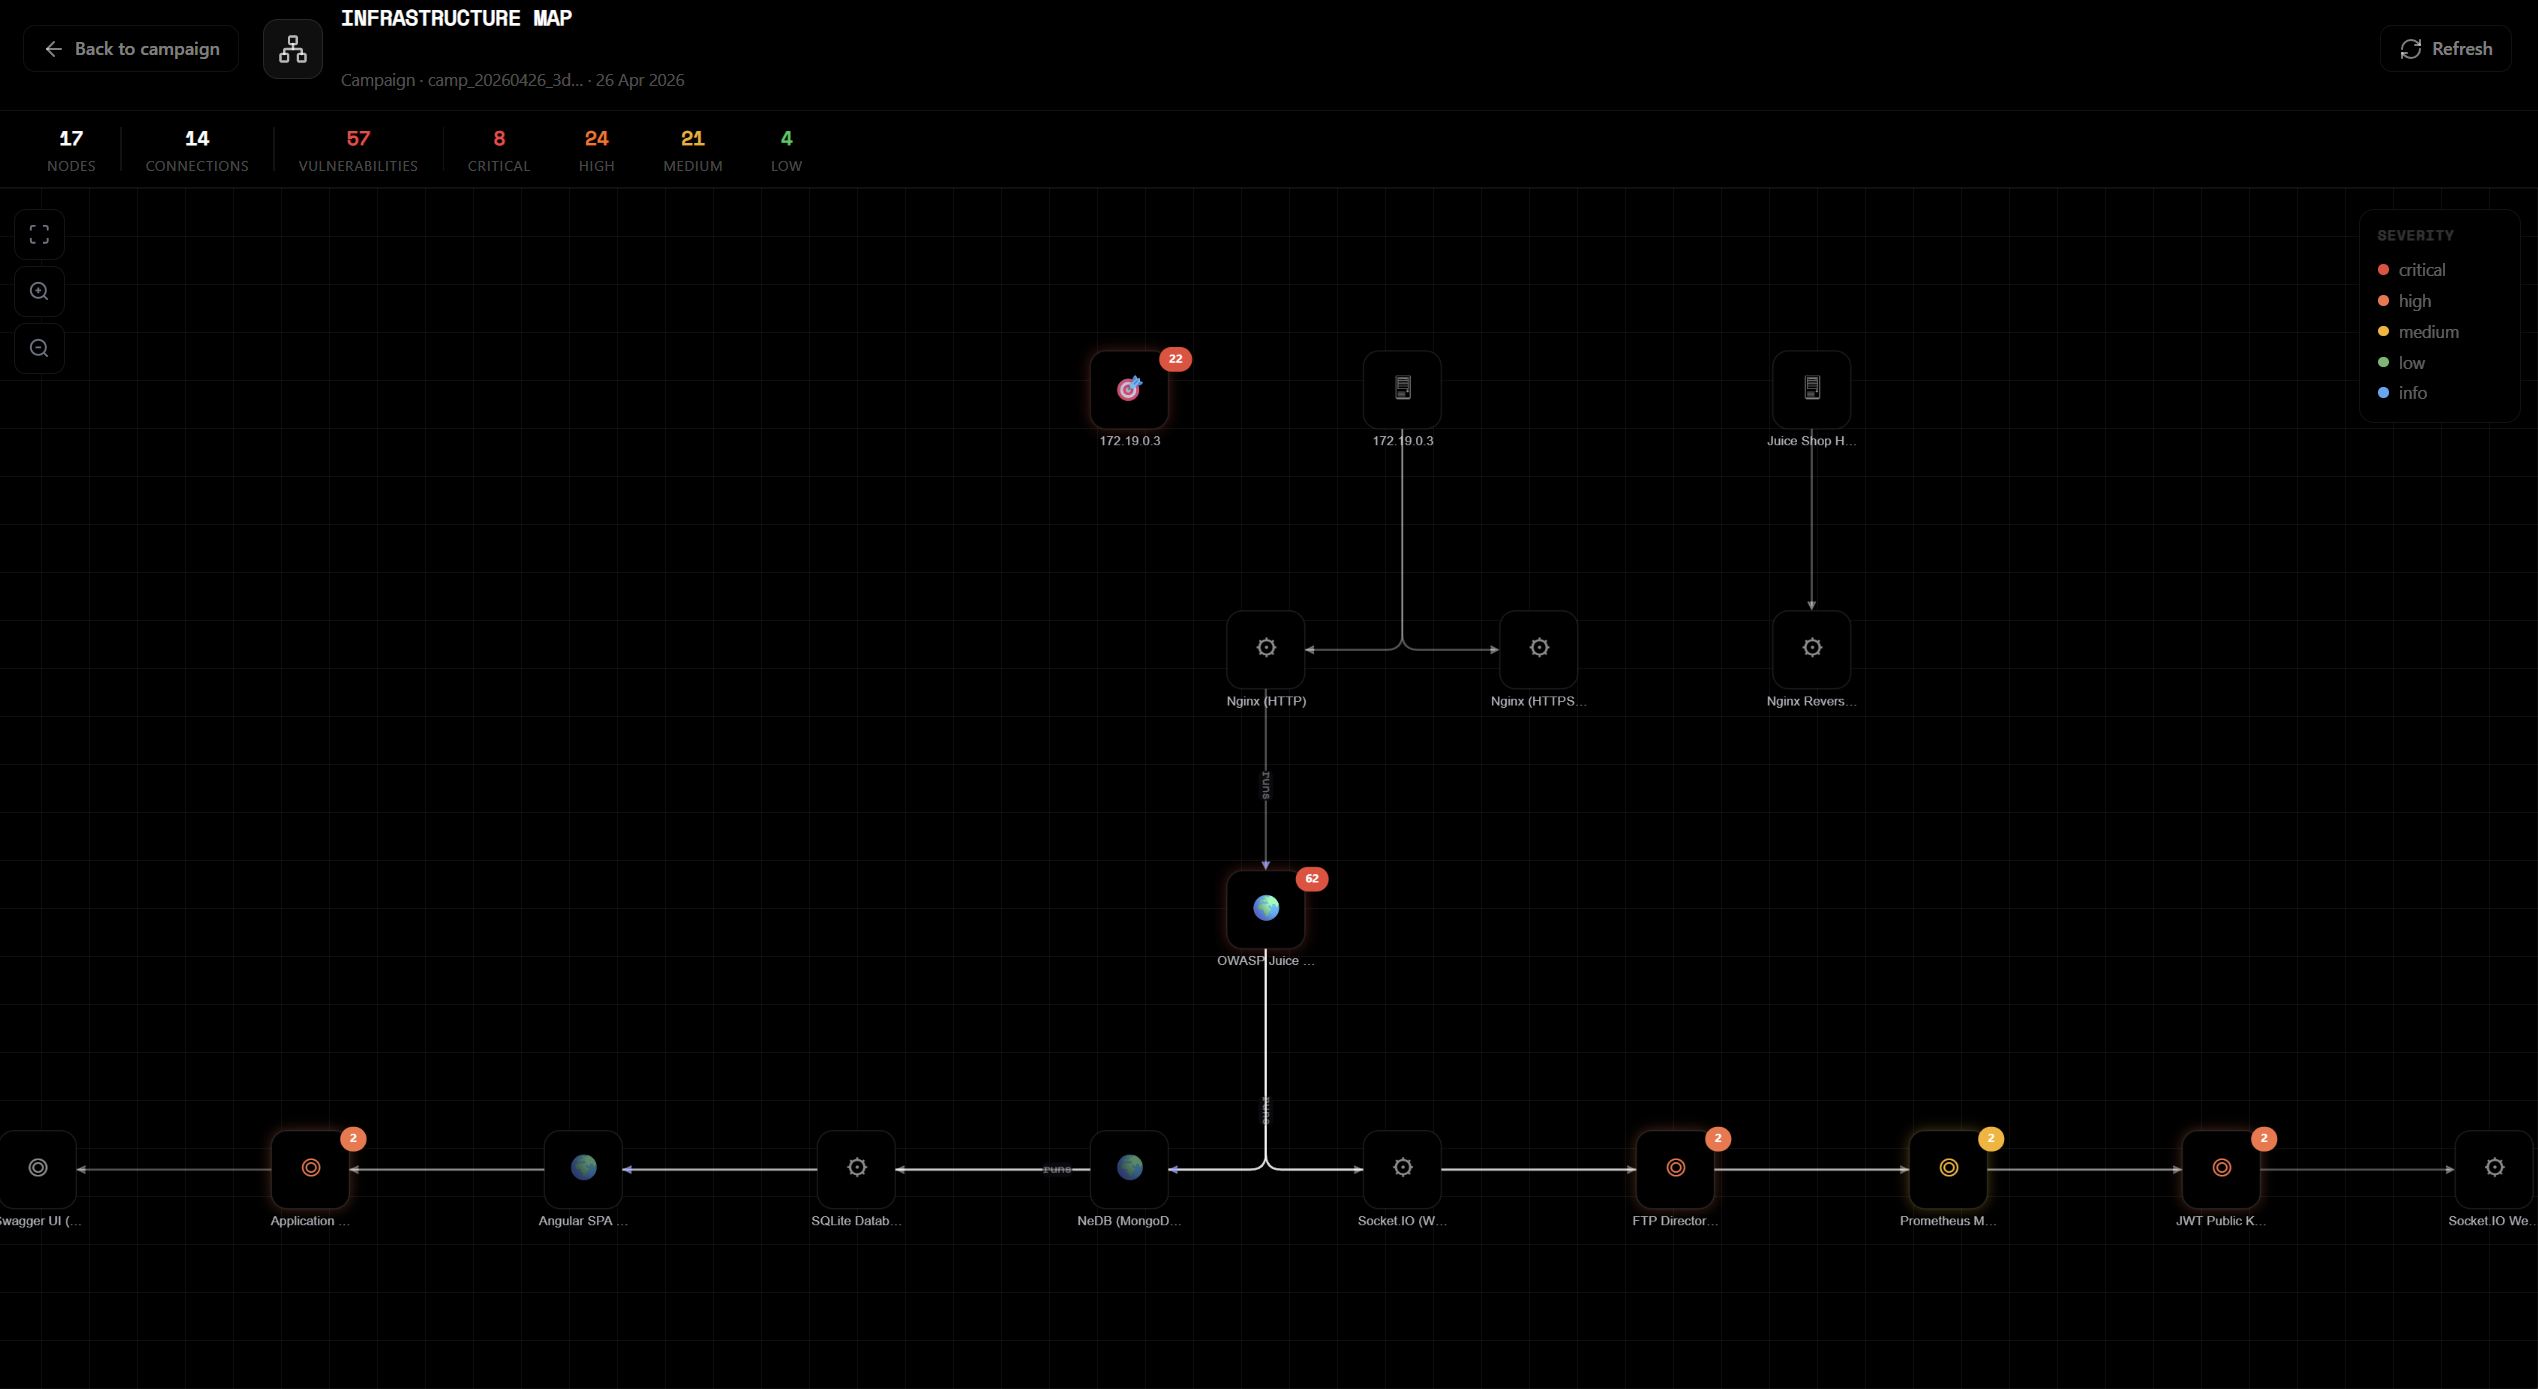
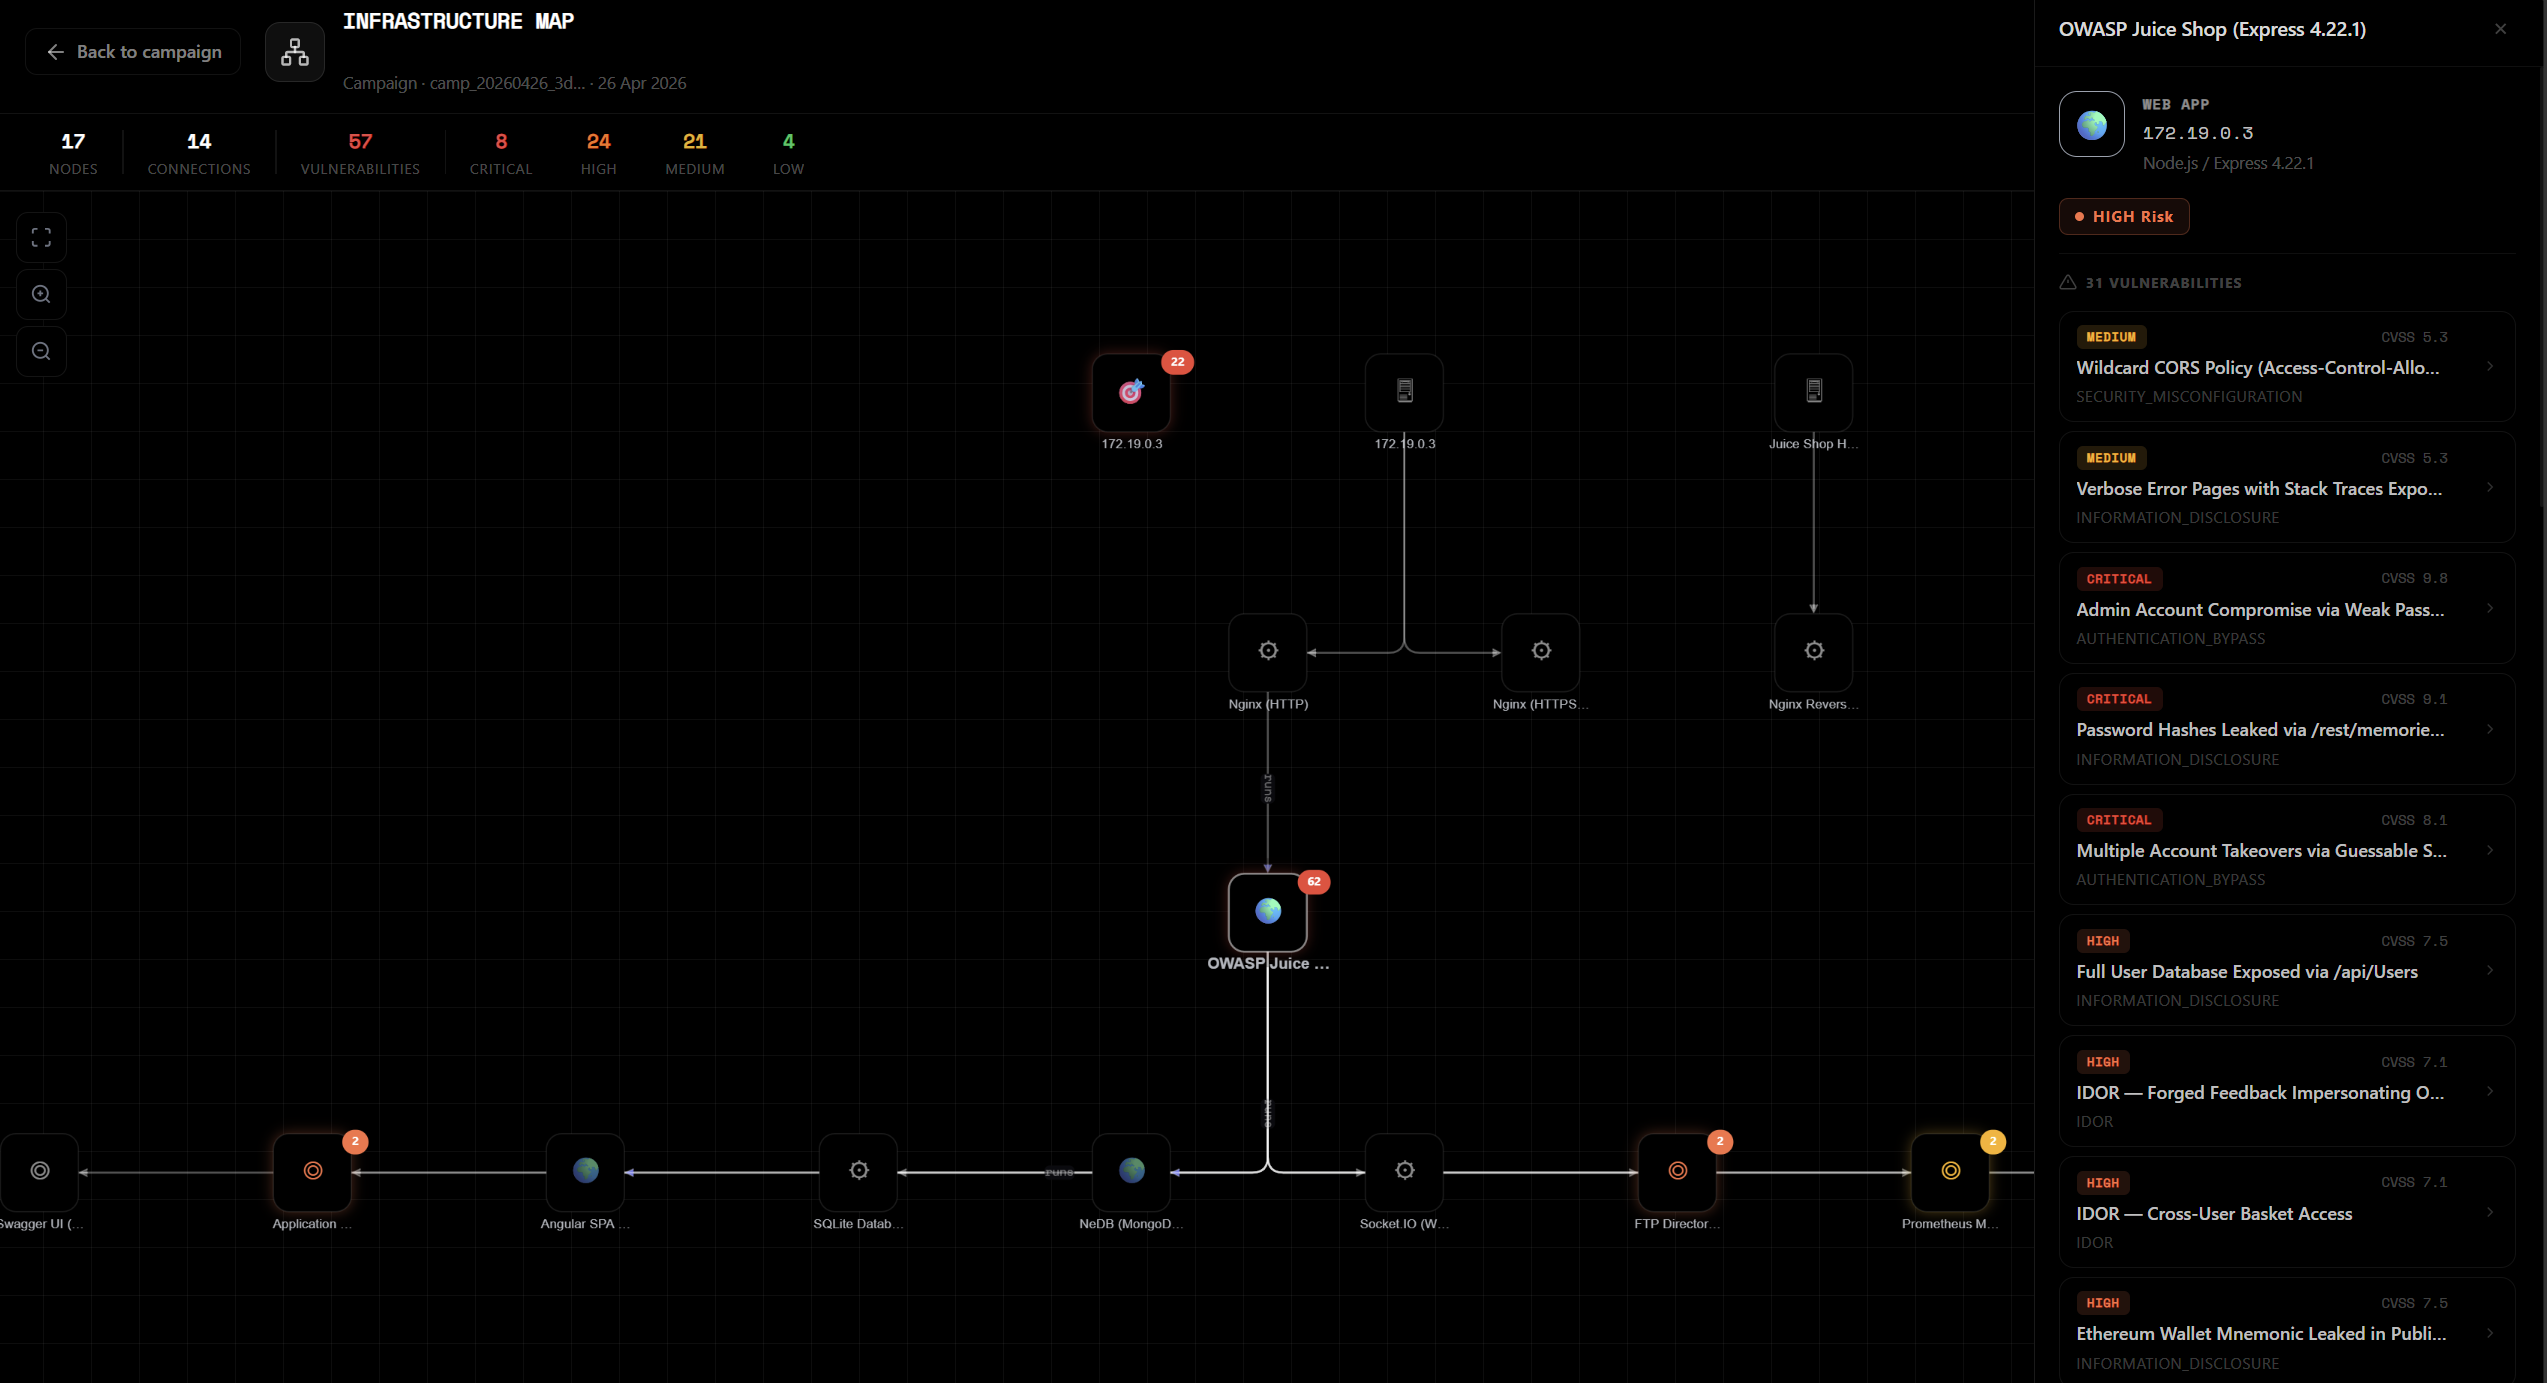
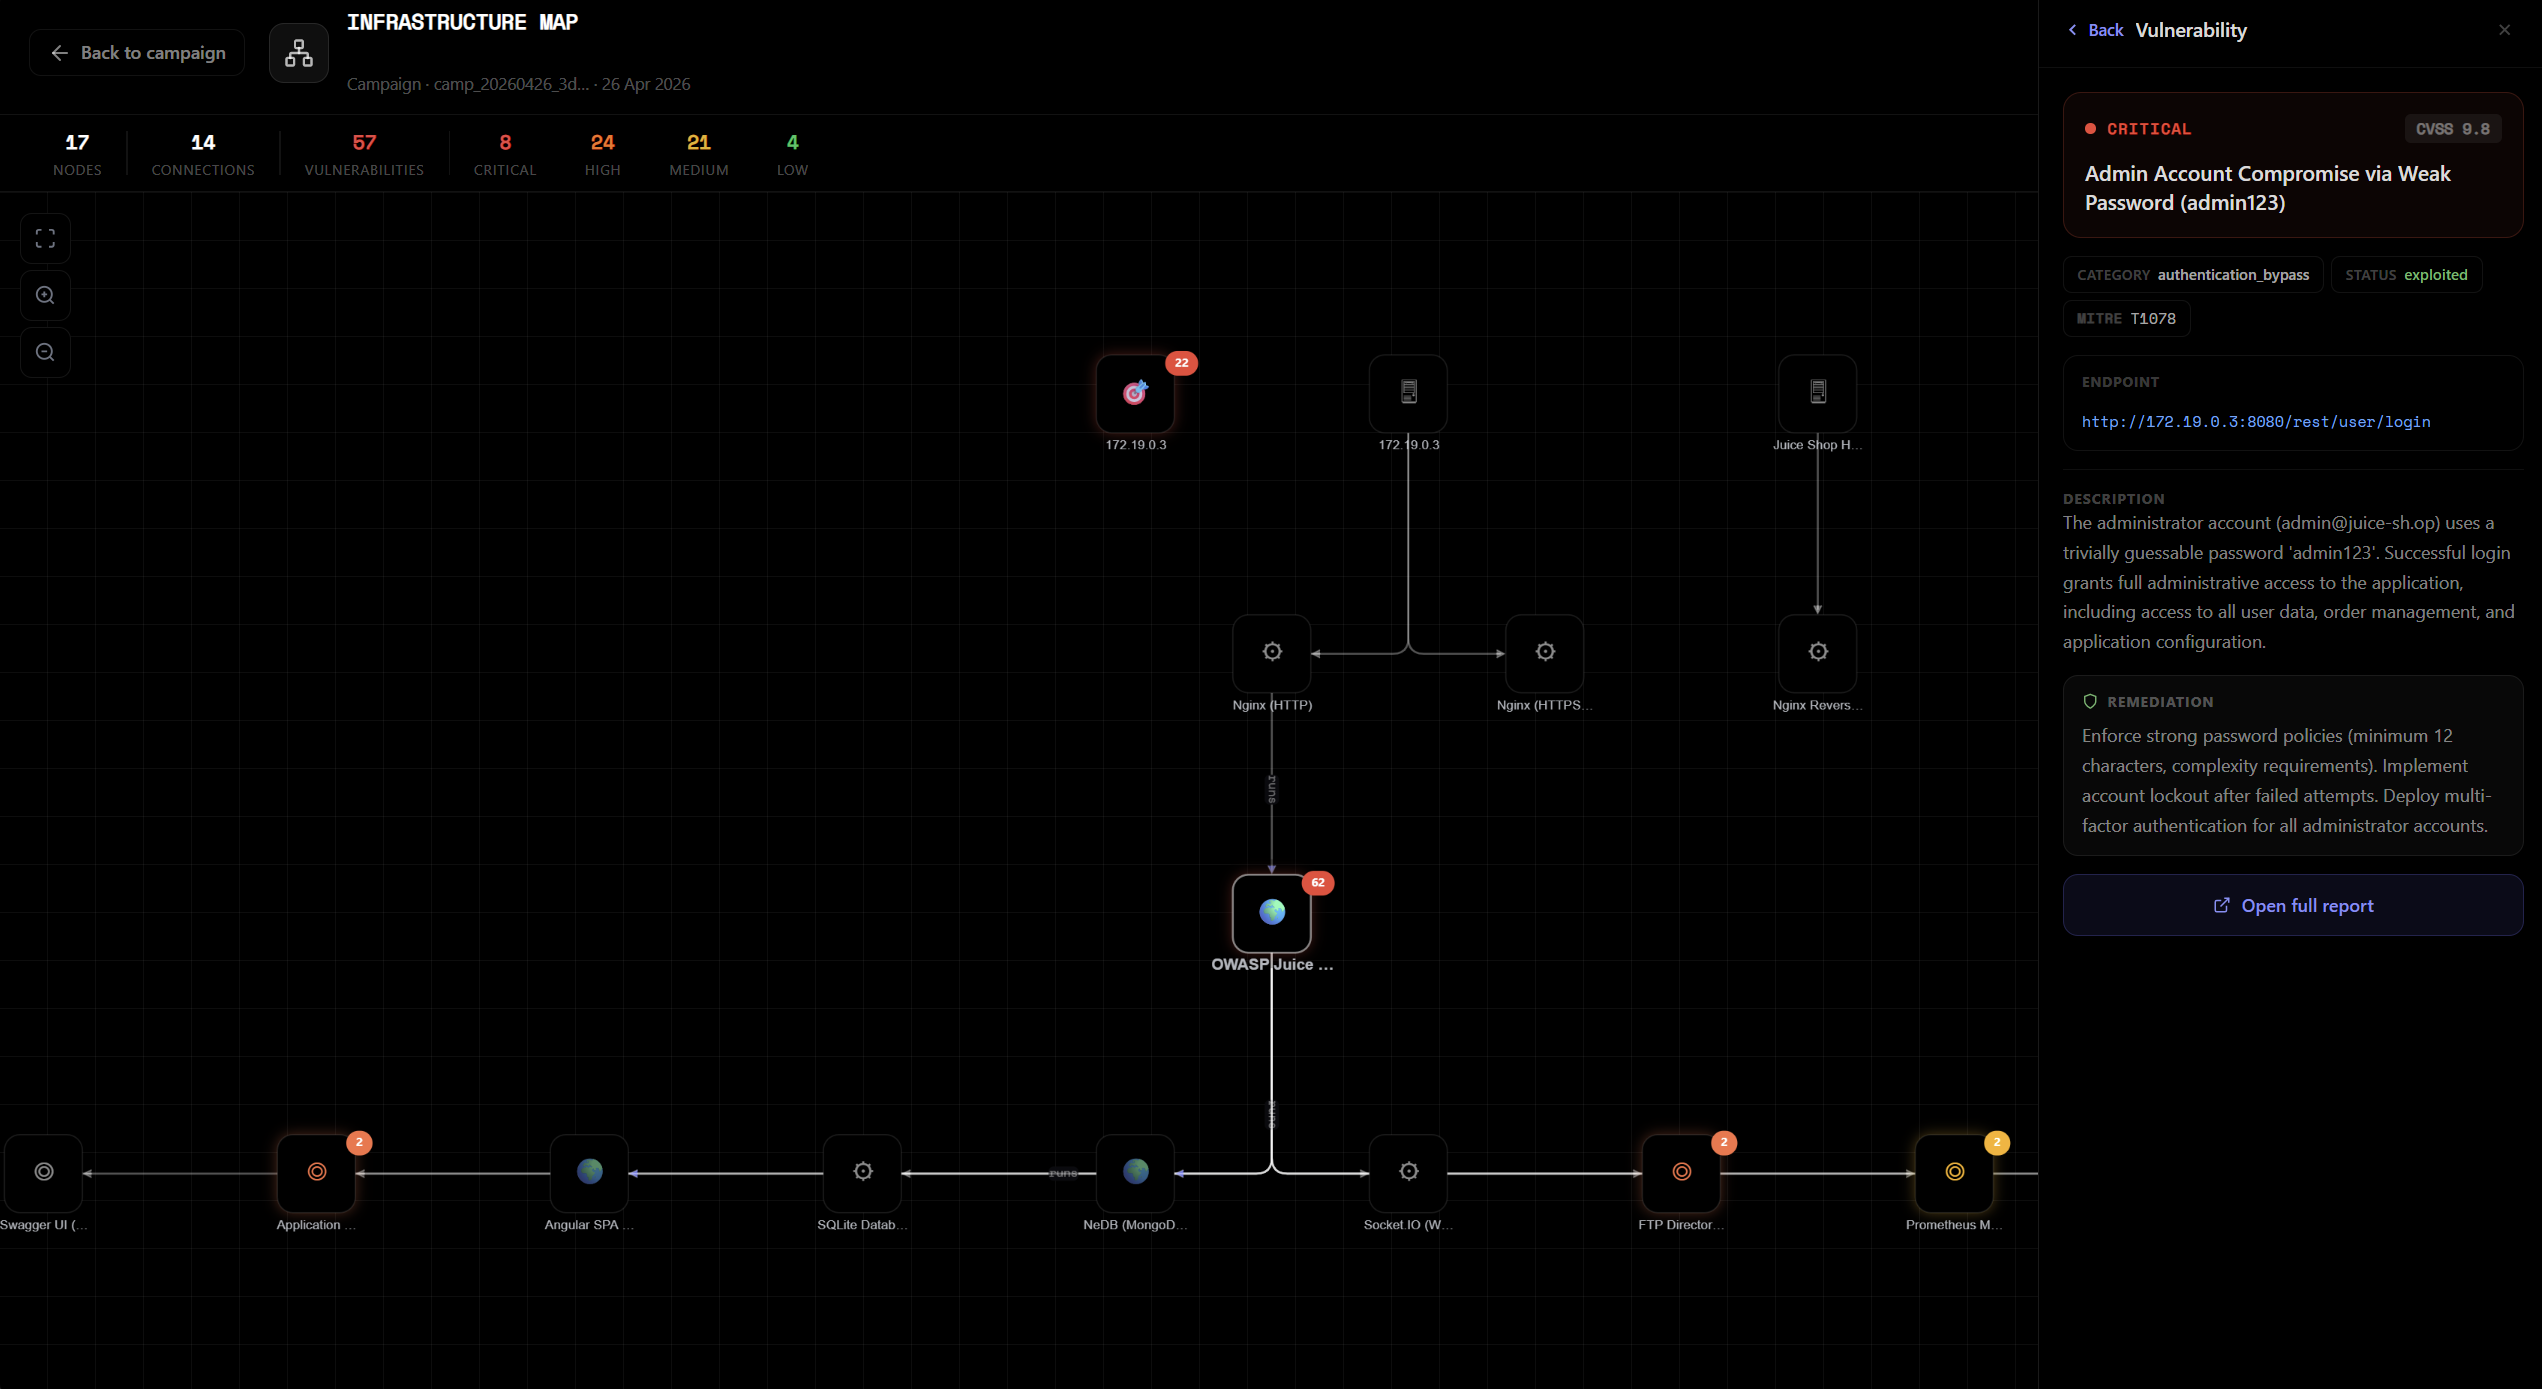
Infrastructure map — interactive graph of discovered nodes and vulnerabilities, click any node to inspect it.
VIII.6.e. Reports & PDF Export
At the end of a campaign (or at any point during it), you can view and export the pentest report.
Markdown preview
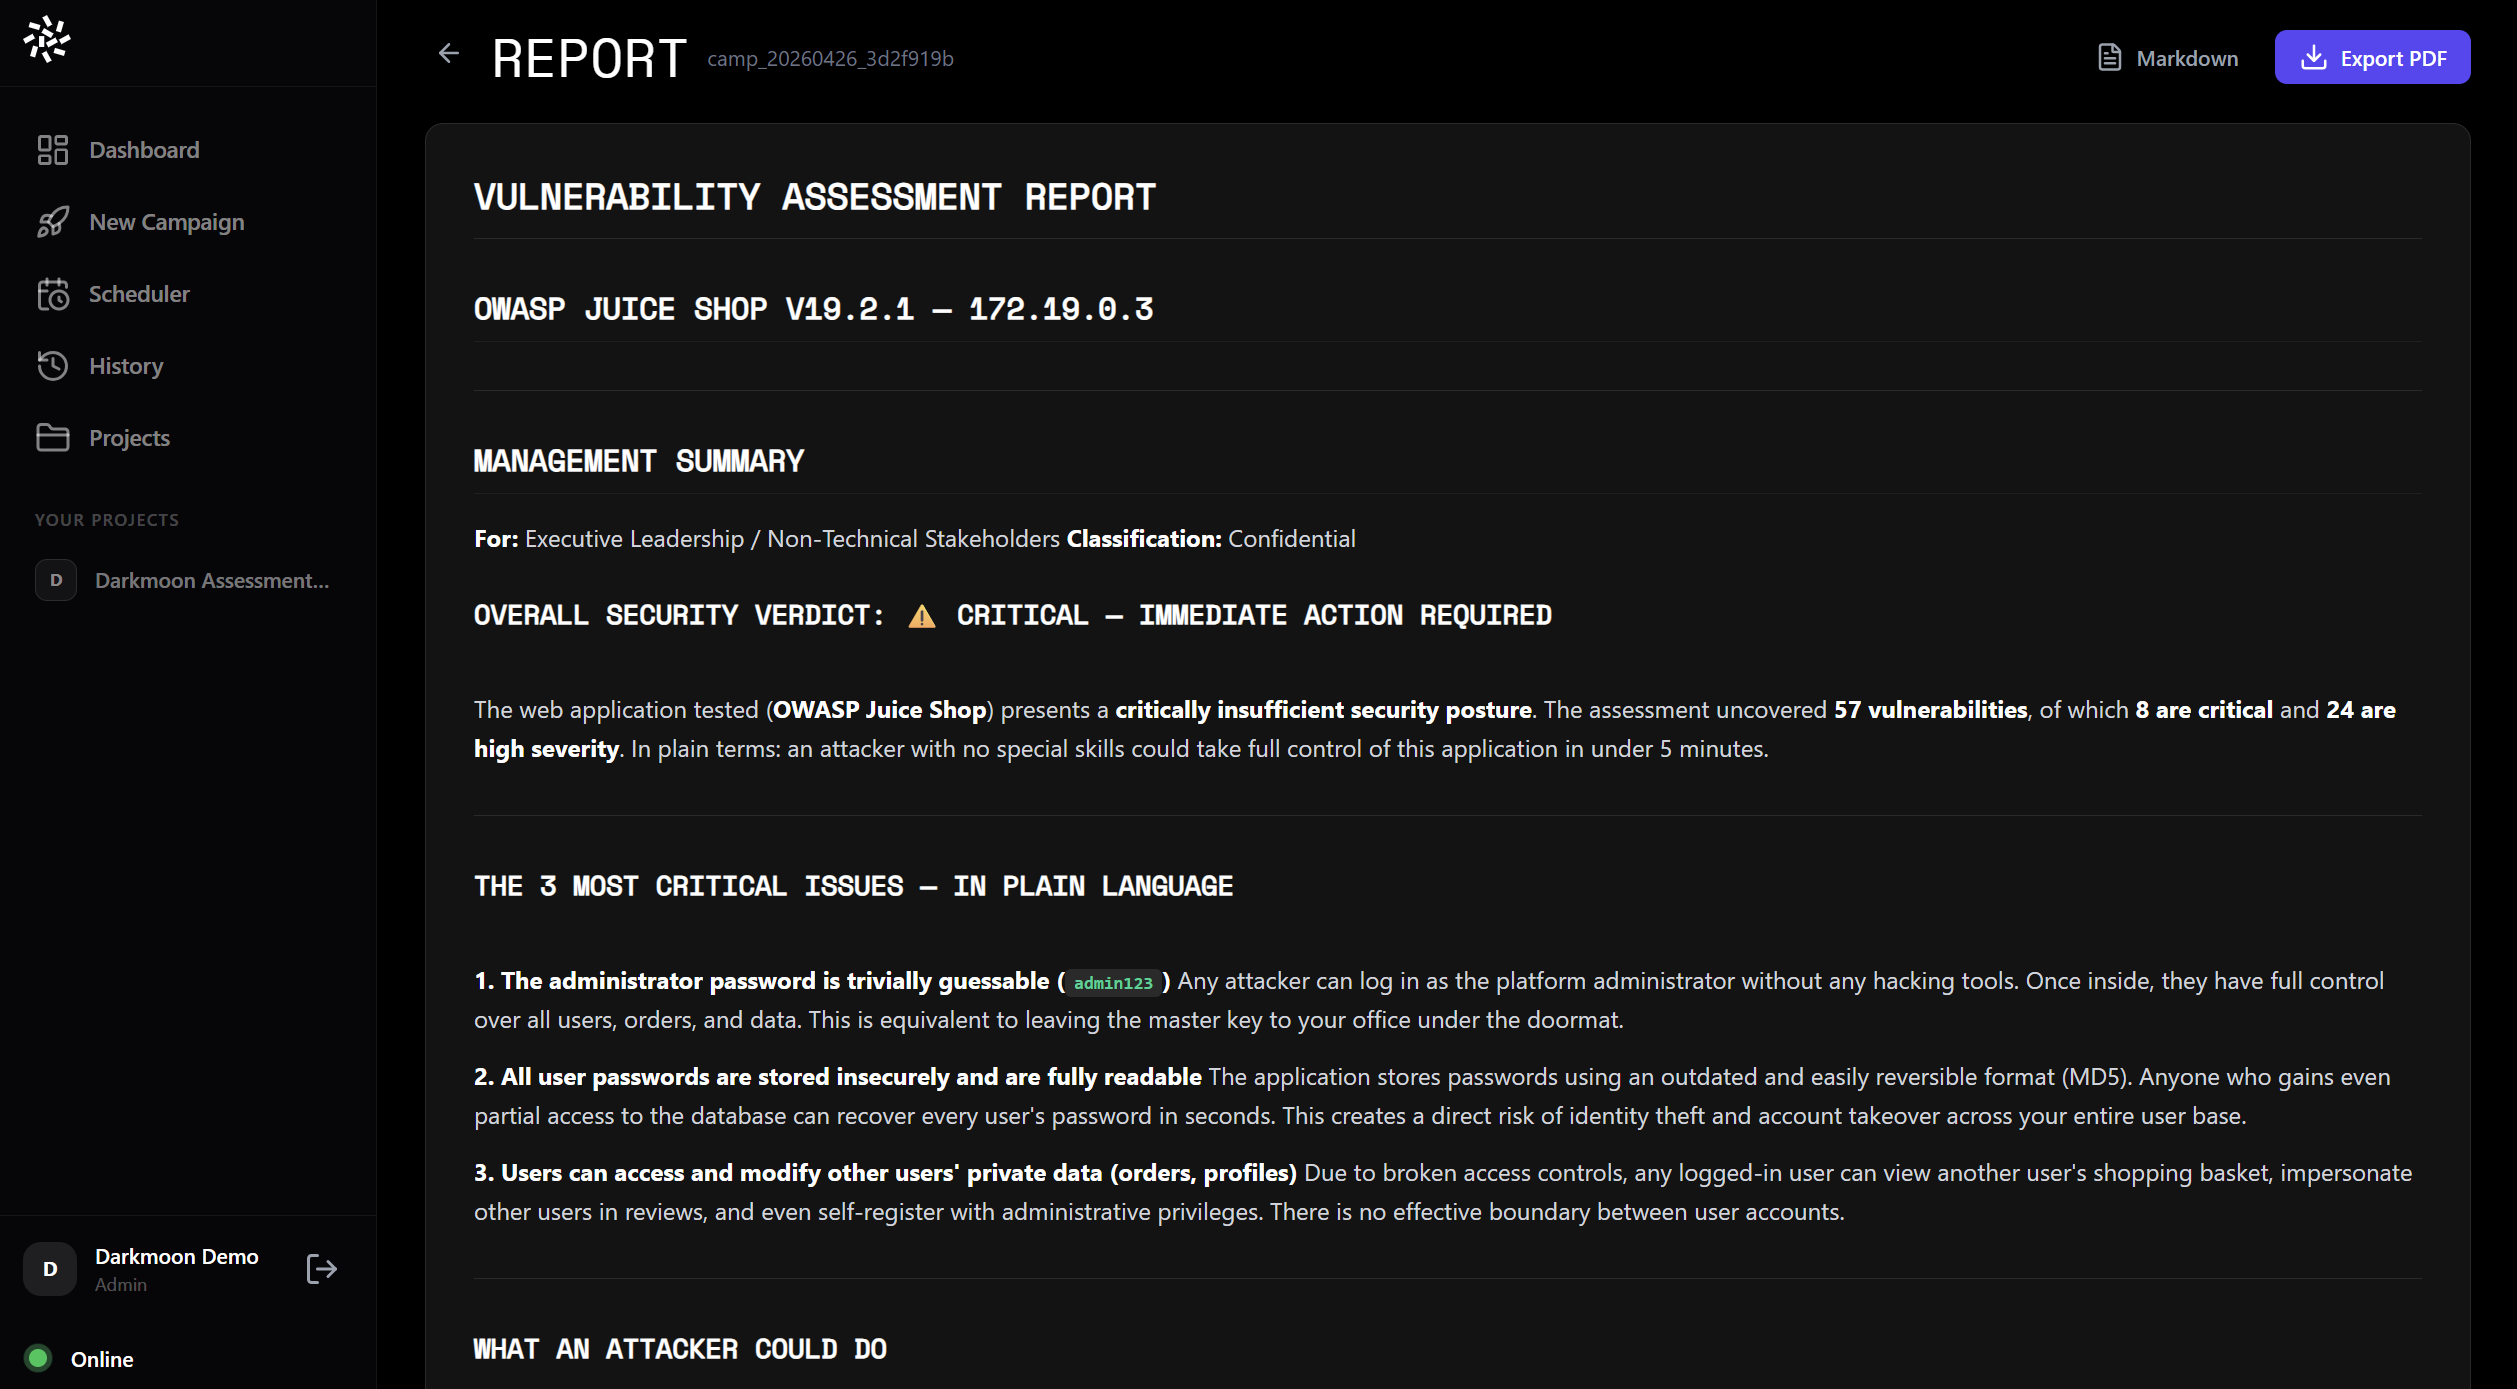
Markdown report preview — full pentest report rendered in the UI with formatted findings.
PDF export (signed & encrypted)
Click Export PDF to generate a signed and encrypted PDF report.
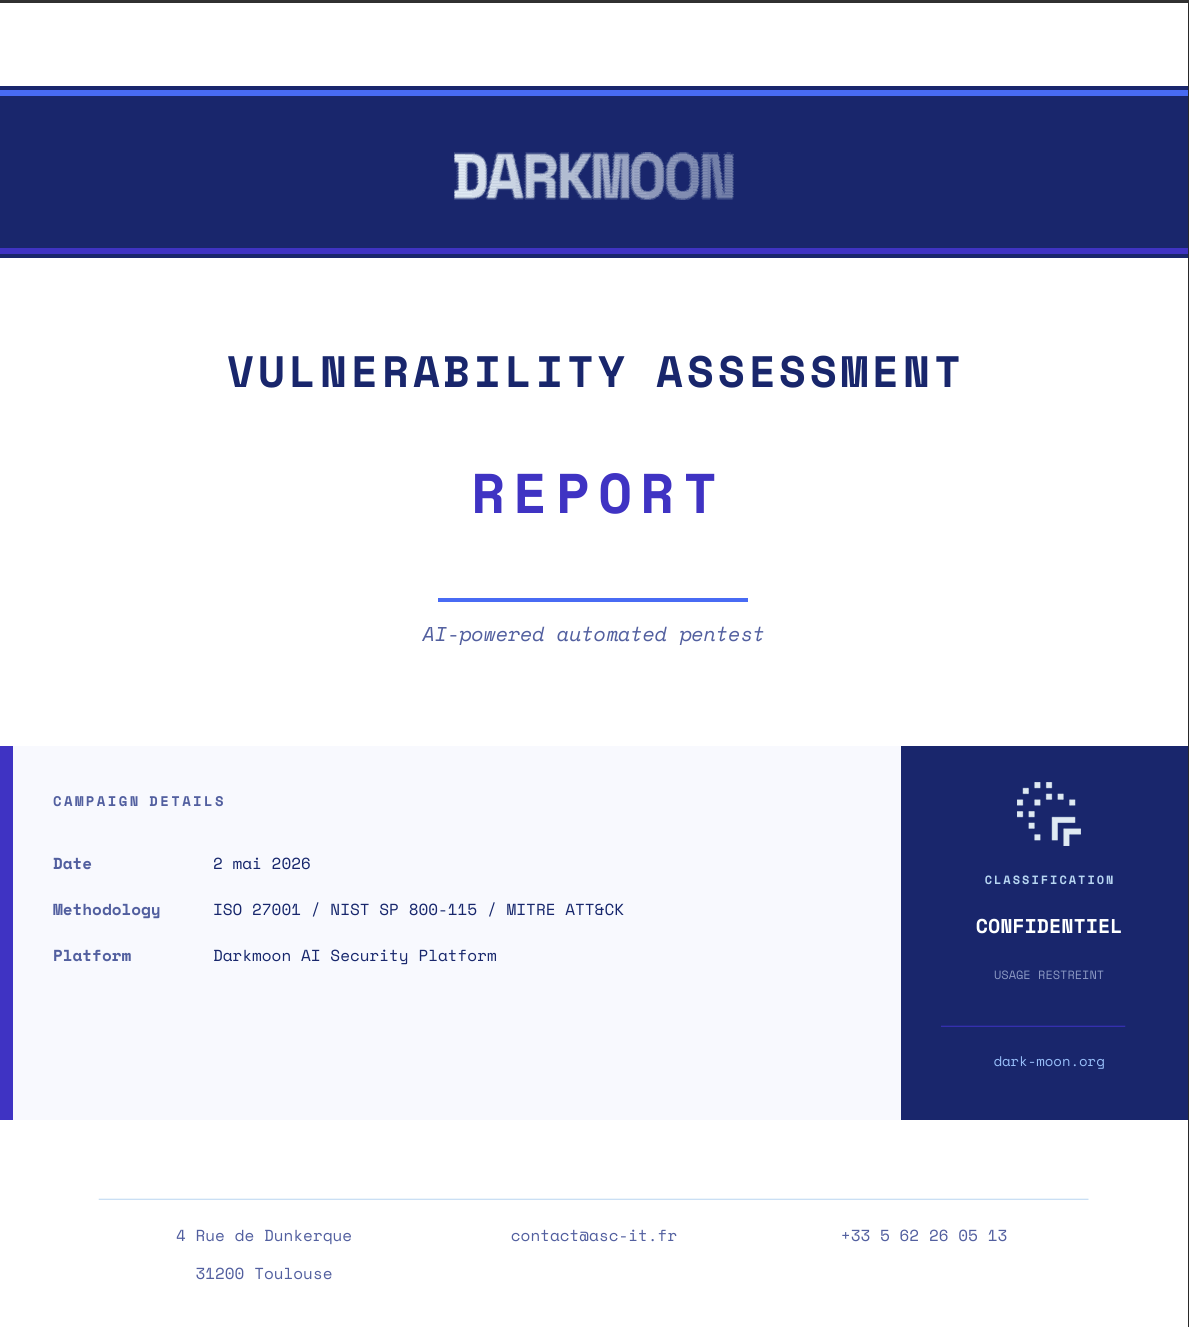
PDF report — professional audit-grade report with cover page, findings, severity ratings, and remediation recommendations.
VIII.7. CI/CD Integration
Darkmoon Pro supports automated penetration testing in CI/CD pipelines. The official demo is available at:
github.com/ASCIT31/Dark-Moon-CI-Demo — Run #7
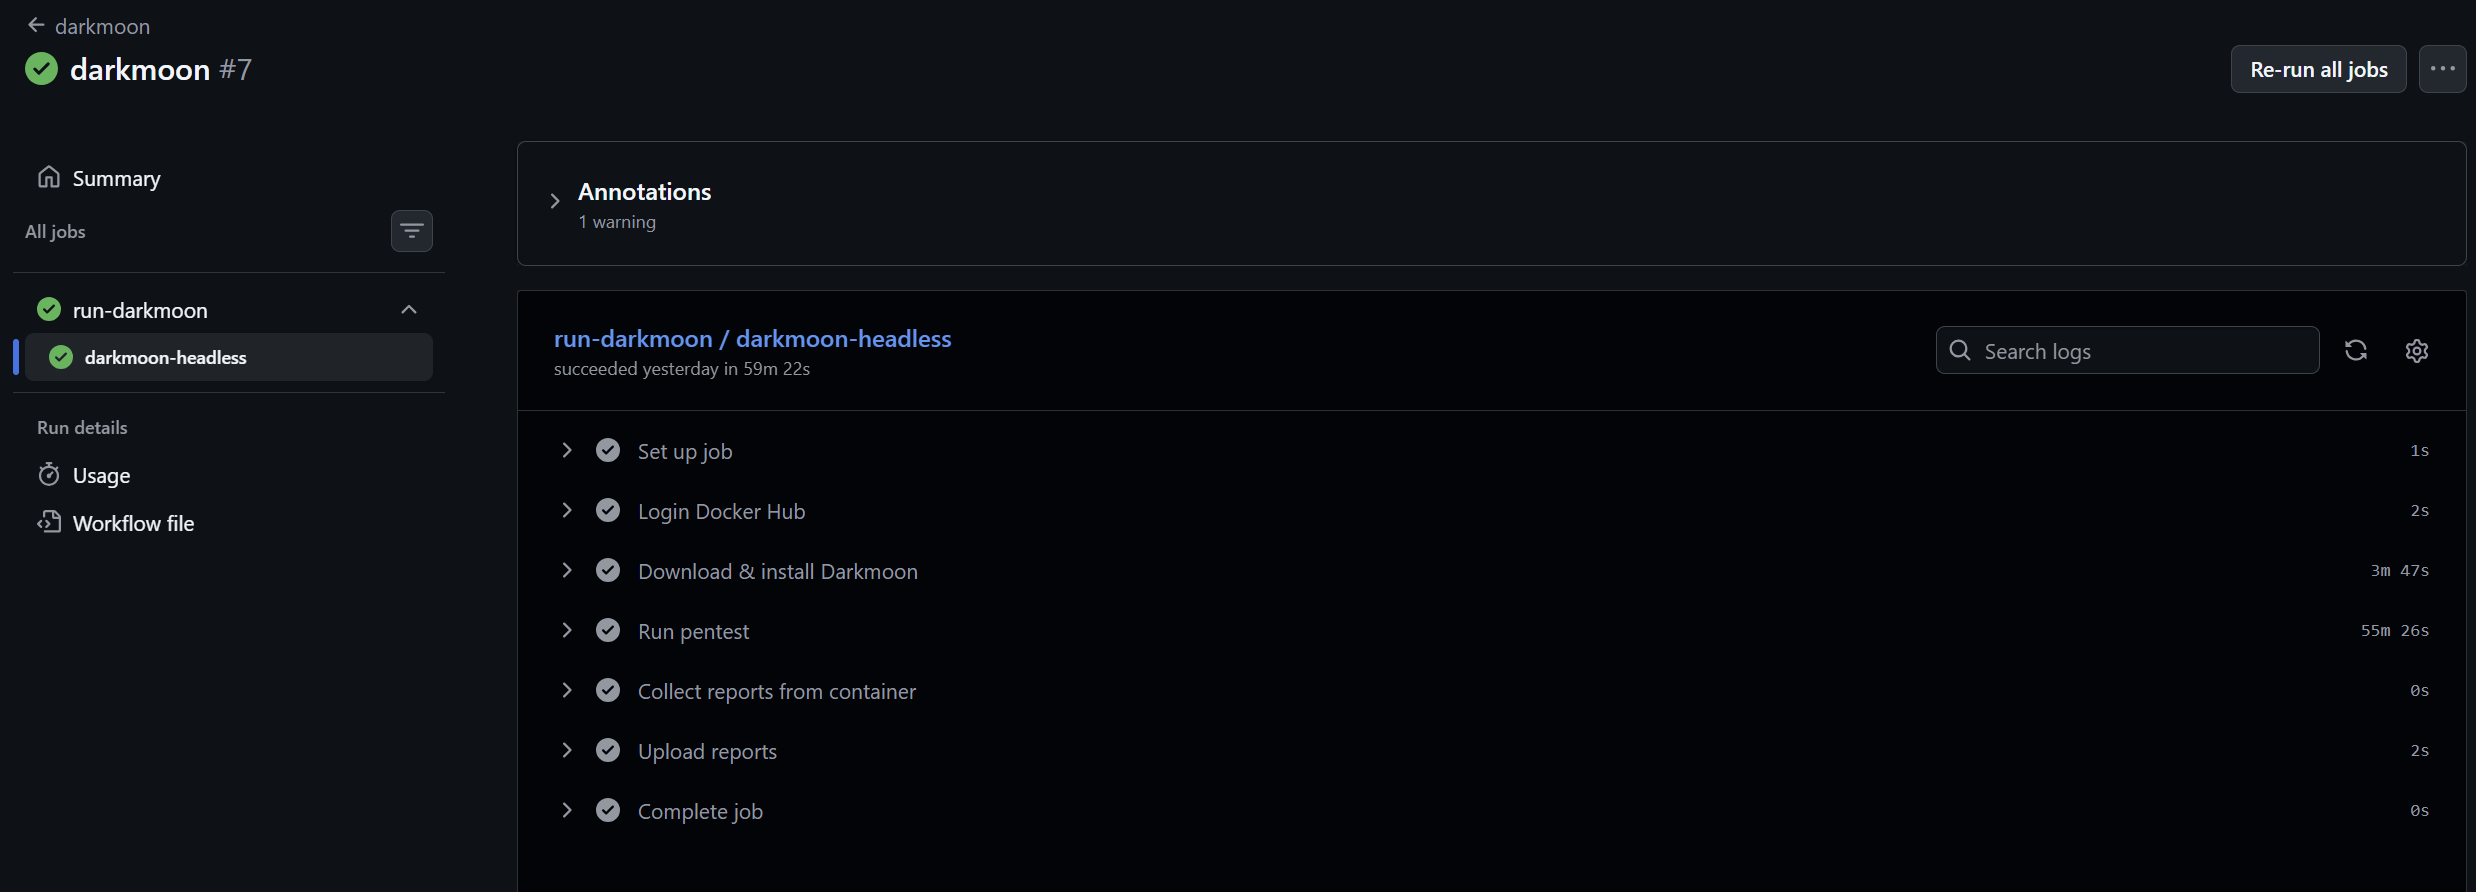
GitHub Actions run — Darkmoon headless pentest triggered automatically on every commit/push.
How it works
Darkmoon runs in headless mode inside the CI/CD pipeline. The workflow:
- Starts the target application (lab) in a Docker container
- Launches Darkmoon with the target IP
- Runs the full autonomous pentest
- Outputs the report as a CI artifact
- Optionally fails the pipeline if critical vulnerabilities are found
GitHub Actions example
name: darkmoon
on:
  push:
    branches: [main]

jobs:
  run-darkmoon:
    runs-on: ubuntu-latest
    steps:
      - uses: actions/checkout@v4

      - name: Start target lab
        run: docker compose -f lab/docker-compose.yml up -d

      - name: Run Darkmoon headless pentest
        run: |
          TARGET_IP=$(docker inspect -f '{{range.NetworkSettings.Networks}}{{.IPAddress}}{{end}}' mylab)
          ./darkmoon.sh "TARGET: http://$TARGET_IP:3000"

      - name: Upload pentest report
        uses: actions/upload-artifact@v4
        with:
          name: darkmoon-report
          path: reports/
CI/CD run details (demo)
The demo run #7 completed in 59 minutes 22 seconds and ran the full autonomous pentest in headless mode.
Key facts:
- Workflow file:
darkmoon.yml - Job:
run-darkmoon / darkmoon-headless - Status: succeeded
- Duration: 59m 22s
IX. Contributing
If you want to contribute to the project, you can access the coding guideline at CONTRIBUTING.md.
X. License
Code licensed under GNU GPL v3.